Generally, you can always throw in some money to get a better Windows 10 experience, like upgrading your computer to a fast solid-state drive (SSD) or get a new computer that has a stock NVMe or at least a standard SATA SSD. And you should do that if your computer still runs on a regular hard drive.
But this article is not about spending dough. Instead, you’ll find here some handy tricks to make your existing Windows 10 computer better. It’s all about optimizing the operating system (OS) itself.

When do I need to do this?
Whenever. It’s always a good idea to make your system run at its best. Likely, your brand-new computer arrives not optimized at all. In fact, it’s almost certainly so.
And if you have a few-year-old computer that’s getting slow, this post will likely hit the spot.
Depending on what you want to do, this project will take a few minutes to a couple of hours. Make sure you back up your computer before doing anything, which you should do regularly anyway.
Can I better Windows 10 for real?
Yes, for real. Right now.
While this might not apply to all computers but chances are your system could use some improvement. This post will help you do so by dealing with a few sad facts of Windows 10:
Generic flashy system settings
All computers with Windows 10 pre-installed—that’s the case when you buy a ready-made computer—use generic system settings.
Specifically, for the sake of efficiency, the manufacturer installs and configures the OS on one computer, then duplicates that to all machines of similar hardware. As a result, yours comes with the standard one-size-fits-all settings and a wholesale set of software drivers and utilities, most of which just sit there taking up space and system resources.
Another thing is hardware vendors, as well as Microsoft, want their products to look “cool.” So they turn on all the flashy features designed to entice users. These features and settings contribute nothing to performance and productivity. You want to turn them off for the system to work at its best.
Pre-installed bloatware
All pre-installed Windows 10 comes with bloatware. These are trial applications from vendors that have “deals” with Microsoft—it’s a type of advertisement. The most notorious examples, in my experience, are the Mcafee Antivirus software and Microsoft Office 365. But there are lots and lots of them.
Apart from taking up space, these apps often automatically run in the background and cause the system to slow down.
System rot
The longer you use a computer, the slower it gets. But this phenomenon is especially true with Windows. For this reason, it’s mostly known as Windows rot.
The reason is Windows is an extremely tolerant OS. Microsoft has always tried to support everything. You can run most software written for Windows 95 (released in 1995) on the latest version of Windows 10.
Over time, as you update the OS, install/remove software, the system accumulates many redundant data, settings, and customization in the user’s account. Now, as you use the machine, Windows has to deal with all sorts of extras before performing actual tasks.
***
All the clutters mentioned above create worse-than-ideal conditions. Eliminating them will make things much faster. But before, let rehash some Windows 10 basics.
Better Windows 10 experience: Understanding the basics
Within the scope of this post, two things you need to know: The user interface and the user profile. Both are quite basic, so if you’re an advanced user, you can skip this part. But chances are you might learn a thing or two if you don’t.
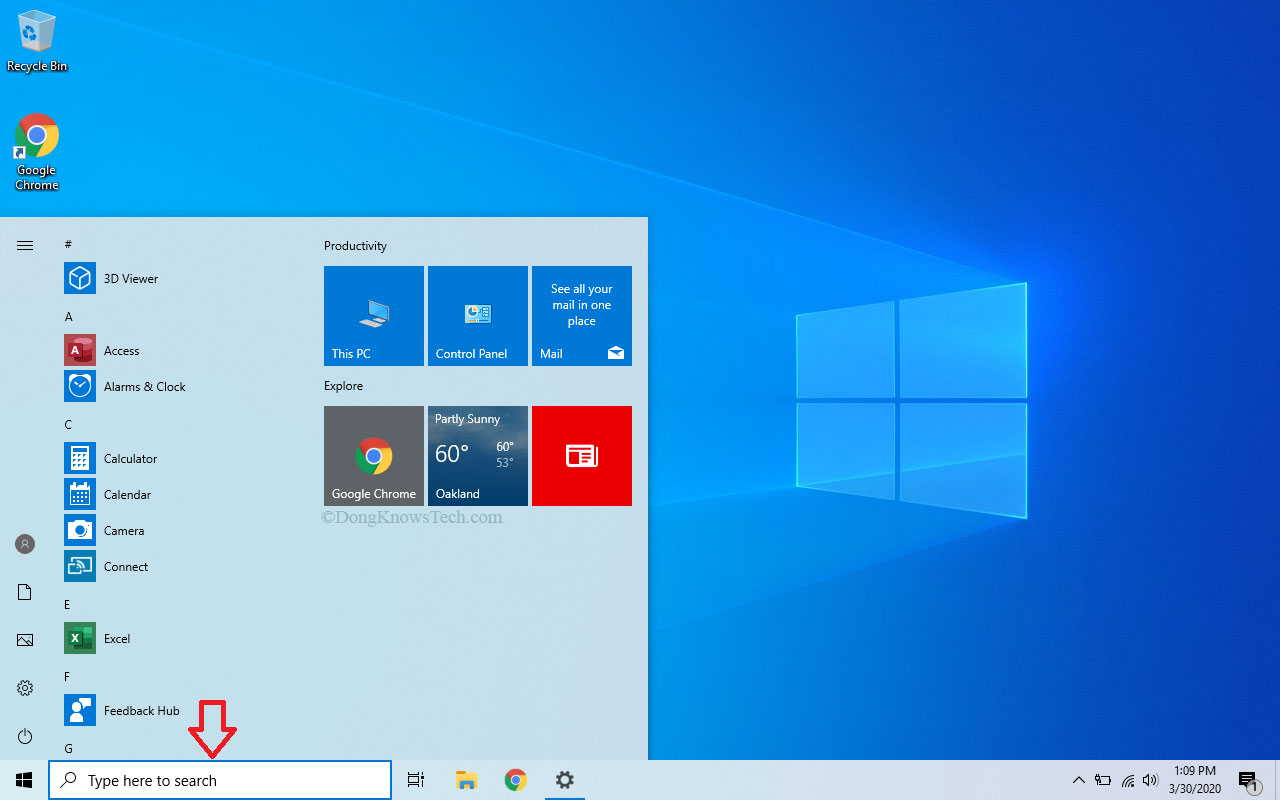
Windows 10’s user interface: How to quickly find things
There are a few things that make up the most obvious level of Windows 10’s user interface. These include the Start button, the Start menu, the Taskbar, and the Desktop. Also, there’s the File Explorer that shows you the content of folders.
- The Start button is the little square icon that takes the shape of the Microsoft Windows flag at the lower-left corner of the screen, by default. You can (left) click on this button to bring up the Start menu, or right-click on it to bring up the advanced Windows X menu. (By the way, I call it Windows X menu because you can call it up by using the Windows + X keyboard combo. Try it!)
- The Taskbar is the bar that runs at the bottom of the screen. It’s the bar that holds the Start button, the Search box, and other shortcuts as well as the notification area.
- The Start menu is the menu that pops up when you click the Start button. It holds shortcuts to apps and Windows settings. It also shows the search results as you type into the search box.
- The Desktop is the entire screen on top of the taskbar. It holds icons of folders, files, and shortcuts
- File Explorer, also known as Windows Explorer, is the software that shows the content of your computer’s storage in the form of Drive, folders, subfolders, and files. By default, File Explorer is a button on the right side of the search box.
(I’m not going to explain everything about these items, but only what’s relevant to this post. By the way, if you want to customize the Start menu and Taskbar, check out this post.)
Of all these items, I want you to remember the Search box. Again, it’s on the right side of the Start button. This box allows for quick access to apps and commands. It’s the fastest and most consistent way to access things within your computer. We’ll use it a lot in this post.
Windows 10 user profile: Where your data resides
Like most modern OSes, Windows 10 manage data via the user accounts. When you use a computer, you effectively log in using a user profile. Many users can use a single profile, but ideally, each should have an account of their own.
The use of user-profiles
The use of profile allows multiple people to use a single computer (at a different time) and still have data and customization of their own—or their own machine, so to speak. You can create as many user accounts on a computer as you want.
You can think of user profiles as rooms in a hotel. It’s one single building, but each person who enters can have their own set of furniture, security, and privacy. And to a certain extent, one person can mess around in their room without affecting those living in other rooms.
Similarly, in a computer, Windows rot tends to happen first at the user level. Over time, one account can get slow, but you’ll note that it’s faster if you use a new one.
Some changes occur system-wide, just like if you cause a big fire in your hotel room, that will likely affect the entire building.
In a computer, each user profile has its unique name, which is the username. Each username can have a password to keep the profile private. Think of the password as the key to your hotel room.
Windows 10 user profile data locations
In a hotel room, you have places to keep your belongings. Similarly, each Windows 10 account has a designated area to store that user’s data.
By default, all user profiles reside as sub-folders inside the C:\Users\ folder of your computer. By the way, C: is the computer’s primary storage device.
To access the user profiles, type the following in the Search box and press Enter:
C:\Users\
That will call up Windows Explorer to show a list of subfolders—each represents a user profile, including that of the account you’re using right now.
You’ll note that the subfolder that holds a profile takes after the username of the account. For example, my account’s username is Dong Ngo, and the root folder for my account’s profile is C:\Users\Dong Ngo\ . I call it the root folder because everything that belongs to my account, including other subfolders, is within that location.
However, if you use an email as your user account—or a Microsoft Account—then the root folder often consists of five first letters before the @ sign of the email. So if you use the JohnDoe@hotmail.com as the username, then the profile folder will likely be C:\Users\JohnD\ .
By the way, if there are so many profiles and you don’t know which folder holds yours, just try opening one at a time—just double-clicking on it—the one that opens up the right way belongs to the account you’re using.
If you open a root folder of another account, you’ll be prompted to get access first and able to do so only when yours is an Administrator account—more below.
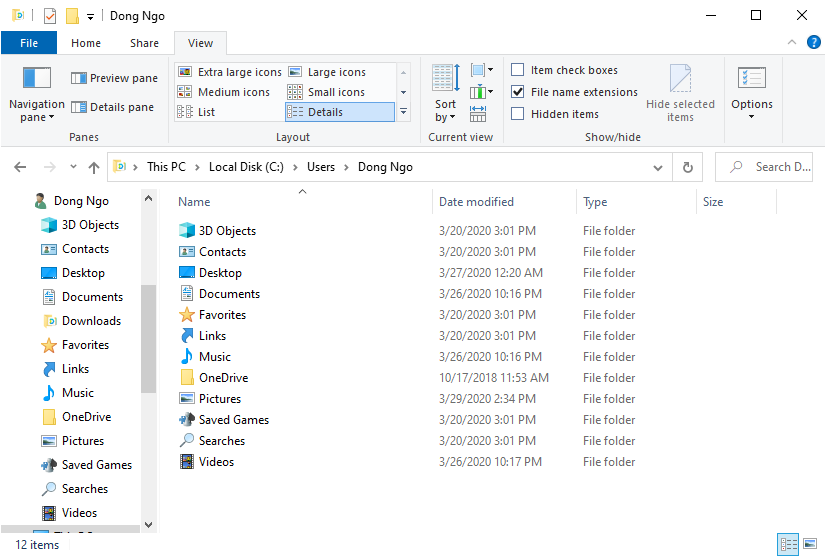
In any case, inside the profile folder, you will see a set of subfolders that contents the user’s data. You’ll find more than a dozen of folders—and can guess what they are for from their names—but there are five important ones:
- Desktop: This folder holds the content of your Desktop area, as mentioned above.
- Documents: It holds your general documents, including Word, Excel, Powerpoint files, and so on.
- Music: You’ll find your music library, including that of iTunes, or Windows Groove Music.
- Pictures: All of your photos from any sources, including those you scan from hard copies.
- Video: This folder holds your homemade videos.
Depending on what software you have on your computer, you’ll see more subfolders inside the profile. However, those above, by default, all hold your data.
User profile manual backup
That said, if you want to back up your profile’s user data manually, just copy these folders onto the backup destination, such as an external hard drive.
Also, there are things that you don’t see because they are hidden. If you check the Hidden items box (as shown in the screenshot above), you’ll see many other folders, including AppData.
Those are folders that hold the custom settings of the profile, which determine how certain software works and the archive of email clients (Outlook, Mail, Thunderbird, etc.). You don’t need to back up these folders for the most part since they don’t contain a profile’s user-generated data.
To restore a profile’s data, just copy these folders back into a new profile’s root folder, and the data will be back to their respective locations.
Local account vs. Microsoft Account
As you might have noted, each time you create a new account on your Windows 10 computer, you’re coerced or even forced into using an email, which subsequently will create a Microsoft account.
It’s Microsoft’s trick to get your local user profile hooked to their server, effectively making you part of its product. The “benefits” include the fact you’ll automatically opt-in for some of Microsft’s embedded services, such as One Drive, and use the online Microsoft account to manage the password of your Windows user account.
But that’s a double-edged sword. Among other things, if somebody hacks into your Microsoft account, they can steal your files, as well as lock you out of your computer. Also, it’s a good idea not to share your data with any big company when you can. So, using a Microsoft account is not something I’d do myself.
How to create a new user account that’s not linked to Microsoft
Here’s a trick to quickly create a Windows 10 user local account, one that doesn’t use an email or linked to Microsoft:
Just turn off your computer’s Internet connection before you create the account and turn it back on afterward. To do that, just unplug your network cable (on a desktop) or turn on the Airplane mode (laptop). And if you’re setting up a new computer from scratch, skip the part where the process asks you to connect to the Internet—you can always do that later.
Detecting that the computer has no Internet access, the system will automatically create a local account instead. If you are a fan of Microsoft, don’t worry, you can always turn a local account into a Microsoft account. And vice versa.
Switching a user account between local and Microsoft
You can convert a user profile from a local account to a Microsoft account and vice versa at any time. Here’s how.
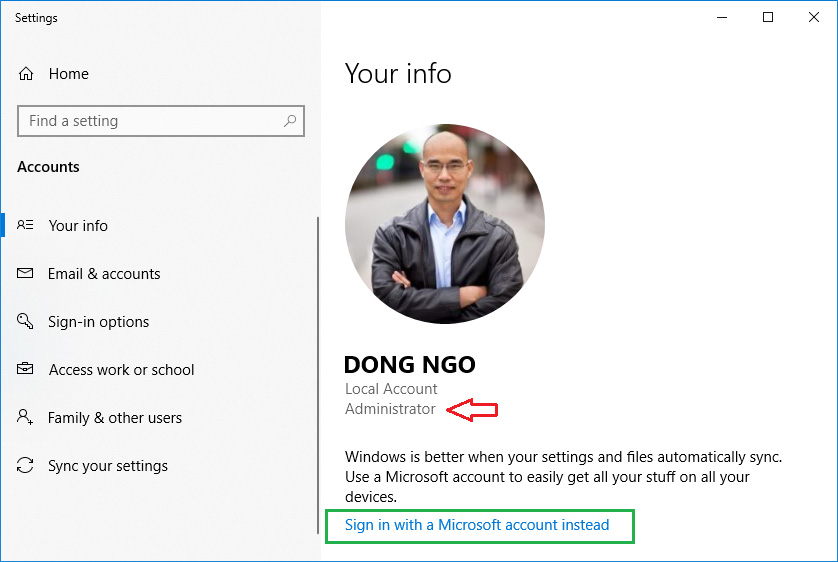
- Type “Manage your account” (no quotes) into the Search box and press enter to bring up the Your info settings window. Here, if the account is an Administrator, you’ll see that under the account’s name.
- Click on Sign in with a Microsoft account instead
- Follow the process to sign in with a Microsoft account, and your local account now links to that.
Conversely, if you’re using a local account and want to link it to a Microsoft Account, repeat step #1 above and click on Sign in with a Local account instead. The rest is self-explanatory.
Add/remove and change account types
There are two account types in Windows 10:
- An Administrator account is an enhanced account that has full access to the computer. An Administrator account can do everything, including installing new software, making system-wise changes, creating/changing/removing other accounts, and so on.
- A Standard account can only use already-installed software and manage its own account. It also has limited access (read-only) to most system settings.
Each computer must have at least one Administrator account. Here’s how to create a new account and remove or change the type of an existing one:
How to create a new user account:
- Log in to the computer using an Administrator-type account. If you want to create a new local account (and not one that’s linked to Microsoft), you should disconnect your computer from the Internet now.
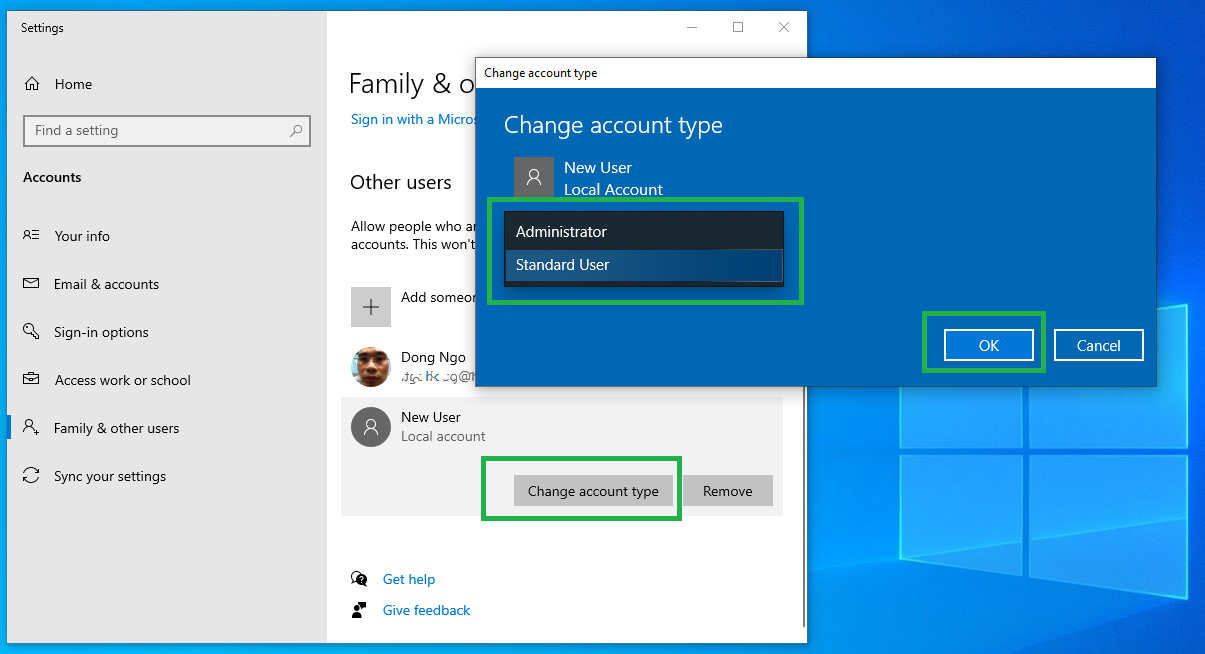
- Type “Add, edit, or remove other users” (no quotes) into the Search box and hit Enter. That will bring up the Family & other user settings window.
- Under the Other users section, click on Add someone else to this PC to create a new account. By default, it will be a Standard account and will show on the account list.
How to remove a user account or switch it between Administrator and Standard:
- Repeat up to step #2 above. Now, under the Other users section, click on the account you want to work on, then on the Change account type button that appears. Switch the user type between Administrator and Standard, then click OK. The new account type will take effect next time the user logs in.
- If you want to remove an account, repeat the step above, but this time click on the Remove button instead. You’ll be asked to confirm, and whether or not you want to remove the user’s data. If you choose to keep the data, the account’s root folder will remain.
Now that you have a good understanding of Windows 10’s interface and user profiles, let dive into how to make the system better. Note, you need an administrator account for this.
How to make Windows 10 better: Simple and safe tricks
These tricks don’t require considerable changes to your system and can be undone easily. That said, you can do them right now. There’s no need to worry about data, assuming you’ve been backing that up regularly. Also, you should do this whenever you log in to a new account for the first time.
Pick a light theme
Themes are sets of customization to Windows 10’s interface that change how the OS looks and feels. A cool and rich theme will use a lot of system recourses.
My favorite is the Windows (light) theme, which is included in all Windows 10 versions starting with version 1903 (May 2019). It’s a super lightweight theme that looks great, too.
Here’s how to change Windows 10’s theme:
- Type “Themes and related settings” (no quotes) in the Search box and press Enter. That will bring up the Theme Settings window.
- Click on Windows (light) theme. That will cause the theme to apply right away.
You can choose any other theme you want, but Windows (light) is the best for performance.
Turn off fancy mouse scheme
By default, Windows 10 comes with a decorative mouse scheme. For example, when you need to wait for a task to complete, the mouse’s cursor changes into a 3D spinning circle. For that to happen, the computer needs to use quite a bit of system resources, causing you to wait longer.
For best performance, you should turn that off. Here’s how:
- Type “Mouse settings” (no quotes) into the Search box and press Enter. That will bring up the Mouse Settings window.
- Click on Additional mouse options. That will call up the Mouse Properties window.
- Click on the Pointers tab. Now, under Scheme, change the value to (None) and click OK.
Now you’ll note the mouse works faster.
Tune visual effects for performance
This tweak is by far the most effective in making Windows 10 respond faster. It sheds all unnecessary animations and fancy transition effects which require processing power.
Here’s how:
- Type “sysdm.cpl” (no quotes) into the Search box and press Enter This will bring up the System Properties window.
- On the System Properties window, pick the Advanced tab then click on the first Settings button in the Performance block to bring up the Performance Options window.
- On the Performance Options window. Choose the Visual Effects tab, and uncheck the first eight boxes under Custom:
- Click on Apply (or OK). You’ll note Windows will take some time to apply the changes. And it’ll be much faster afterward.
By the way, you can find out what those boxes do via their names and choose to enable more or fewer boxes to your liking. Keep in mind that among them, the Enable Peek box and those with “Animate…” in the names use the most system resources. They should all be unchecked if you want your system to be snappy.
Turn off auto-launch apps
Your computer might have a lot of apps that run by themselves as soon as you log in. A lot of these apps come included with Windows 10. It’s best to remove them, but that requires you to know what
Generally, I’d recommend turning those all off, except for the antivirus software. What should be turned off or on depends on your situation, but here are how to do that:
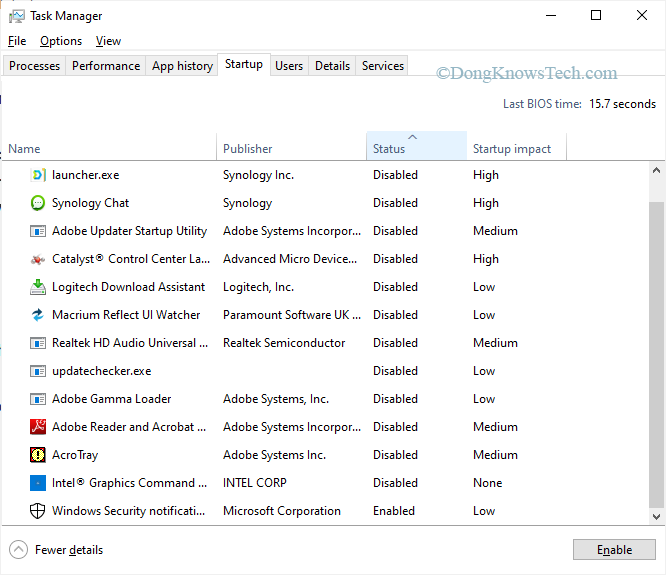
- Type “Task Manager” (no quotes) in the Search box and press Enter. That will bring up the Task Manager.
- On the Task Manager window, choose the Startup tab. You’ll see a (long) list of software that auto-ran at launch. Note you can disable one at time.
- Click on a line on the list then on the Disable button. You note that its value on the Status volume changes to “Disabled.” Repeat that with other lines until you’ve disabled all that you don’t want to run.
Now restart your computer, and you’ll note that it’ll start slightly faster. It’ll run faster, too.
Extra: Use Windows 10’s built-in security suite for antivirus
Windows 10 comes with Windows Security as free Antivirus software. In my opinion, it’s by far the best security suite.
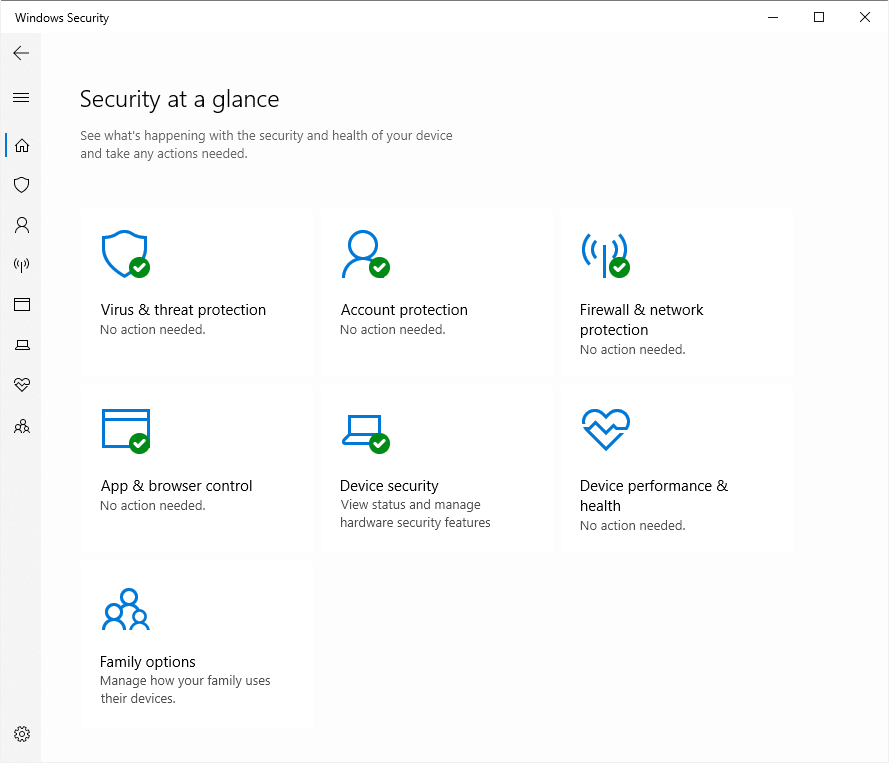
For one, it’s free. Also, it’s lightweight. No, it doesn’t have all the bells and whistles as other security suites. But here’s the hard truth: It offers the same level of warranty for your safety as do others, which is none.
That’s correct. No security vendor backs their product up by saying that “if you still get hacked or infected, we’ll pay XYZ amount of money.” That’s because they can’t.
In the world of security, the last defender is you, the user. Security software applications can only help your situation; none of them can protect you 100%.
That said, I always remove any third-party security suite and enable Windows Security—you will be prompted to do so. Third-party security suites are notorious for hogging system resources.
How to make Windows 10 better: Advanced tweaks
These two tweaks are not exactly hard. However, they alter the system in a big way, so make sure you have backups and set some time aside for them.
The objectives are to have your user account and your computer as clean as possible, respectively.
Getting rid of Windows rot via a new user account
Creating a new user account and move your data over help rid of system rot since you remove all accumulated customization and settings.
It’s important to note that this means you’ll need to personalize your apps all over again. That includes, though is not limited to, setting up your email clients, like Outlook from scratch.
Here are the steps to properly migrate your information to a new account.
Preparing the old account for the migration
- Back up your user data. You can do a manual backup, as mentioned above, or any other type of backups you like.
- Create an account with your browser (Firefox, Chrome, Edge, etc.) to sync browsing data. This will allow you to restore your bookmarks, saved passwords, etc. later.
- Follow this tweak to make your Start menu persistent in all new accounts. If you don’t, the new account’s Start menu will be cluttered with all sorts of junk.
Creating a new account
- Temporarily disconnect your computer from the Internet. (Skip this step if you want to create an online account with Microsoft using an email.)
- Follow the steps above to create a new Administrator account. For this post, I name the account “New Account.”
- Sign off your current account, or restart your computer.
Migrating data to a new account
This one is the most time-consuming part. First, you need to perform some basic steps.
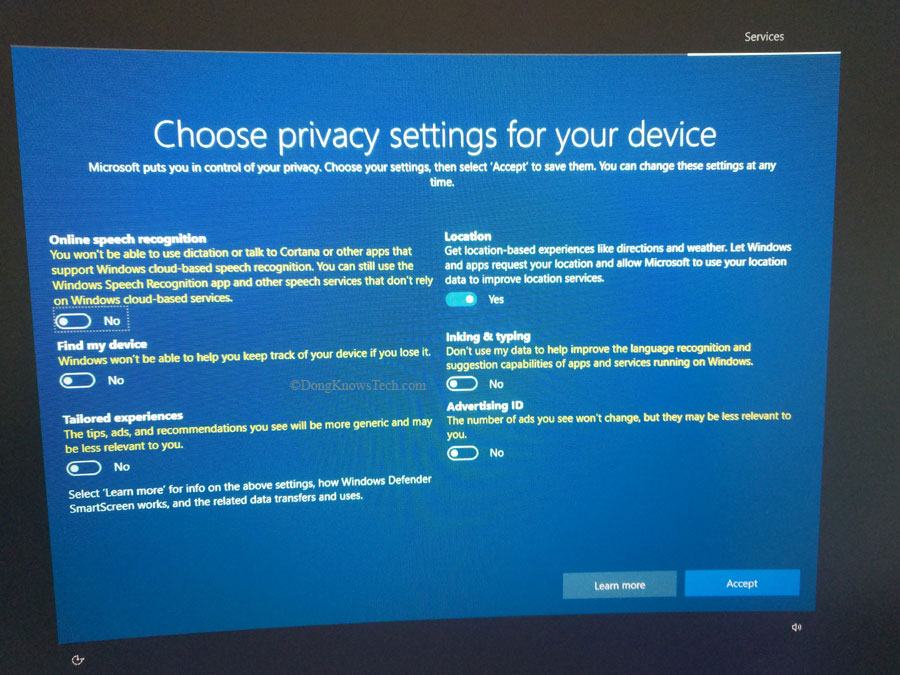
- Sign in with your new account.
- You’ll run into the “Choose privacy settings for your device” dialog. Choose wisely. The more items you say Yes to, the more personal information Microsoft can collect from you.
- Perform the Simple and Safe tricks above to make your new account faster.
- Sign in with your bowser’s account to restore your bookmarks and saved online passwords (if applicable.
Steps to move user data over from the old account
1. Type C:\Users into the Search box and press enter. That will bring up Windows Explorer showing the list of existing user accounts. You’ll see both the old account and the new account here. For this example, the old account’s name is “Dong Ngo,” and the new one is “New Account.”
2. Right-click on New Account and chose to open it in a new window. Move that window aside.
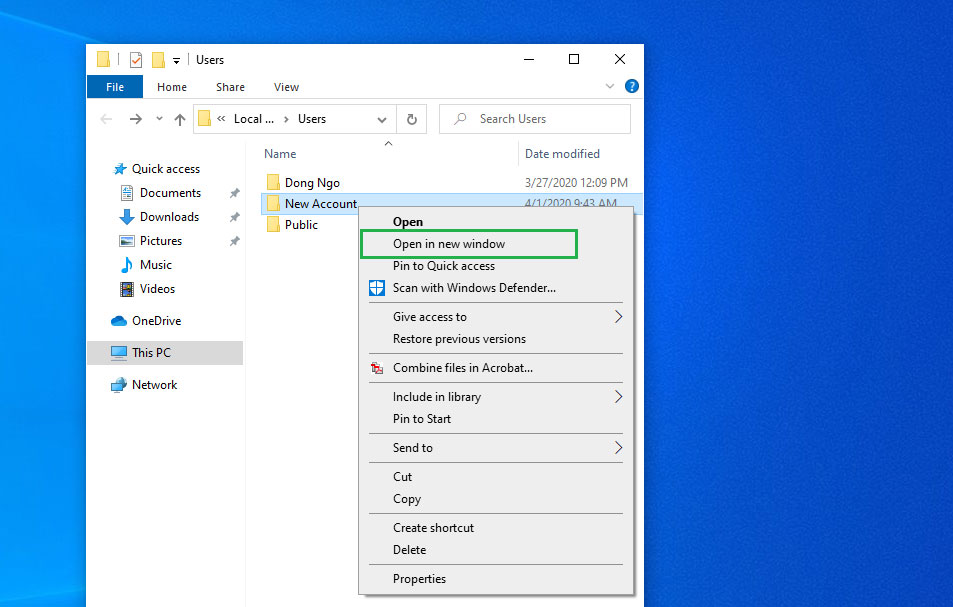
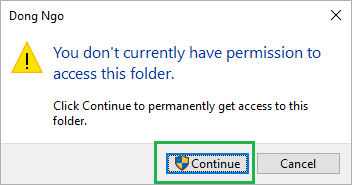
3. Go back to the account list and right-click on the old account (Dong Ngo), and choose to open it in a new window, hit Continue on the permission prompt.
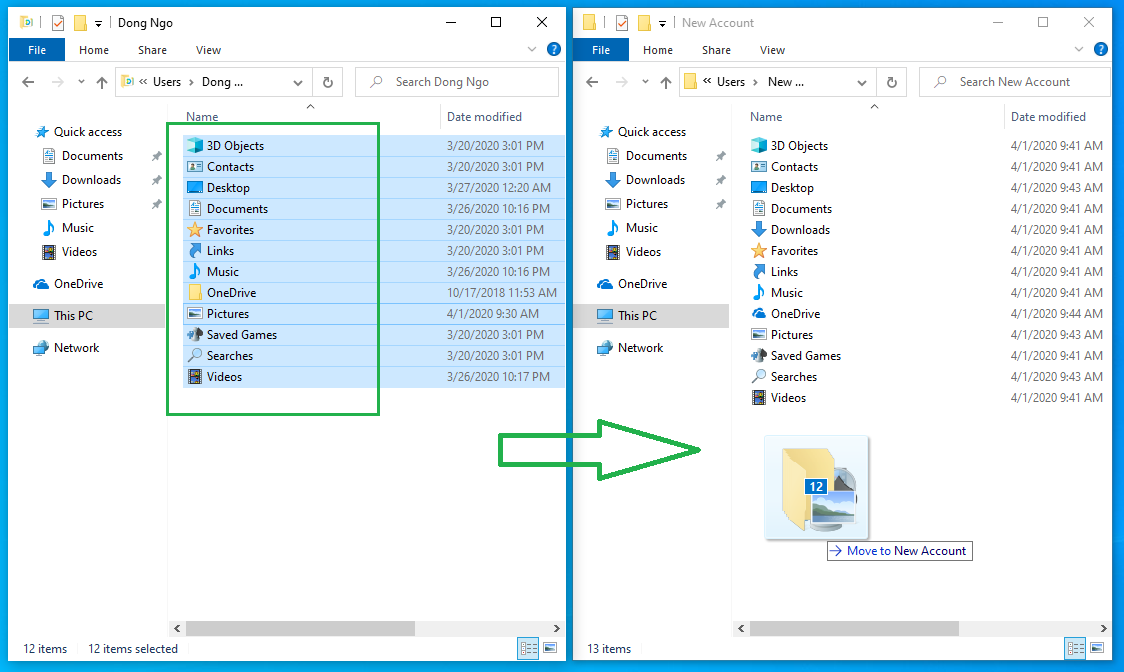
4. Set the two windows of the old and new accounts side by side. Now you can just drag and drop the data folders from the old account to the new account. Choose to overwrite the destination if prompted.
A couple of notes in this step:
- You can drag and drop each folder one by one or select all of them and drag all over.
- As mentioned above, Desktop, Documents, Music, Pictures, Videos are essential and need to move over. The rest is up to you.
- If you see a folder called AppData, leave it alone, do NOT move it to the new account.
Set default apps
By default, Windows will make all Microsoft apps the default to open your documents. For example, it’ll make Edge your default browser, as well as your default reader of your PDF files. If you’re OK with that, there’s nothing else to do.
In most cases, though, it’s better to set the default app to a better one. I use Firefox or Chrome as my default browser and acrobat reader as the default app to open PDF.
Here are the steps to change the default apps:
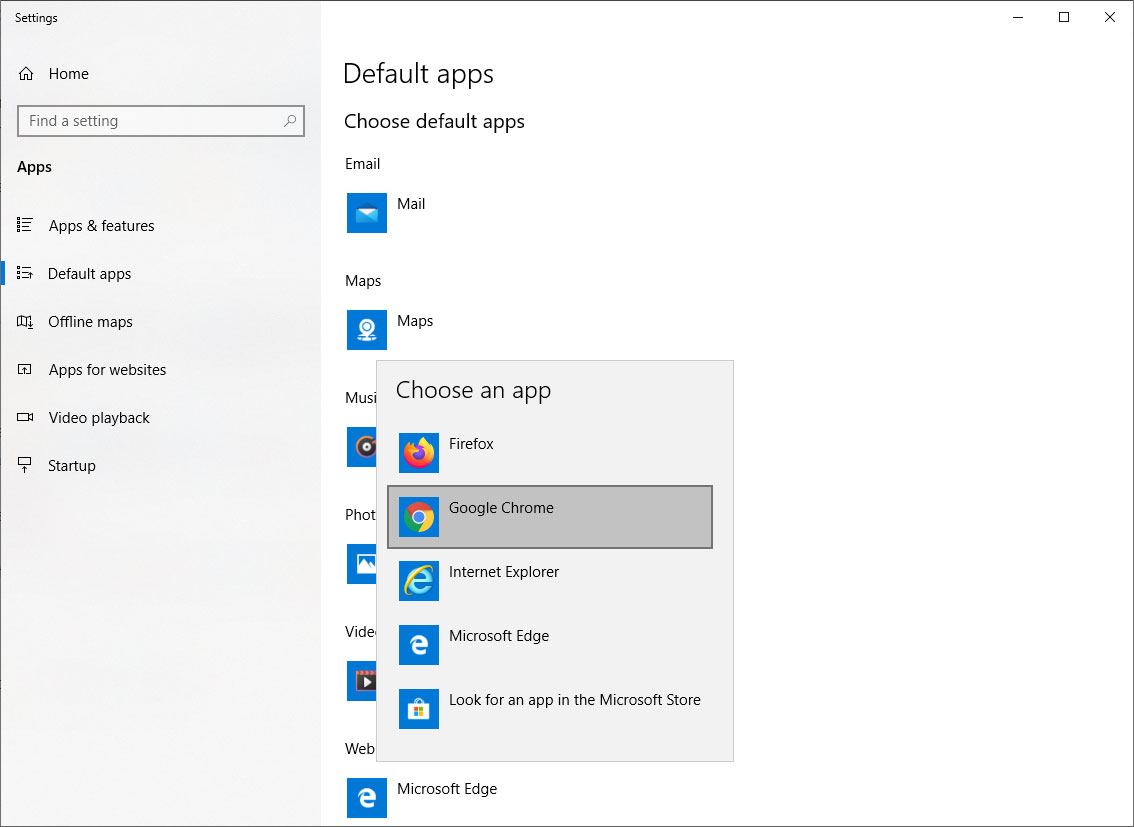
- Type “default apps” (no quotes) into the Search box and hit Enter. That will bring up the Default apps Settings window.
- Click on the current default app of category and select an alternative.
And that’s it! You’ll note that your account performs better now.
The ultimate Windows 10 improvement: A fresh installation
Install a fresh copy of Windows 10 is the best way to ensure that your system is clean of junk software and preloaded settings. This tweak is what you should do when you first get a new computer.
If you’re doing this on an existing computer, make sure you back up your data first.
Fresh installation vs. reset
Windows 10 comes with the Reset this PC function (type it in the Search box!), where it’ll restore your machine to the state when you first bought it.
I don’t recommend that, however. That’s because it’ll bring the computer back to the same state where it has pre-installed bloatware and a wholesale set of software drivers, as mentioned above.
Instead, we should manually install Windows 10 fresh on it. That’s the only way to make sure you have a completely clean system.
Steps to install Windows 10 fresh on an existing computer
For this part, your computer needs to have a fast connection to the Internet. There are three parts to this job.
Create a Windows 10 ISO
1. Download the Media Creation Tool from the Microsoft website.
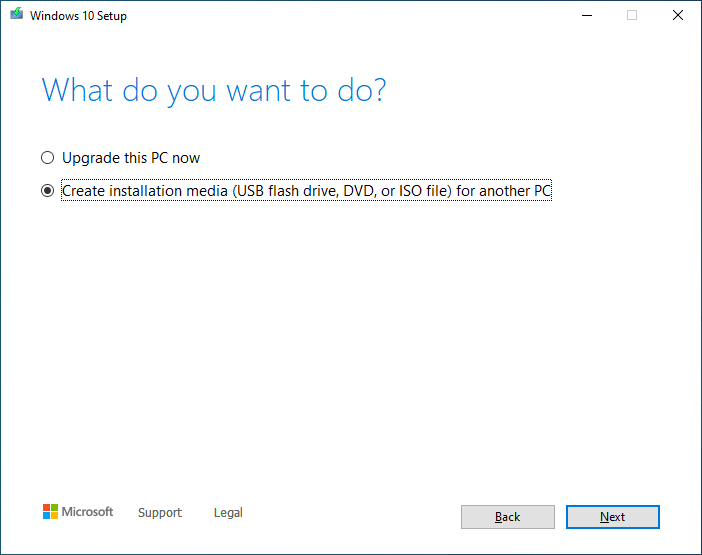
2. Run the tool and choose to create an ISO file of the Windows 10 installer.
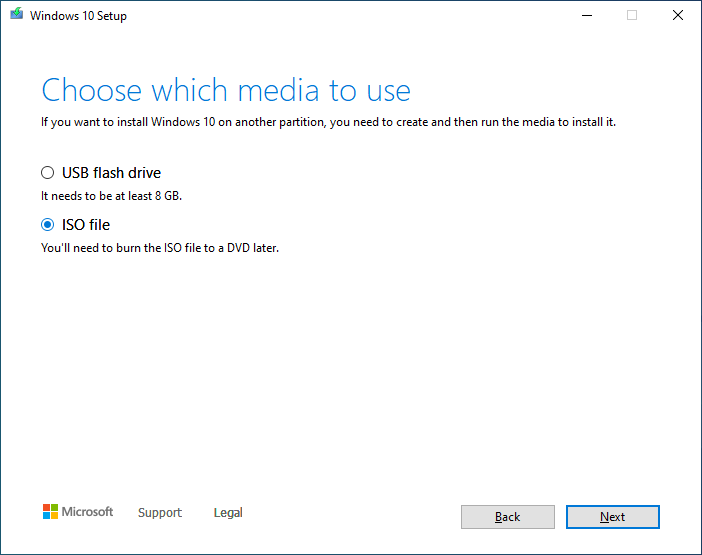
3. Choose the file on your computer. You can save it anywhere as long as you remember the location.
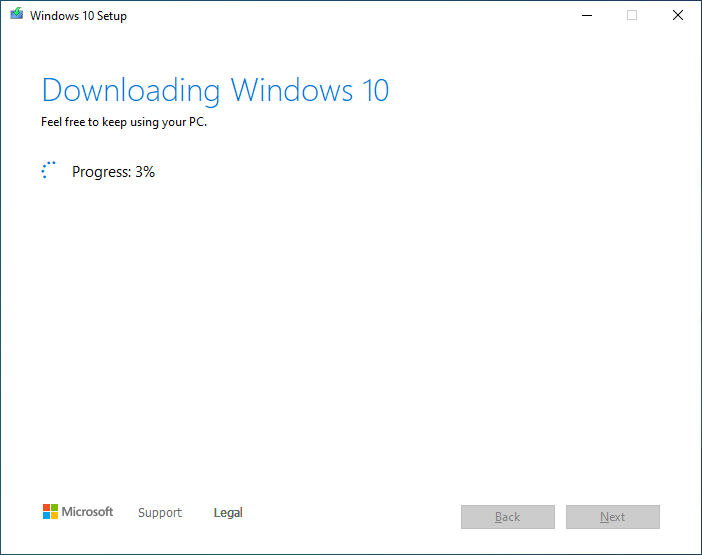
4. Wait for the download to finish and click on Finish.
Install Windows 10
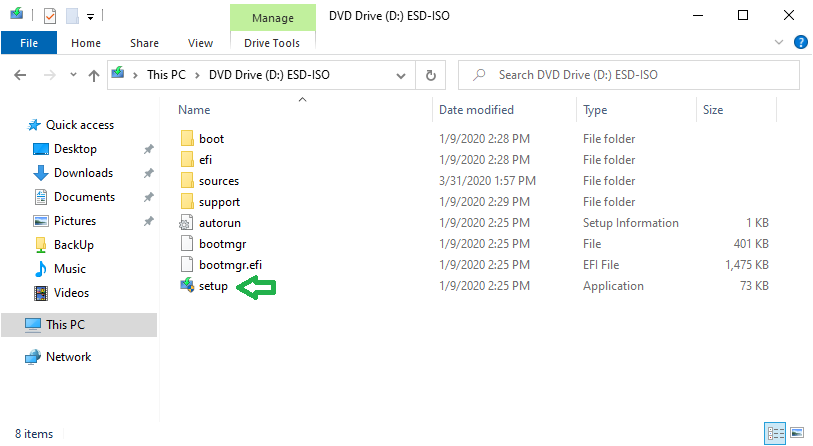
1. Navigate to the ISO file and double-click on it. Then on Setup. The Windows installed will launch.
2. Follow through the steps and until Choose what to keep and select nothing.
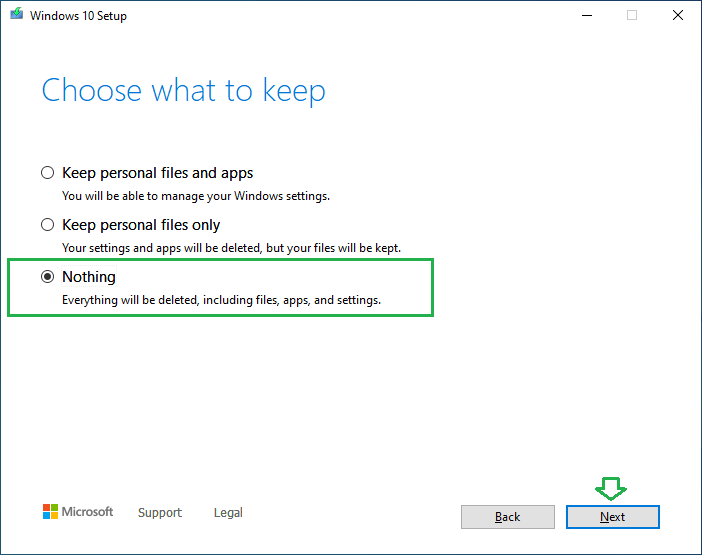
Note: Even though you choose to keep nothing, the process won’t delete the current system. Instead, it’ll place everything in the C:\Windows.old\ folder. As a result, you’ll be able to find the existing user profiles in the C:\Windows.old\Users\ folder afterward.
3. Proceed with the installation.
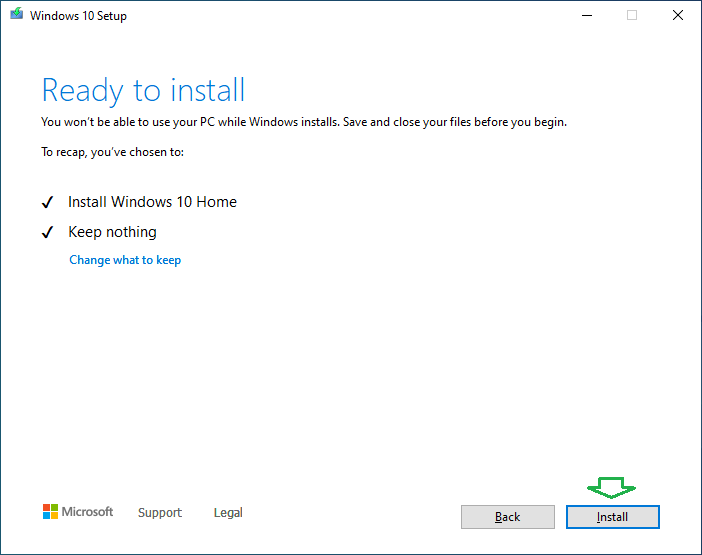
Depending on the computer’s hardware, the process will take somewhere between 10 minutes to an hour. Once it’s completed, you now have a “brand-new “computer, similar to when you first bought it.
Set up your “new” computer
After the installation, the machine will start for the first time as new, and you’ll be prompted to create a new user account to log in. (Again, if you don’t want to use a Microsoft account, skip the Internet setup part.)
After that, if you need to restore your data, follow all the steps in the Migrating data to a new account part above to finish your new account, including the performance optimization part.
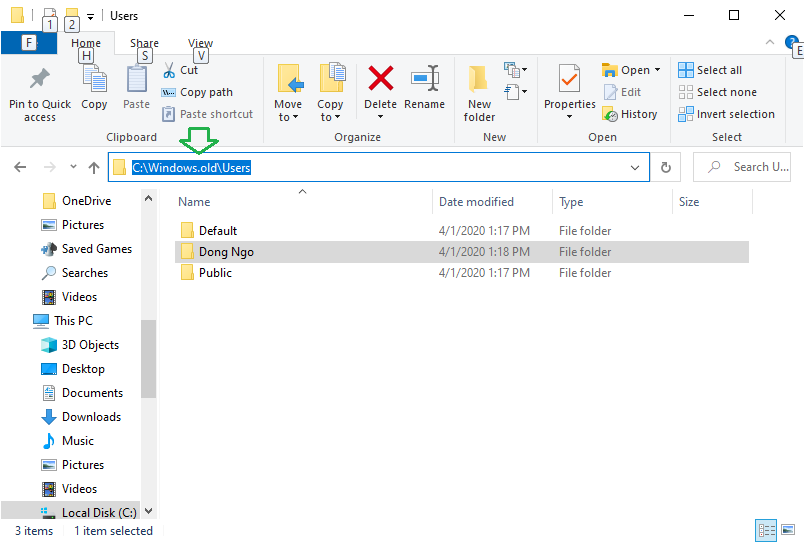
Again, one thing to note, in this case, you’ll find your old account and all of its data in this folder:
C:\Windows.old\Users\
The C:\Windows.old The folder will be automatically removed after ten days. To regain storage space immediately, you can delete it using Windows 10’s Storage Sense feature (just use the Search box again).


Hi Dong,
one the reasons I have been using a Microsoft account to login to my PC’s is that it will activate Windows with a digital license. With that, I can upgrate my machines (e.g. change motherboard and processor), without losing the license.
That’s a good trick, Bertrand. But you don’t need to keep using the account after the reactivation.