This post will help you install Windows 11 on an Intel-based Mac.
It’s worth noting that if you have a Mac powered by Apple’s M-series chip, you can’t install Windows on it without using an emulator, a virtual machine, which is not ideal. That said, in this case, you can forget about Windows altogether, which is why you wanted to use a Mac in the first place.
On the other hand, if you have an Intel-based Mac, you can use the Boot Camp Assistant app to install Windows 10 natively as a dual-boot option alongside macOS. All you need is a Windows 10 ISO file, and BCA will take care of the rest.
However, if you use a Windows 11 ISO file, Boot Camp Assistant might encounter an error and not continue. That’s almost always the case, especially with the latest Intel-based hardware, such as the 2019 MacBook Pro.
And that’s where this post comes into play.
Dong’s note: This post was initially a part of the piece on how to upgrade to Windows 11 on supported hardware.
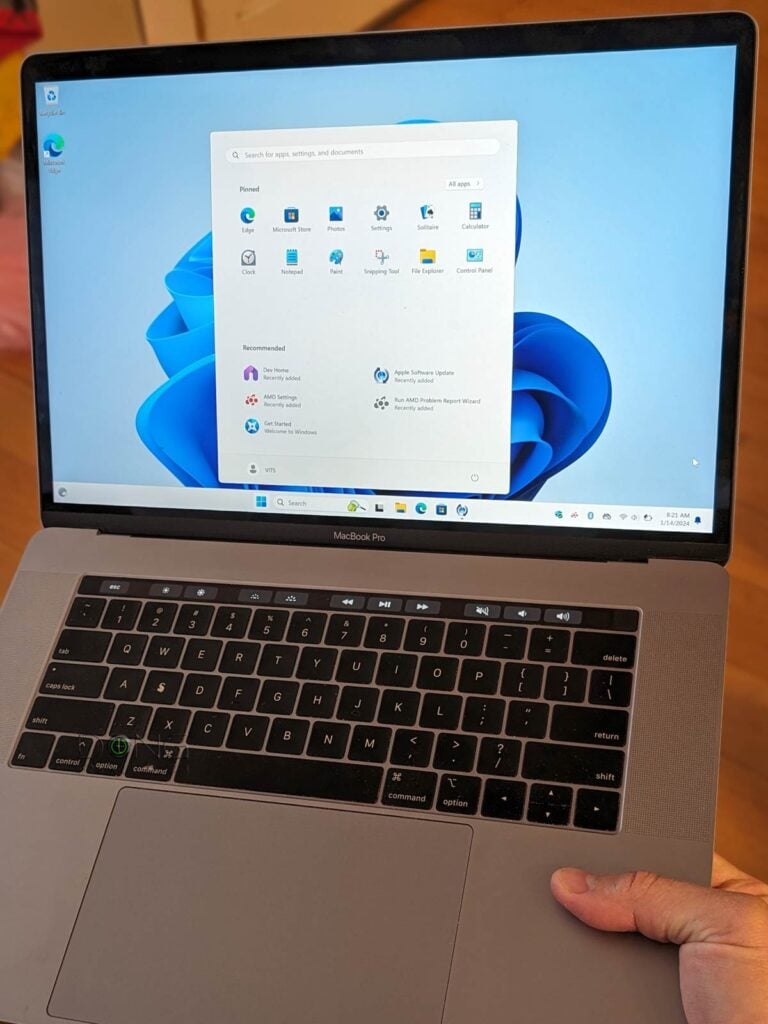
How to install Windows 11 on an Intel-based Mac
You need a special ISO file to install Windows 11 on these Macs successfully. Here are the steps.
1. Download the ISO
There are two, one for Windows 11 version 23H2 (the most stable) and the other for version 24H2 (the latest). Here are the download links:
- Windows 11 23H2 (for Intel-based Macs)
- Windows 11 24H2 (for Intel-based Macs)
Download the version you like and save it on the desktop area of your Mac.
Note that you can use these files to:
- a clean install on a Mac computer that does not yet have Windows via Bootcamp. Or
- an in-place upgrade on any computer running Windows 10, including Bootcamp Macs.
If your Mac already runs Windows 11, neither of these files applies, but you can upgrade it to the latest version the same way you upgrade any unsupported hardware.
2. Step to perform a clean installation of Windows 11 on an Intel-based Mac
The process of installing Windows 11 on an Intel-based Mac is the same as when you want to install Windows 10 on the machine. The only difference is the ISO you just downloaded.
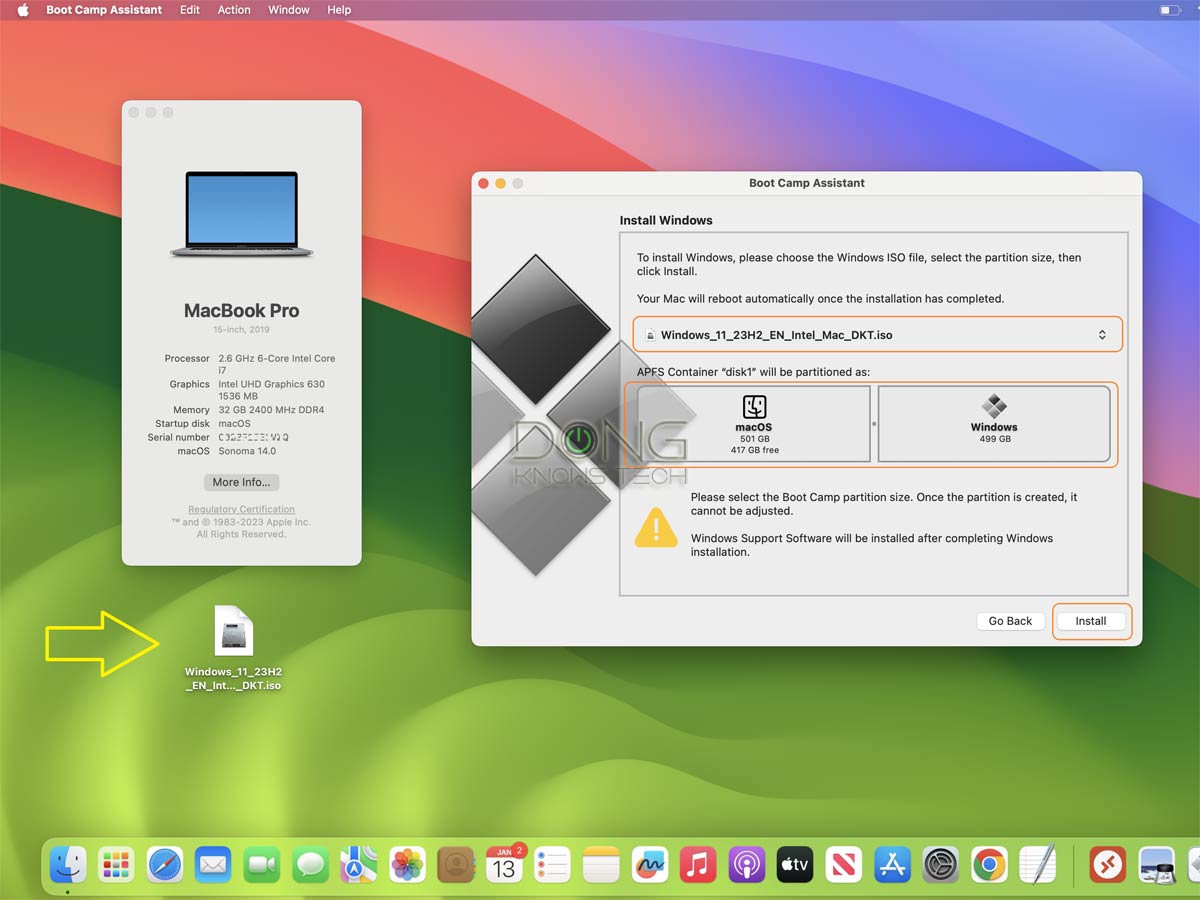
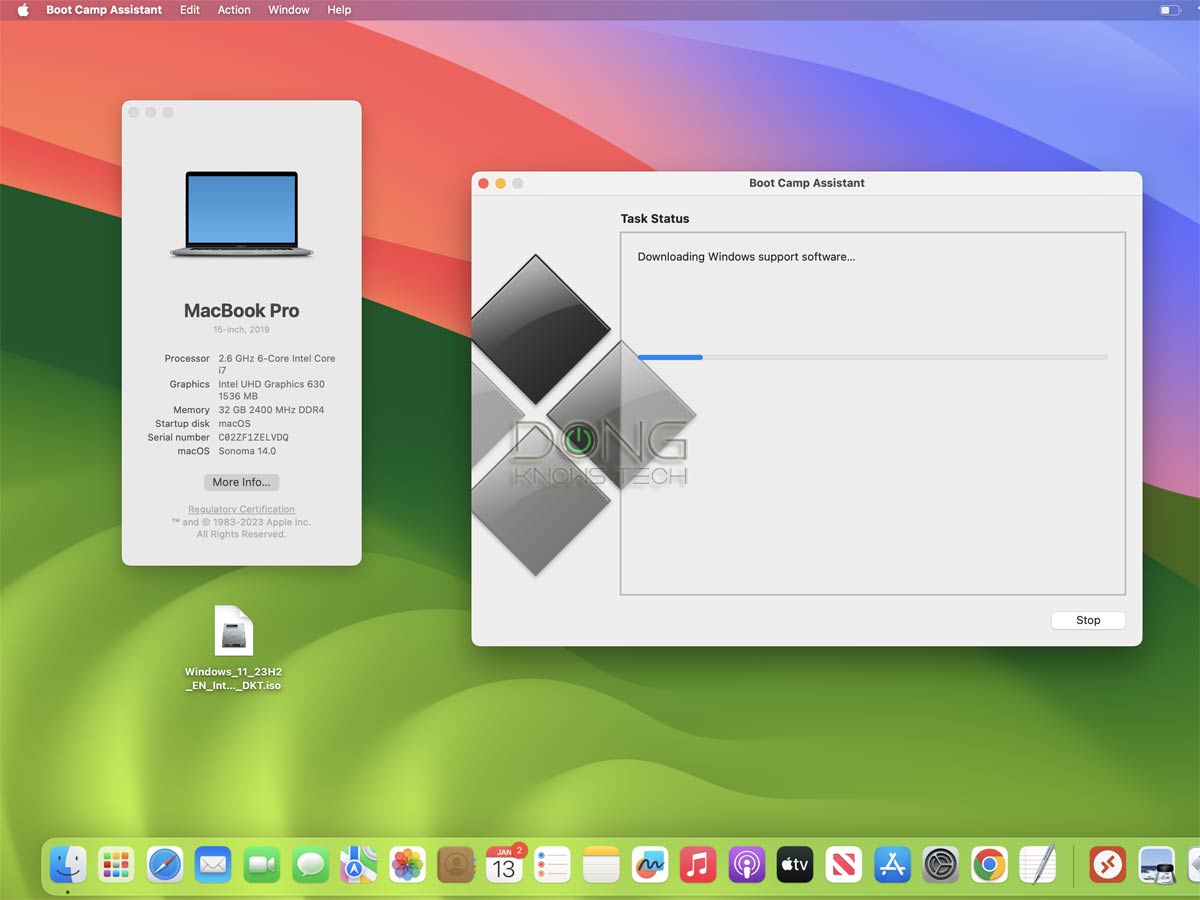
Here are the steps:
- Run Boot Camp Assistant. If you don’t know where it is, use Spotlight to search for it.
- Select the downloaded ISO. If it’s the only ISO file you leave on the desktop area, chances are BCA will automatically pick it for you.
- Use the slider to pick the size of the partition you want to use for Windows. Hint: If you want to use the machine mainly as a Windows computer, pick the largest possible size for the Windows partition.
- Click “Install,” and the rest is self-explanatory: The Boot Camp Assistant tool will download the necessary drivers and restart the computer to start the installation. You’ll be prompted to pick the Windows 11 edition (Home, Pro, etc.) and other parameters. And then you’ll just need to wait until the process is done.
Tip
The Windows setup process will ask you for the CD key of the Windows version you want to install on your Mac, but you can continue without one by choosing “I don’t have a serial key right now.” If you’ve activated Windows 10 on your Mac before, the machine will automatically be activated with Windows 11 (of the same edition, such as Home or Professional) once connected to the Internet.
3. Steps to do an in-place upgrade from Windows 10 to Windows 11 on an Intel-based Mac
On a Mac that’s already running Windows 10, the in-place upgrade process to Windows 11 is the same as when you upgrade Windows on unsupported hardware. Specifically:
- Right-click on the downloaded ISO file and choose “Mount” or “Open with Windows Explorer”.
- Double-click don’t the Setup file to start the upgrade process. Note: The first few Setup screens show that you’re installing Windows 10, but you’re actually installing Windows 11.
- Important: Click on “Change how Setup downloads updates” and choose “Not right now” to defer the updates til after the upgrade process is finished.
- Proceed with the upgrade.
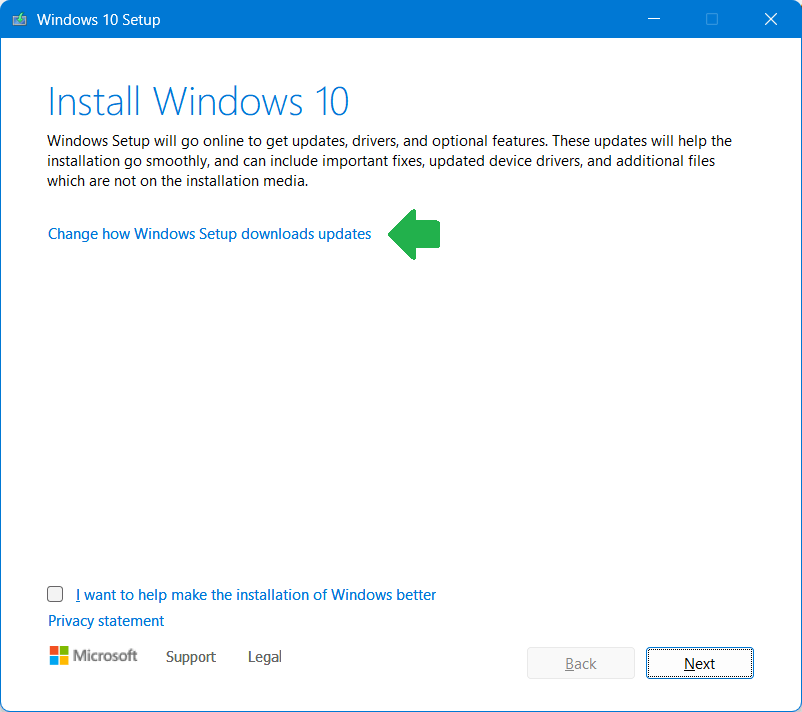
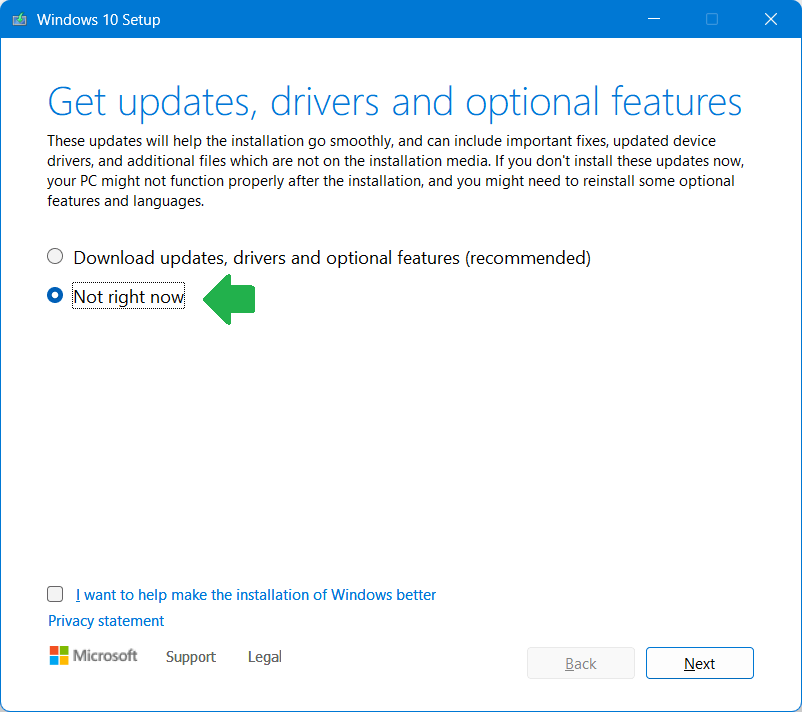
And that’s it. The process will continue like a typical Windows feature upgrade, which will restart the computer a few times. After about 30 minutes or so, depending on how fast your computer is, you’ll get yourself a Windows 11 computer. The first time you log in, BootCamp will install all the software and drivers necessary for the machine to work as intended.
Windows 11 on an Intel-based Mac: Keep your Mac longer
With a dual-boot Mac, you can choose to start the computer between macOS and Windows by holding down the Option key on the keyboard right after turning it on. So, it’s about having options.
Most importantly, in my experience, Windows 11 runs very well on any Intel-based Mac computer, especially on older machines that are no longer supported by the latest macOS. In this case, putting Windows on it, even as the only or the main OS, means you can keep using it for much longer than Apple would like you to.


Hi there,
I’ve got an iMac 27″ with Intel processor running Windows 10 on a separate partition. I’ve downloaded your Win11 Mac ISO’s and the latest ISO but after mounting them and starting setup.exe, all I can see is a command prompt window that opens for a split second and then nothing happens. I’ve downloaded an official Win 11 ISO image and that starts the install successfully (but then of course I run into issues). Am I doing something wrong here?
I’d like to do an in place upgrade rather than a fresh install if possible. Any suggestions?
Thanks in advance
Stephan
Assuming you downloaded the file successfully (check its size and compared that to the one on the server) make sure you’re not using a third-party ISO handler, Stephan. You need to open the ISO using Windows Explorer. So, right click on the file and do that accordingly, don’t double-click. In any case, make sure you actually read the post first. If your current system is not “clean” you might need to do a fresh installation.
Hi Dong,
Thanks for the prompt reply. Mounting wasn’t the issue, but you may be right on the system not being ‘clean’. I tried to upgrade a few months ago and experimented with some batch file to skip the TPM check and must have left this in off state. I ran the command again and then ran the Win11 upgrade and it seems to work now, fingers crossed.
Cheers
This post might help if you run into certain issues. In my experience, though, with Bootcamp, it’s best to back up the data and to a fresh installation from within macOS.
You mentioned these .iso files are customized. After installing will we be able to update Windows normally or will we not be able to update at all?
Yes, Davik, they’ll work just like on any computer running Windows 11. More details here.
I’ve just installed Catalina on it this morning, as High Sierra boot camp won’t work. So the Os is fresh.
On High Sierra, I could never get boot camp to work.
On Catalina, boot camp work, but the iMac hang (look like a power cut). I’ve seen that on Windows computers when the processor is too hot.
Unfortuatenly, you need to install Windows successfully and then BootCam software driver before the power issue can be regulated. It’s a bit of a catch 20. Still, it seems the machine has hardware issue, maybe open it up and check to make sure the fan and the ventilation are working properly.
Will try again on another day as the iMac was on today from 8 pm to 6 am Central European Time (now 8.36 pm). Perhaps ten hours are too long for a iMac known to overheat easily.
Even with the win iso on a key or on the desktop, boot camp can’t find it (Imac 27 2009 High Sierra).
That doesn’t seem right, Barca. Also, you need to browse for the file within the Boot Camp Assistant app. The app doesn’t “find” the file on its own.
I’ve find an other way, burning the ISO on a DVD and it works but when the install appear, the Imac screen went black and the reboot with a « No bootable device-insert boot disk and press any key » screen. Fortunately, I can recover my Imac with the option keyboard key. I found that ther’s a boot camp partition but I can’t add nothing on.
Is it possible that the Imac was too hot and then stop working at the end of partitionning ? What can I do now ? Thanks for the help
Maybe something is wrong with that Mac, Barca. I’d recommended wiping its drive, install macOS fresh and try again. You can also install Windows 10 first and then use the ISO provided here to upgrade that to Windows 11 from Windows 10. Good luck!