Since the original version of Windows 11 (21H2) became available in late 2021, and especially since my post on how to do so on unsupported hardware, I’ve received numerous requests for help overcoming a wide range of Windows 11 upgrade errors, particularly those with cryptic messages.
This post offers some easy-to-follow tips to help you deal with those annoying situations.
Dong’s note: I first published this piece on August 13, 2024, and updated it on August 26 with additional tips.

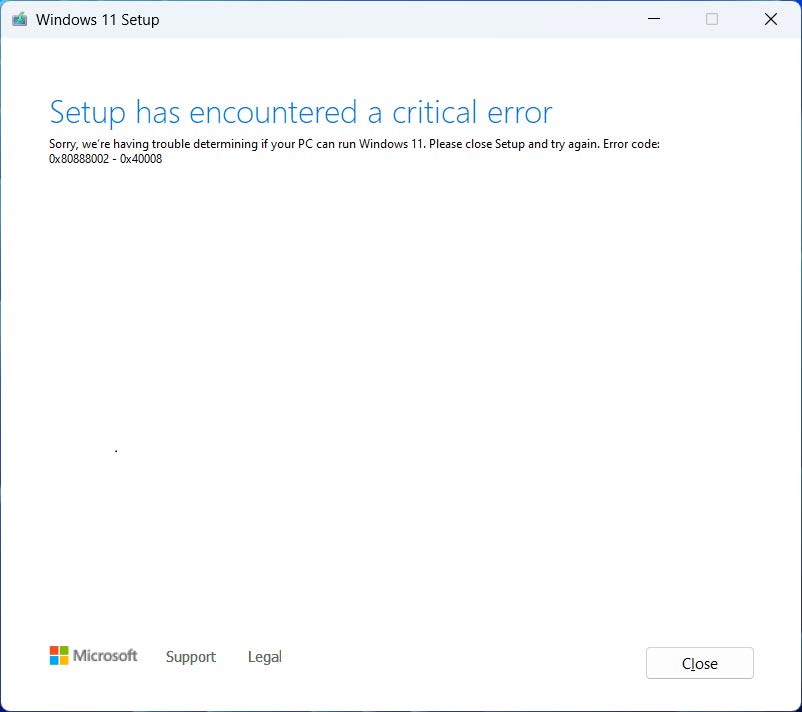
Upgrading to Windows 11 fails: The cryptic error messages and possible solutions
Some of the error messages you might encounter when upgrading your computer from Windows 10 to Windows 11 or from a previous release of the OS, such as from build 21H2 to 23H2, can be frustratingly vague. Here are some notorious examples:
- “Sorry, we’re having trouble determining if your PC can run Windows 11. Please close the setup and try again.“
- “We can’t tell if your PC is ready to continue installing Windows 11. Try restarting Setup.“
- We can’t tell if your PC has enough space to continue installing Windows 11. Try restarting Setup.
Sometimes, these messages are accompanied by an error code; other times, they are not. In most cases, none of them gives you an idea of what to do, and you might blame the Setup program itself or think that the ISO image you’ve downloaded is faulty or corrupted.
Rest assured, more often than not, it’s your computer that has unknown software issues preventing the Windows 11 upgrade process from functioning as intended.
Below are some solutions I’ve used, including the simple (A) and advanced (B) tricks. They will likely rectify the situation.
“Likely” because there’s a chance none of them will work. In that case, your only option is to go nuclear, which is the last resort option (C) mentioned below.
Before we continue, make sure you back up your computer. I’d recommend creating an image of the entire system, but the rule is any backup is better than no backup at all, and it never hurts to make multiple backups of different types.
Make sure you’ve made backups before continuing. Some methods below can cause you to lose data currently stored on your computer. Consider yourself warned!
A. Windows 11 Upgrade fails: The simple housekeeping tips
These are tips you can do without making intrusive changes to your computer.
I. Ensure the drive that holds the Windows operating system has enough free space
This is generally the C: drive, as it should be. (If you have used another drive letter, that can be an issue in itself. In this case, go nuclear, as mentioned below instead.) This drive needs to have at least 30GB of free space. If it has less, clean up your drive or move your data to a different location first. Or, if you need a new, larger drive, here’s the guide on how to upgrade it.
II. Remove specific third-party software
Here are the following software you should remove/disable:
- Third-party VPN or Security software, such as North VPN, Norton Security, McAfee, etc. You can choose to install them later, but in my opinion, a VPN is generally unnecessary. You don’t, either, need more security than the OS’s built-in Windows Security, which is free.
- Third-party ZIP and ISO handler—you should use Windows Explorer as the default for both. Sometimes, this third-party software alters how the system accesses compressed files, causing unknown errors.
Once you’ve removed these software applications, restart the computer and try the Windows 11 upgrade again.
III. Turn off non-Microsoft services
Some third-party services may prevent the upgrade from running successfully. To eliminate that possibility, you can boot the system using only Microsoft services during the Windows 11 upgrade process. Here are the steps:
- Hit Windows + S and type in the search field:
msconfig- As the “System Configuration” appears in the result, hit Enter.
- On the System Configuration window that appears, pick the Services tab.
- Click the box that reads “Hide all Microsoft services”, then click on the “Disable all” button.
- Click on the Apply (or OK) button.
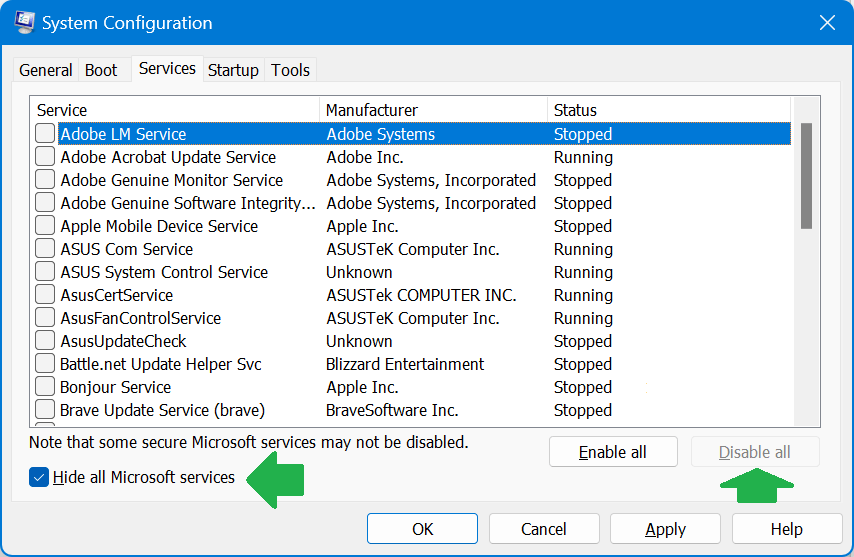
Now, restart your computer and try the Windows 11 upgrade process again. You can repeat the steps above, but use the “Enable all” button at step #4 to restore all these services after the Windows 11 upgrade process or whenever you want.
IV. Make Windows Update up to snuff
Run Windows Update and update your system to the latest patches, including all optional updates, which can be accessed in the “Advanced options”.
Additionally, run the Windows Update troubleshooters to ensure there are no issues. Here’s how:
- Hit Windows + S (that’s when you press and hold the Windows key and then press the S key on the keyboard) and type in the search field:
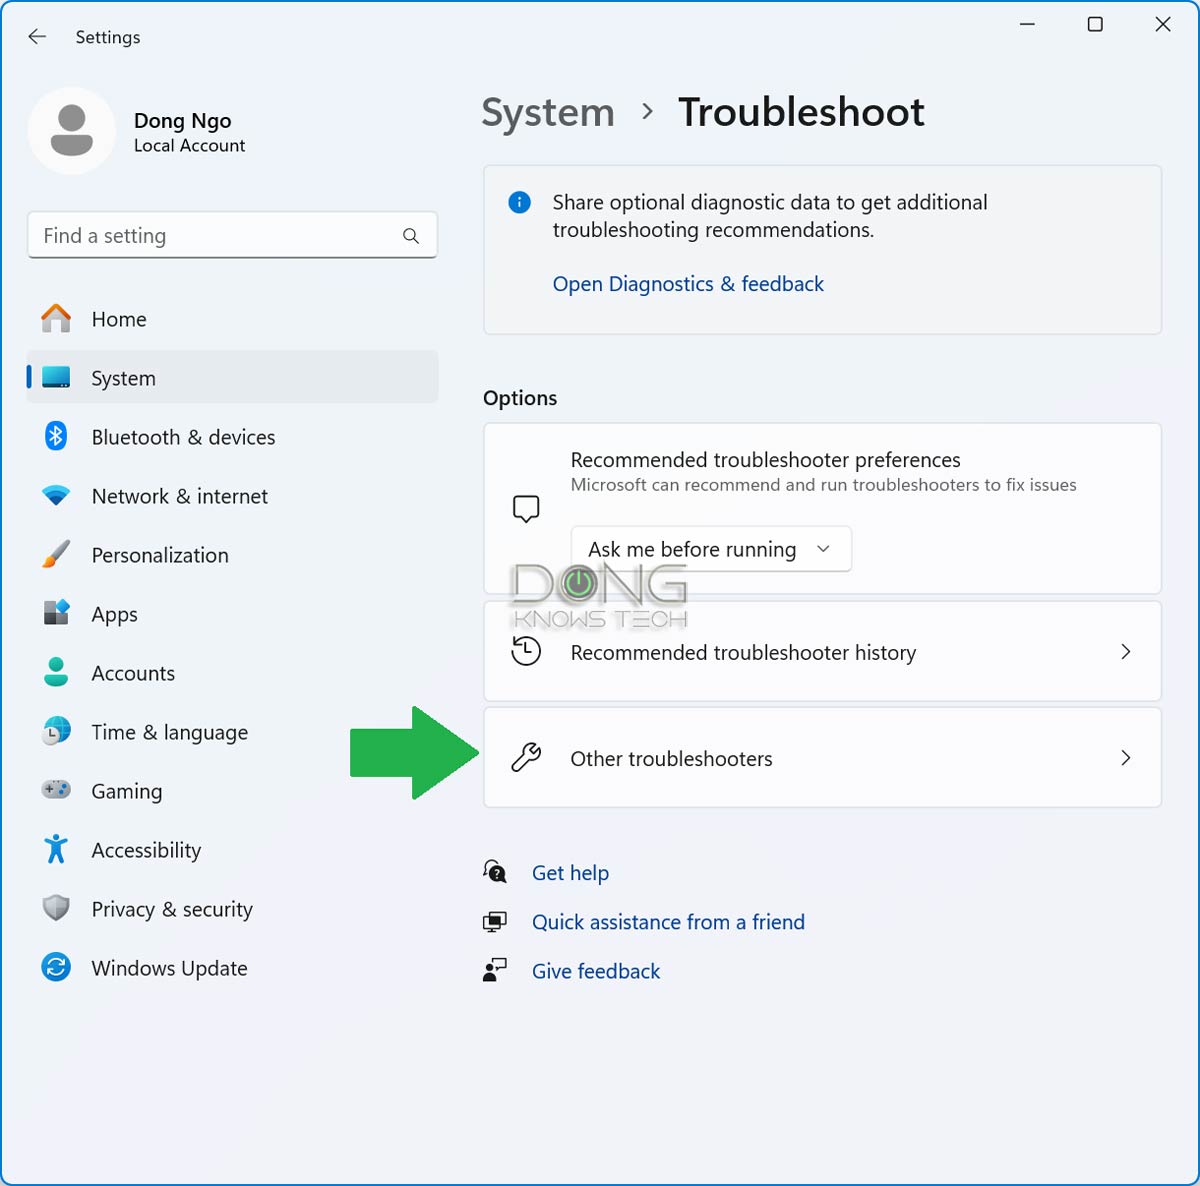
Troubleshot settings- As “Troubleshoot settings” appears in the result, hit Enter.
- On the Troubleshoot window that appears, pick “Other troubleshooters”.
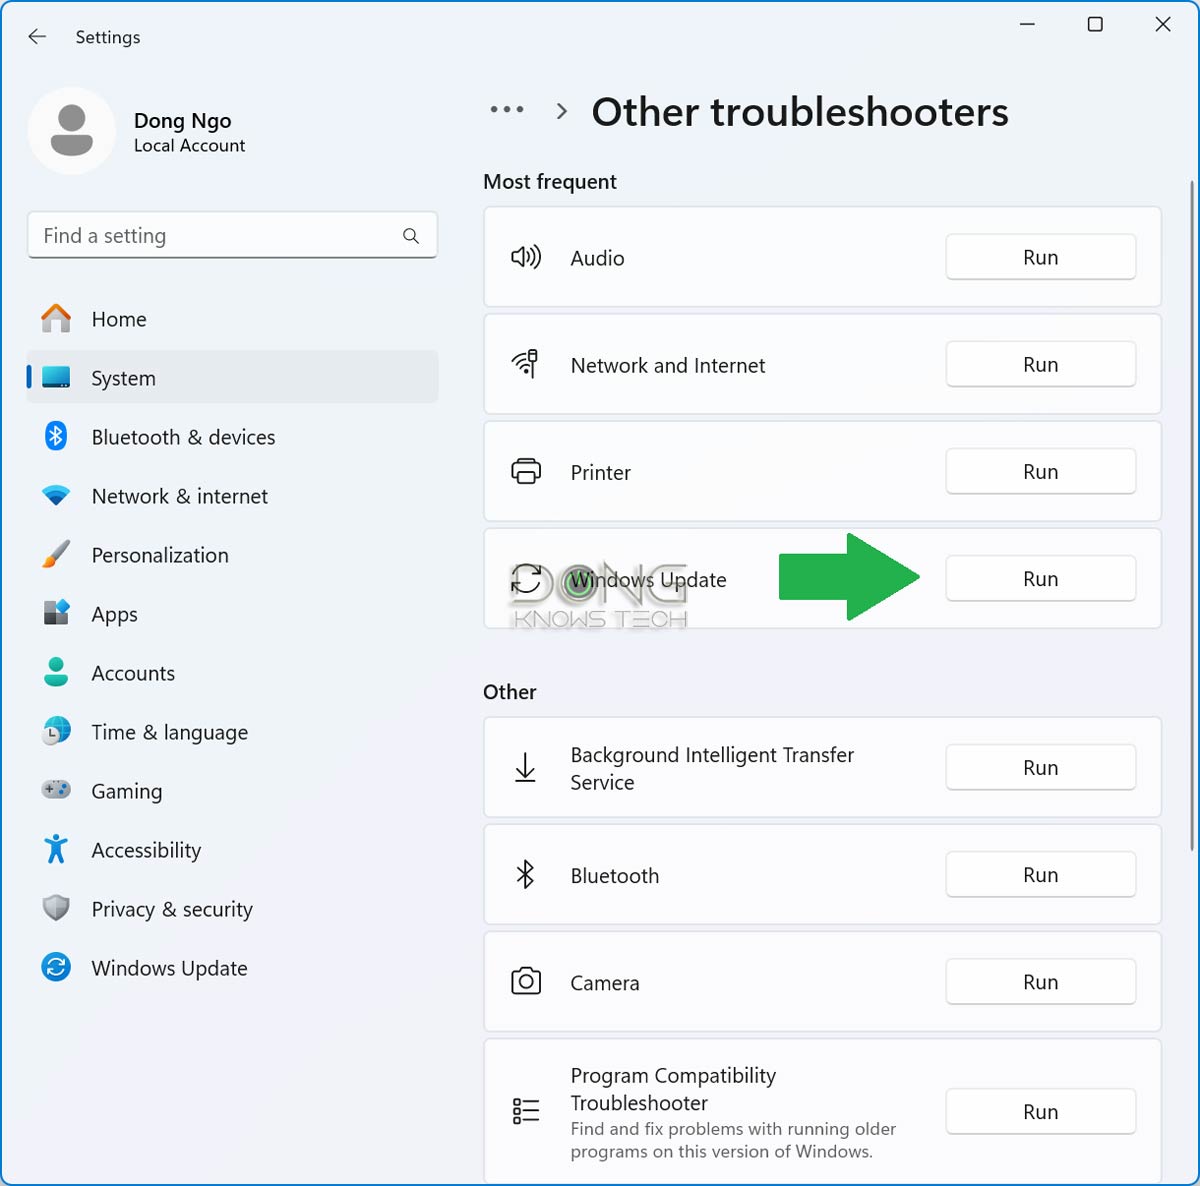
- On the next window, click on the Run button on the right of “Windows Update”.
After that, run Windows Update one more time. Once there are no more updates, it’s time to try the Windows 11 upgrade process again.
B. Windows 11 Upgrade fails: The advanced tips
These tips require you to remove data or make significant changes to the system. Most of these changes are safe to do. Still, note that you’re here because you have already made backups of your computer, as mentioned above.
V. Completely remove Windows Update’s existing data
Often, the computer has erroneous update information that prevents the upgrade from working correctly. In this case, removing all existing Windows Update-related data will fix the issue. To do that, you need to remove the content of the two following folders on the computer:
- C:\Windows\SoftwareDistribution
- C:\Windows\System32\catroot2
Unfortunately, that’s not as easy as removing any other folder since these two are protected system folders.
Here’s how:
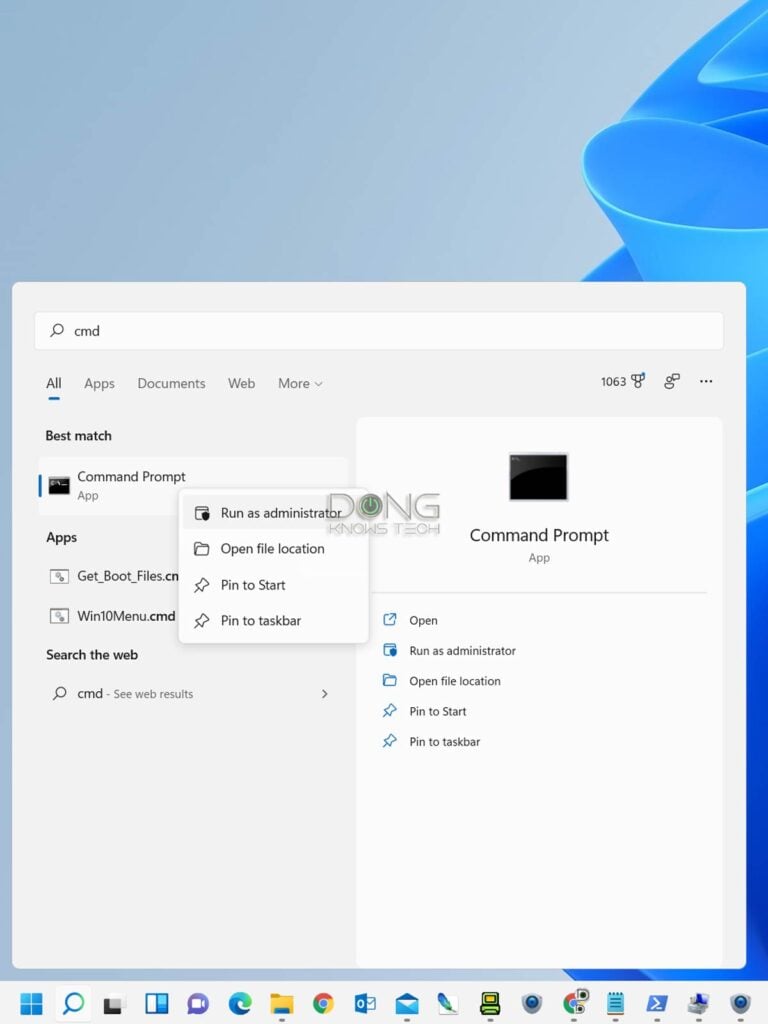
- Open an elevated Command Prompt window—if you don’t know how to do that, the cabinet below contains detailed steps.
How to open an elevated Command Prompt
Steps to open an elevated (or admin) Command Prompt:
- Hit Win + S and enter the following text in the search field:
cmd- As the Command Prompt appears in the results, right-click on it, choose Run as administrator, and click on Yes to accept the User Account Control security warning.
- The Administrator: Command Prompt window will appear.
- Enter the following comments, one line at a time, hitting Enter after each (you can copy and paste):
net stop bits
net stop wuauserv
net stop appidsvc
net stop cryptsvc
rmdir C:\Windows\SoftwareDistribution /s /q
rmdir C:\Windows\System32\catroot2 /s /q
net start bits
net start wuauserv
net start appidsvc
If you do that correctly, you’ll see what’s shown in the screenshot below.
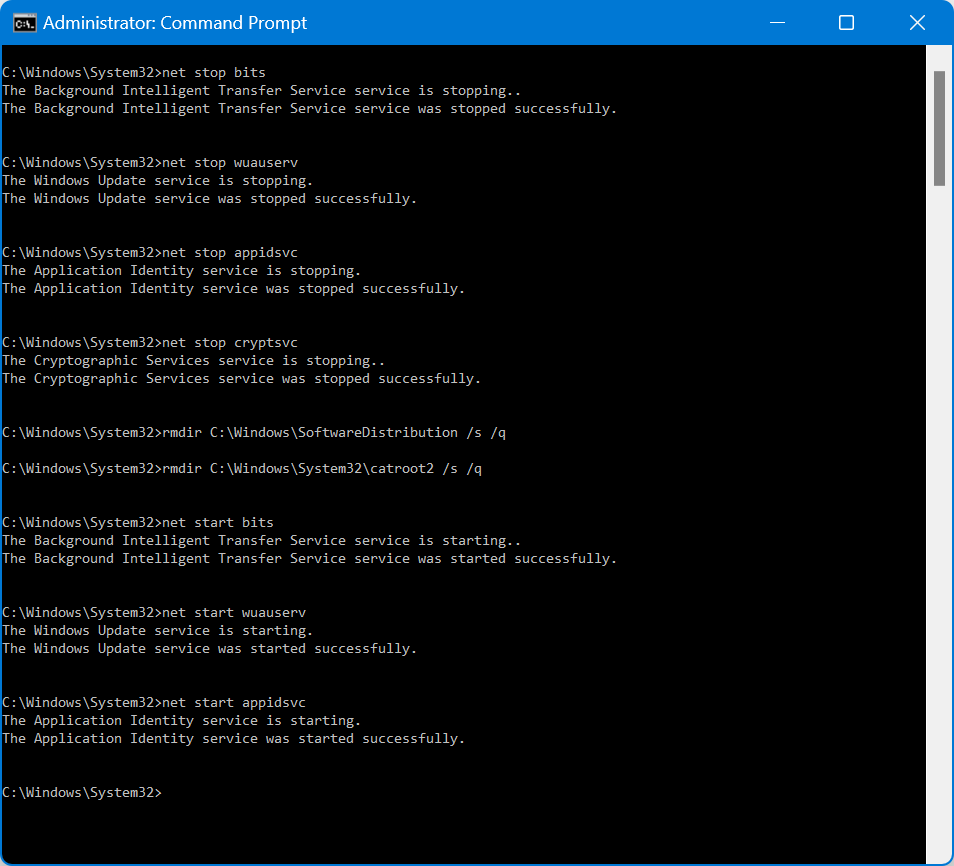
That’s it. You can start the Windows 11 upgrade process now, without needing to restart your computer.
VI. Remove or repair problematic registry settings and files
These are additional items that can be removed or repaired to make sure the computer is free of errors.
Run the following command using an elevated command prompt window (mentioned above). You can copy and paste each command into the window and press Enter after each:
reg delete "HKLM\SOFTWARE\Microsoft\Windows NT\CurrentVersion\Image File Execution Options\vdsldr.exe" /fThis command removes an entry in Windows’ registry to reset the state of Windows’ virtual disk service loader (the vdsldr.exe file) in case it blocks the Setup process.
reg delete "HKLM\SOFTWARE\Microsoft\Windows NT\CurrentVersion\Image File Execution Options\setuphost.exe" /fThis command removes another entry from the registry to make sure the Setuphost.exe module is not blocked.
sfc /scanfile=C:\Windows\System32\vdsldr.exeThis command checks the integrity of the virtual disk service loader and restores it if needed.
reg delete "HKLM\SOFTWARE\Policies\Microsoft\Windows\WindowsUpdate" /v "DisableWUfBSafeguards" /fThis command removes another problematic entry in the registry if the system’s GPO setting blocks the upgrade process.
rmdir C:\$WINDOWS.~BT /s /qThis command removes the temp folder of the previous (and failed) upgrade attempt if it’s still there.
And that’s it. Now, restart your computer and try the upgrade process again. It should work.
C. Going nuclear: Remove everything
This last-resort option should be used only if you have already made backups. It will bring your computer back to its brand-new state by removing all software and user data, and with that, any possible errors that prevent the upgrade from working correctly. This option also helps the machine run at its best afterward:
Here’s how:
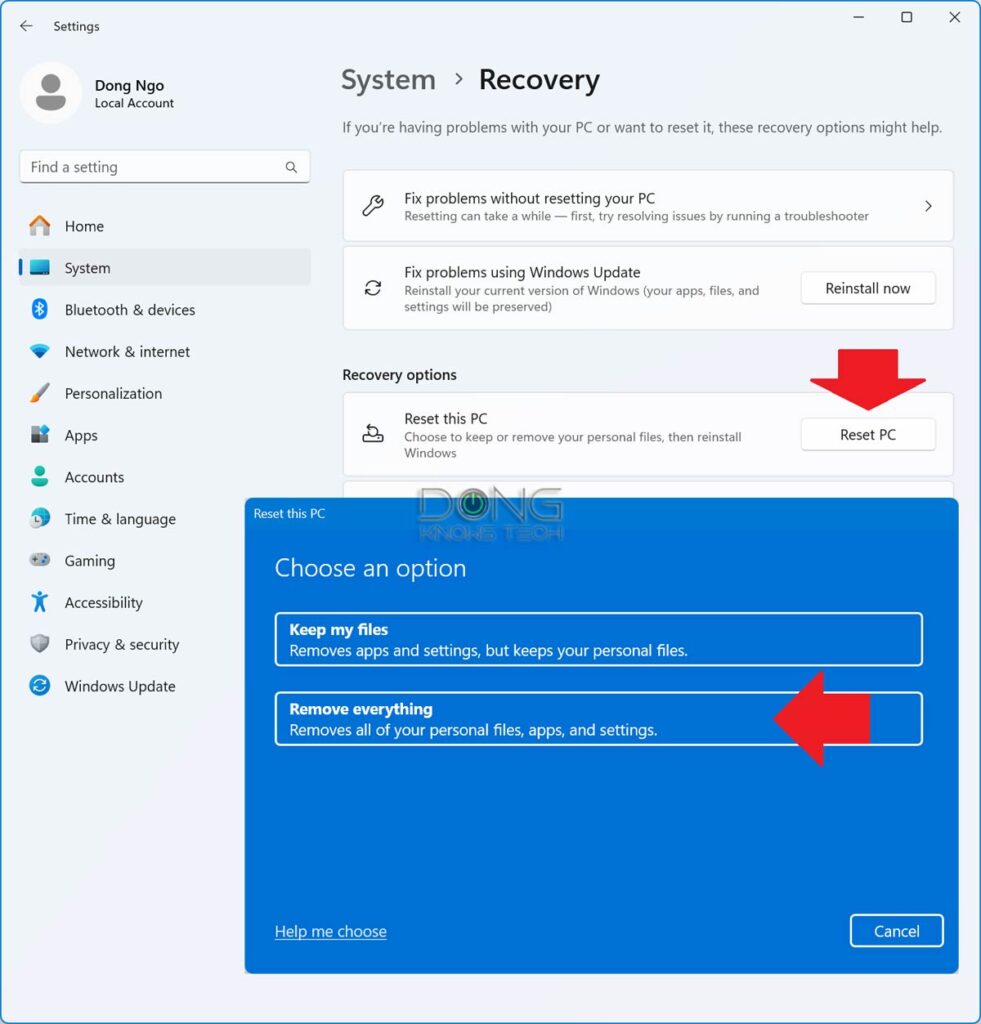
- Hit Windows + S, then type the following phrase in the search area:
reset this PC- When “Reset this PC” appears in the results, press Enter to open the Recovery dialog.
- Click on the “Reset PC” button.
- Choose the “Remove everything” option.
Wait for the process to finish, which takes from a few minutes to half an hour, depending on the computer. After that, you can set up the computer with the first user account and begin the Windows 11 upgrade process before installing any additional software or updates. It’ll work now.
The final thoughts
Clearly, the final method is the last resort when all of the previous ones don’t work. I’ll update this post with more easily executed tips before this nuclear option is needed, when applicable. In the meantime, good luck! You’ll need it.


Comments are subject to approval, redaction, or removal. You're in the no-nonsense zone and that applies BOTH ways.
It's generally faster to get answers via site/page search. Your question/comment is one of many Dong Knows Tech receives daily.
Thank you!
(•) If you have subscription-related issues or represent a company/product mentioned here, please use the contact page or a PR channel.