Since I first published the post on how to turn a router into a NAS server, I’ve received multiple inquiries on making that “server” a Time Machine backup destination. In other words, folks want a Time Capsule alternative.
And that makes sense since Apple got out of the networking business a couple of years now ago. As a result, using third-party hardware with the same backup capability is the only option for Mac users.
This post will walk you through the process of turning a USB-enabled supported router into a Time Capsule—not all routers can do this.
I used the Asus RT-AX89X here as an example, but the steps are the same on other Asus routers and similar if you use a non-Asus one.
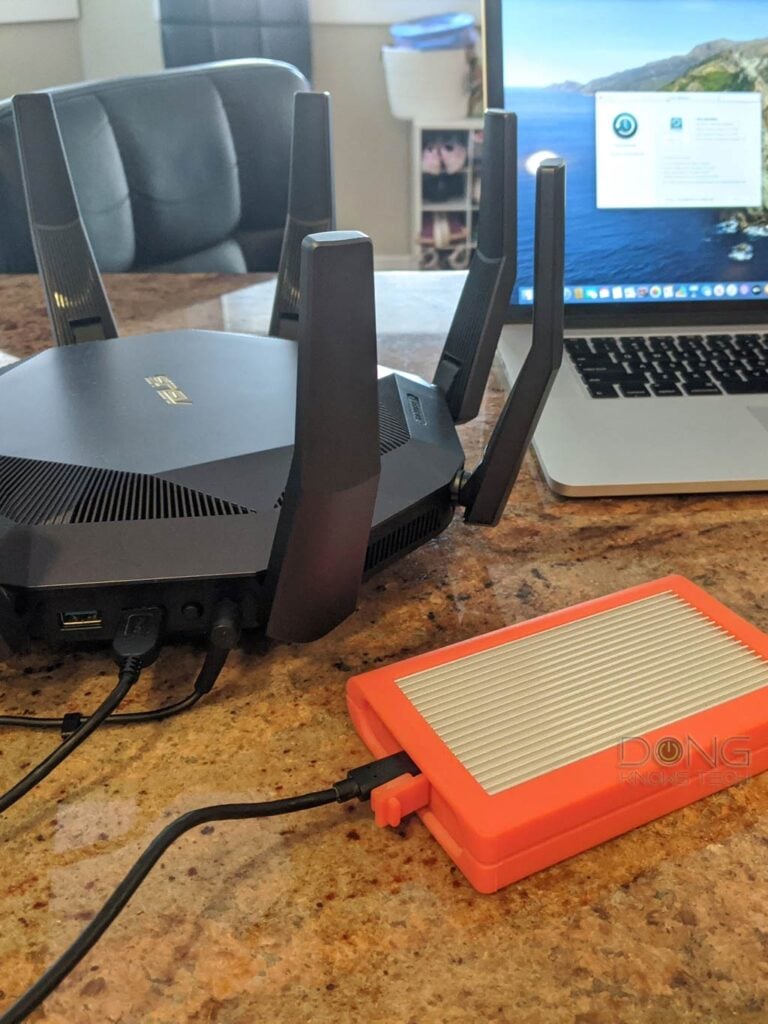
Which routers support Time Machine backup
To work well as a Time Capsule alternative, a router needs to meet a few criteria.
- It has to have a peripheral port—mostly a USB port—for storage hosting.
- It has to support Time Machine—a matter of luck.
On top of that, ideally, the router should have updated hardware specs. Get a high-end Wi-Fi 5 router or a new Wi-Fi 6 one.
Generally, from my experience, most routers (that have a USB port) from Asus and TP-Link support Time Machine. Some from Linksys and Netgear do, too, though you might have to do some tweaking. Among these, Asus routers’ support is the most comprehensive.
(Note: Linksys doesn’t officially support Time Machine, but you might be able to make it work by using a drive formatted using the HFS+ file system.)
Many from other vendors do, too. But not all routers with a USB port can handle this. To make sure, though, check with the manufacturer on a specific model.
Tame your expectations
Note that we’re talking about using a router and not an actual storage server.
Consequently, it’s essential to understand the degree and the nuance. Just because a router can work as a Time Capsule, doesn’t mean it satisfies this role to the highest demands.
Generally, you should only use a router to handle the backups of a single Mac at a time. Since Time Machine doesn’t have meaningful scheduling, you shouldn’t use this solution if you have more than one Mac—get a real server instead.
Why do you want a Time Capsule?
Time Machine works when you plug a drive directly into your Mac’s USB (or Thunderbolt) port. However, that can be cumbersome for laptop users, plus the drive can host the backup of just one computer.
Using a Time Capsule, you can back up the Mac via your local network without having anything attached to it. Also, you can use a single storage device as the backup destination for multiple Macs.
Steps to turn a router into a Time Capsule alternative
There are three general steps to get your third-party Time Capsule up and running.
1. Prepare the external drive.
Make sure you use a drive that has a decent amount of storage space. Generally, you want to use one with a higher capacity than the data stored on your Mac computer(s). The larger the storage device, the longer you can go back in time to restore information when needed.
Check to make sure the device uses a file system that the router supports. Most routers support popular file systems, including NTFS (Windows) and HFS+ (macOS). If it’s a new drive, you should format it.
On an Asus router, you can use the router’s web interface to perform the format. With most other routers, it’s a good idea to format the drive before you connect it to the router.
Things to keep in mind when formatting a drive for Time Machine
- Just because you want to use the drive for Time Machine doesn’t mean you need to use the HFS+ file system necessarily. Even though Time Machine requires a Mac-specific file system, that only applies to the case when you plug a drive directly into a Mac’s USB port. But since you’re a Mac user, it doesn’t hurt if you use HFS+.
- Certain Netgear routers might support the existing Time Machine drive. In that case, you can unplug it from your Mac and use it with your router.
- Asus routers can be flexible and will work with a drive that already has data on it. Some routers, like those for Linksys, tend to require a freshly reformatted drive for its NAS feature to work.
- You can format the storage device into multiple partitions (logical drives) and use one for Time Machine. It’s an excellent way to keep Time Machine’s storage under control. That’s not necessary with an Asus router since you can enforce a storage limit using the router’s web interface.
Once the drive is ready, plug it into the router’s USB port.
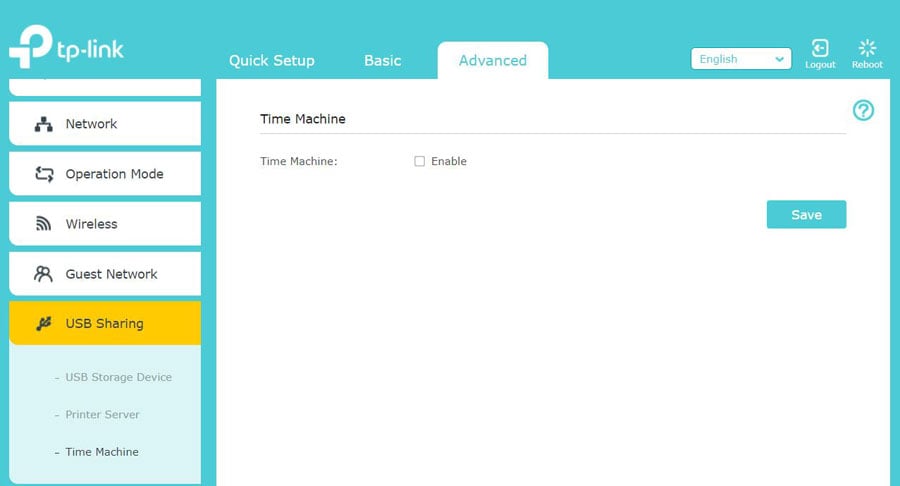
2. Turning on Time Machine backup on the router
This step varies from one router to another and generally requires you to log into the web interface.
On a Linksys router, for example, there’s nothing to do. You only need to turn on the router’s network-attached storage feature. That’s also the case with a supported Netgear router.
On a TP-Link router, you have to check the box that says, “Time Machine: Enable.”
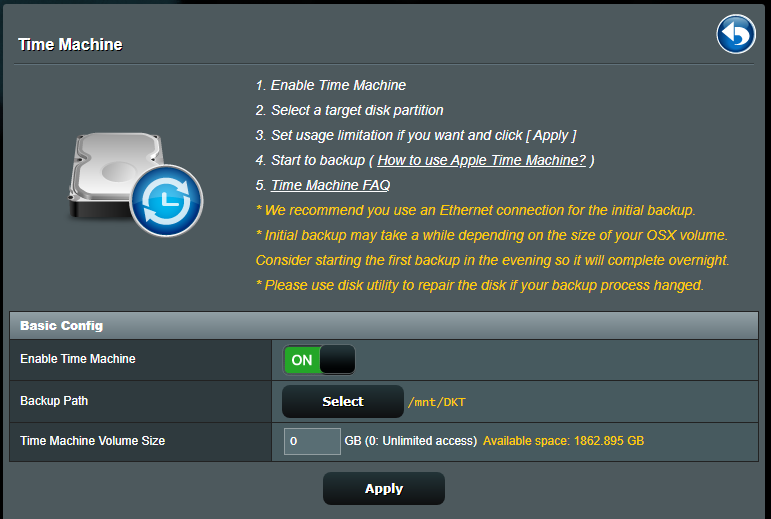
Asus router has a whole section for Time Machine that you can configure.
Step to configure Time Machine backup on an Asus router
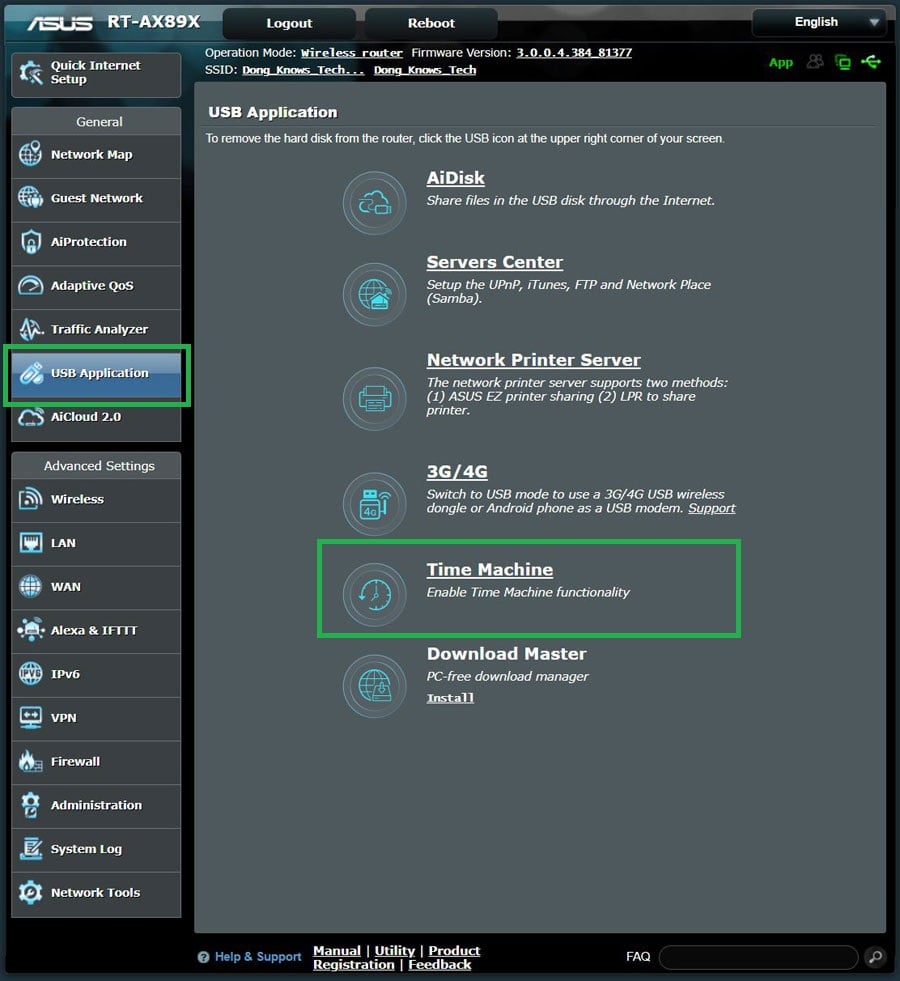
1. Open up the router’s web interface. You’ll find the USB Application on the menu. Click on it and then on Time Machine to open up the section.
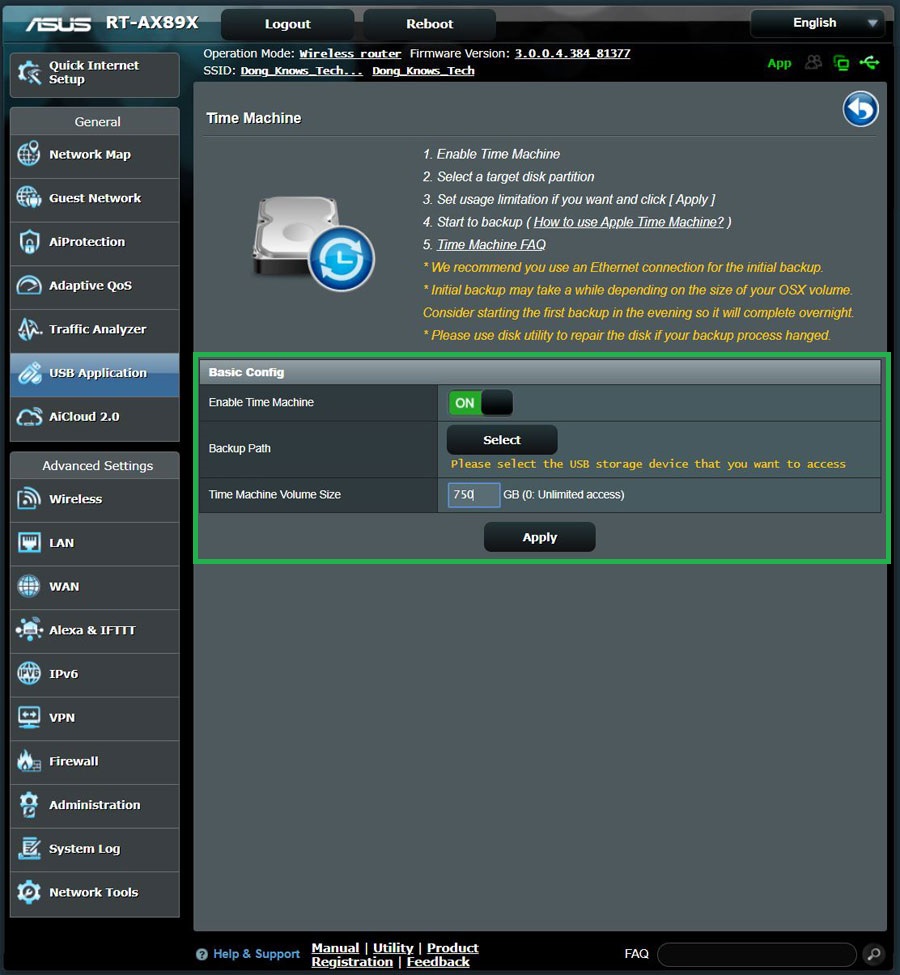
2. Turn the slide to On for the Enable Time Machine setting. After that, you need to configure two options:
Select the Backup Path: Click on it and pick the partition you want to use. You need to do this even if there is just one partition. If you have formatted the storage device into multiple logical drives—as mentioned above—pick the one you want to use for Time Machine.
Time Machine Volume Size: Enter the size (in Gigabyte) that you want to limit for Time Machine. Leave it as 0 if you want Time Machine to use the entire drive’s capacity.
3. Click on Apply. The router will restart. After that, it will function as a Time Capsule.
3. Connecting your Mac to the third-party Time Capsule
Once you have prepped the router to work as a Time Capsule, it’s time to make your Mac use it.
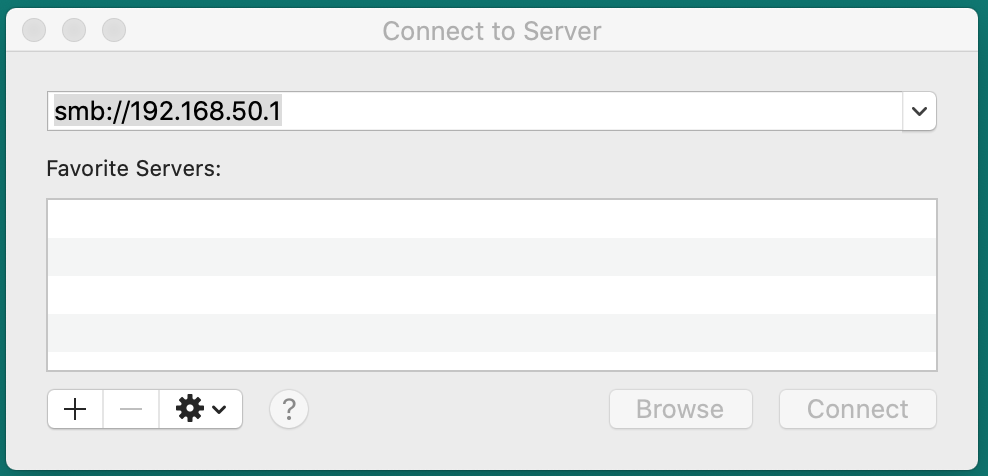
You’ll first need to connect your Mac to the router the way you do any network server for most routers. To do that, use the combo Command + K, then type in:
smb://RouterName
Then click on Connect.
RouterName tends to be the router’s model number. If you don’t know what it is, you can use the router’s IP address. The same address you use to access the router’s web interface, as mentioned above. You’ll need to enter the credentials and use those that allow access to the router’s interface.
If you use an Asus router, it’s quite simple. As soon as you connect your Mac to your local network hosted by the router via a network cable or Wi-Fi, the router’s Time Capsule function is ready.
Steps to using an Asus-based Time Capsule on a Mac
1. Run Time Machine.
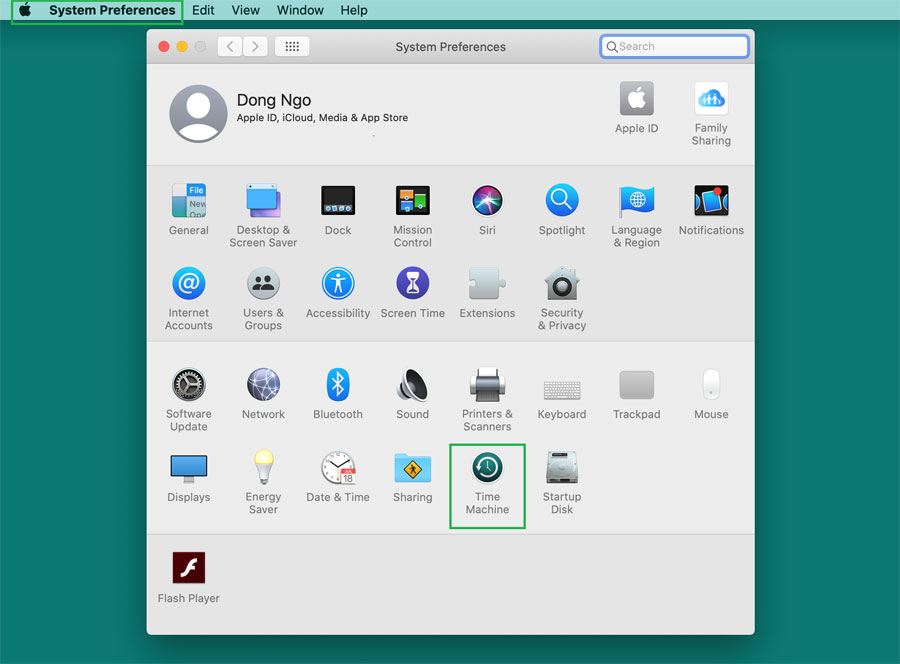
To start Time Machine, click on the Apple icon (at the top left corner), pick System Preferences.., then click on Time Machine.
2. Browse for the available backup destinations.
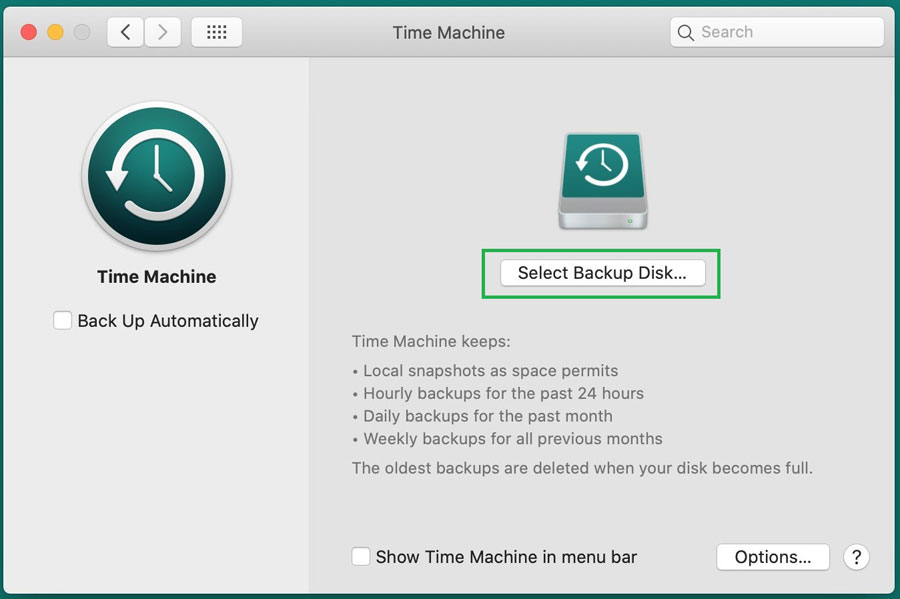
On the Time Machine window, click on Select Disk.
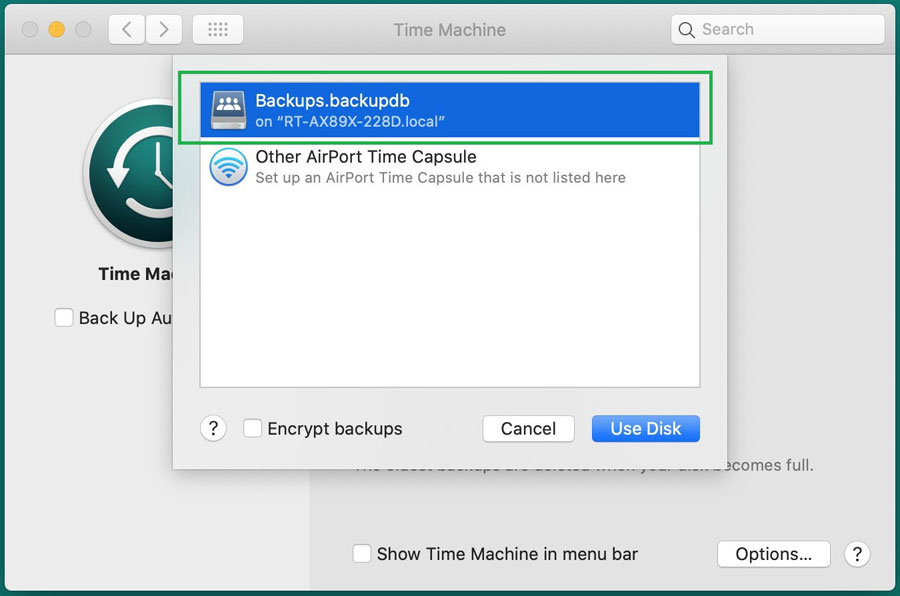
Under Available Disks, you’ll note the new Time Machine backup destination. By default, it has a name prefixed by the router’s model number. Select it and then click on Use Disk.
3. Enter the authentication
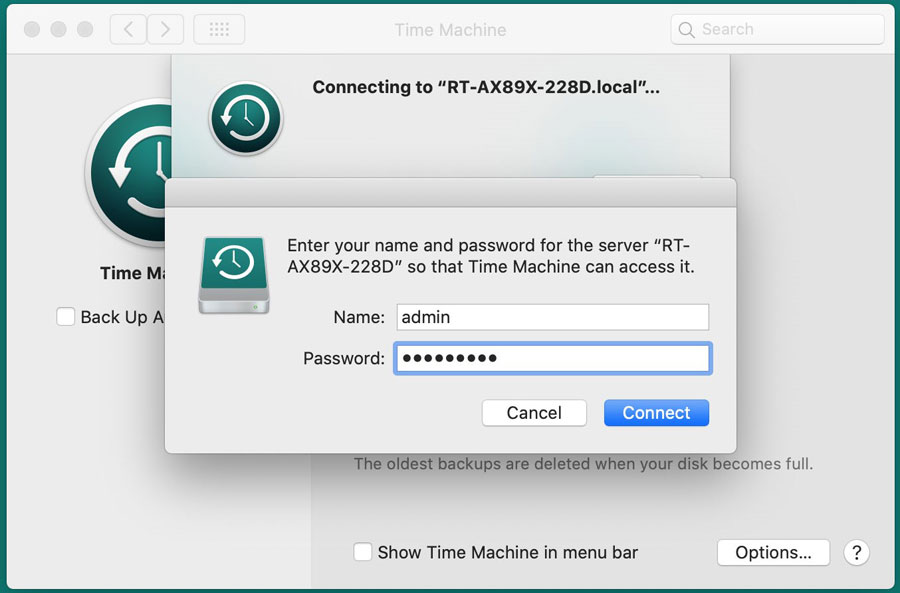
By default, the system will ask you to enter the credential to access the router’s resources. Enter the same username and password you used to access the router’s web interface. Then click on Connect.
And that’s it. Your new Time Capsule system is now ready and running.
Notes on using third-party Time Capsule
Just because your new Time Capsule system is running doesn’t mean it works well. A couple of things to keep in mind.
A third-party Time Capsule setup doesn’t have the support from Apple. Also, the router’s vendor can’t guarantee that it works well, either, since they don’t have full control of the Time Machine function on your Mac.
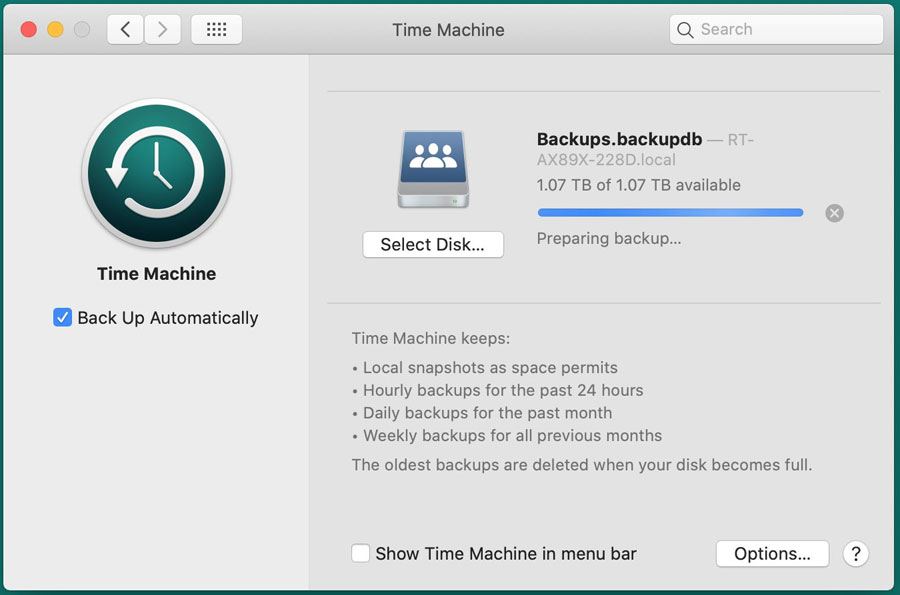
That said, it’s a good idea to do a test restore once in a while. You can choose to recover just one or two files to a new location to make sure the backups work.
By the way, unless you use Wi-Fi 6, you should make the first backup using a wired connection. If that’s not possible, pick a time when you don’t use the computer—like before going to bed—to ensure you have the first successful backup via Wi-Fi.
Finally, if you want to know which router makes the best Time Capsule alternatives, check out this regularly updated post on the best Wi-Fi routers that can also work as a mini NAS server.


Worthless and unreliable…
Asus should just remove it from their interface…
Sometimes works sometimes does not.
Eventually it will corrupt the drive needing to reformat it…
Wasted time and money on this…
It’s always the nuance, Bruce, as mentioned.
Hello Dong! This is an older thread but happy I found it while searching to see if I could do a Time Machine backup via my Asus router. Looks like I came to the right place for that info! I have a 24″ iMac M1 connected by ethernet to my AX-86U which is running the latest Asuswrt-Merlin firmware. My backup disk connected to the Asus USB port is a Samsung T7 SSD. Well, so far, so good! The only hiccup was realizing that I had to disable pass word security on the T7 before it would show up as a selectable backup disk. But after that, the first 650GB backup went flawlessly and the hourly auto backups have been fine for the past two days. My intent was to stop using and sell my 2TB Apple Time Capsule, but before I do that, the comments here have convinced me to wait a few weeks and make sure this backup continues to work. I’m a little dismayed by reports that all goes well for a while and then the error messages start. Arrgghhh. I guess we’ll see! I don’t know why Apple hasn’t rolled out Time Machine backups to the cloud–THAT would be ideal.
As of May 2020 Netgear dropped support for Time Machine in their routers, still have it in ReadyNAS devices.
Interesting. That probably had more to do with Apple than Netgear. Thanks for the input, Fred.
Actually both Apple and Netgear. Netgear not publishing the fact that for their routers they are not licensing it from Apple but instead calling it a security risk. Funny that Apple calls SMB a security risk.
Hi Dong,
My other Mac gets kicked out when I log into my Asus time machine via Finder using the same username/password. It seems that it only allows for one user session for the Asus USB 3.0 mounted Time Machine disk.
I have the RT-AC68W. Do you know if it’s just a limitation with my router model, or is that across the board with all Asus routers?
Thanks,
Richard
I think you need to create a different user account on the router, Richard.
Dong,
I have an ASUS RT-AX86U and have followed your instructions, however the drive I am attaching is already partitioned in half where both halves are functioning as Time Machines for two MacBooks in the house. How do I set that up?
Thanks in advance!
You can’t. You need to reformat it or get a new drive. Your router is not a Mac. Read the post again.
Hi. I have an ASUS RT-AX58U. I would like to setup TimeMachine using a RAID 1 mirrored set of two 4TB drives. The drives are in a dual bay HDD dock and connected to the router through a Belkin USB 3.0 hub. The router recognizes the drive (and 2 others also connected) but the RAID set is showing as having only 0.125GB available. The RAID set is brand new without any data. Do you have any insight into this complicated setup?
A couple of things, Chris.
1. Read this post in its entirety (don’t skimp it.)
2. Make sure your RAID (it must be a hardware RAID) is set up property (using a computer) and formated into a SINGLE volume using NTFS file system.
3. Connect the RAID drive DIRECTLY to the router and remove EVERYTHING ELSE. It should be the ONLY thing you connect to the router’s USB port. Remember, it’s a router (and a pretty low-powered one) you’re using. It’s NOT a computer.
That will do it.
Hello Dong,
Nice useful post (and site!). I’m hoping to attach an external drive to an ASUS router (maybe an AX86U) and use Time Machine to back up two different MacBook Pros wirelessly in my household. However, I’m discouraged by comments on message boards stating that even when one gets this to work, it doesn’t work for long (a few weeks) because eventually Time Machine “trims the sparsebundle” and then problems ensue. I have already tried the above with a Netgear r7800 and that is exactly what happened — it backed up well for a few weeks, and then started failing with error messages mentioning sparsebundles. And it sounds like I’m not alone. Have you not experienced this?
Thank you,
Joe
I haven’t, Joe, but that’s not surprising considering Apple is a very controlling company. You can get a synology NAS server, TM backup works MUCH better there.
Update on the above. Your site is a national treasure. Not writing for help here, because I’ve GIVEN UP. Time Machine simply doesn’t work via a router with a USB-connected drive… for long. I’ve had the same experience with two different router/drive combos now: a Netgear Nighthawk X4S R7800 (AC2600) with a LaCie HDD last year, and now an Asus RT-AX86U with a WD MyPassport SSD (2020) – the latter combo being based on your excellent recommendations (I’m very happy with both devices individually).
In both cases, the first few backups do indeed work fine; then soon I get this: “Time Machine completed a verification of your backups on [drive]. To improve reliability, Time Machine must create a new backup for you.” As you know, doing so wipes out your entire backup history and requires a prolonged initial backup – which will just be needed again a few days hence.
In short, my experience tallies with that of Ray Haverfield’s comment here in March. I get that I could use actual NAS, maybe with Synology hardware, or Carbon Copy Cloner – but the world should stop pretending that TM via router-to-USB device is a thing. Thank you!
You have Apple to blame, Joe. No one knows what happens after a MacOS update.
Per Carbon Copy Cloner’s article “Choosing a Backup Drive” […] “Disk image files can eventually become corrupted if frequent network connectivity loss occurs while they are mounted, or when free space on the underlying NAS volume becomes constrained. If you’ve seen a recommendation from Time Machine to delete and recreate the backup on a network volume, that’s the same underlying issue.” The strategy of backing up to a network volume may be inherently glitchy, and Apple’s walled-garden approach only a secondary issue.
That’s simply untrue, Joe (and for that, I removed the link). If anything that’s the downside of using TM. To be honest, if you use Apple, things are never 100% right when you put a non-Apple device in the mix. But that’s why I don’t use Apple exclusively. 🙂
Hello Dong, I hope you can help. Just got a TP-Link Archer AX6000 router. First, can this router “see” what’s already on the Seagate drive I already had my Time Machine backup with my Apple Airport Extreme or is it one of those routers that doesn’t? Just to clarify, can the Asus router above continue the existing backup for my 2 laptops, or would it create a new backup file, but can still see and access all other existing files on the drive? I am basically trying to find a router that works as close to the Apple Airport Extreme as possible. Thanks for your help.
Generally, you want to use a clean drive, Tudor. As for viewing the existing content, that depends on many things, so there’s not a simple answer to your question.
I am looking for suggestions for how to set up TimeMachine. I don’t want to lose the data already stored on my existing TimeMachine backups.
Here’s where I am at right now:
I have an old 2-TB Time Capsule to which I recently added an external LaCie drive. I added the LaCie about three months ago
I just set up an Asus RT-AX92U to replace my 2-TB Time Capsule router.
What I would like to know is IF, and if so how, I can connect the Time Capsule and/or the LaCie drive(s) to the new ASUS without losing the archives already stored on them.
One issue is that the Time Capsule only has one USB port, and that was where the LaCie was connected. And there is only one USB port I can see on the LaCie. I don’t see how to connect both the LaCie and the TimeCapsule to the new ASUS wifi router. (Maybe with a LAN connection to the TimeCapsule?)
Chances are you won’t be able to keep your existing Time Machine backups, Rebecca. And you don’t need to. But if you really want to, just leave the Time Capsule and the Lacie drive alone and get a new portable drive for the Asus router.
Clif again, this was a BIG reason for going with the Asus router to replace my Apple Airport Extremes. Once I address the other issues I’ll look to set this up. Some what assuming the USB drive would need to be connected to the main router and not to a satellite router? Even one that was backhauled?
Generally, you can’t use the node’s USB port, Clif. If you use the ZenWiFi, that might work but prolly still not ideal.
I was facing the issue and could not enable Time Machine on my Asus AX88U and using my Macbook Pro 2019 running Latest Catalina 10.14.4
Setup SMB on your router
Setup Time Machine and select the drive (the drive can be in any format that Asus router reads)
On the Mac Setup a AFP connect to the SNB (afp://192.168.50.1 in the connect window). I also set it up to auto login at reboot.
On the Mac goto the Time Machine and try to connect, you should see the AFP drive to backup.
The below link also helped, just replace smb with afp in the link
https://dongknows.com/how-to-turn-your-wi-fi-router-into-a-time-capsule/
I did some extensive testing of Time Machine with Asus RT3200AC and then RT-AC88U. The backup worked perfectly for about 8 weeks then would corrupt itself. Attempting to recover proved useless and it was necessary to wipe the backup and start over. After one year of testing I gave up. The problem was consistent.
Now it is not uncommon for Time Machine to have issues even on a Time Capsule. That seemed to go about a year between corruption of the Sparsebundle backup. YMMV. I see different numbers in different reports.. but don’t consider a week or two of testing definitive.
The alternatives that work well.
1. Synology NAS or Synology Router, which several of us (group on Apple Discussions) have tested with excellent results. The router firmware got lots of goodies from NAS firmware. I have tested this on the older RT1900AC as well as RT2600AC. You might even pick up the older one second hand and use it bridged purely for network Time Machine.
2. Use alternative like Carbon Copy Cloner. Although Time Machine is popular since it is built in and well integrated, a cloner does a more reliable job of backup. Using a local disk is better as the clone can then work as full boot drive, which is the easiest way imaginable to test a backup, but network backup work for laptops. There are lots of reports of issues with Time Machine in later Mac OS.
3. Time Capsule combined with using Time Machine still works best if you are upgrading Mac since it shows up immediately in recovery. Other backups remain hidden and you need to dig them out.
For the DIYer a Gen3 A1355 or Gen4 A109 can still work ok plugged into the main router.. bridged and wireless off used for nothing more than Time Machine. Apple built the earlier model with a Marvell processor commonly used in low end NAS. The optimisation shows it faster and better than the last AC version. Better built and tougher too. I would replace the hard disk which is now old and power supply with modified external.
Remember these things only support AFP and SMB1 protocol and will fade away eventually.
Thanks for the input, Ray! Very helpful!