If you have never heard of network-attached storage (NAS), this post is for you. Even if you already know about NAS, you’ll probably learn a thing or two. It’ll explain, in simple terms, the general NAS concept and its significance in data redundancy and safekeeping.
For those who want to dabble in this world of network-based storage, there’s also a basic guide on accessing your server from a Windows or Mac computer. From there, you can slowly move up to the myriads of other sophisticated applications afforded by a good NAS server.
Dong’s note: I first published this post on November 30, 2022, and last updated it on April 8, 2025, with the latest relevant information.
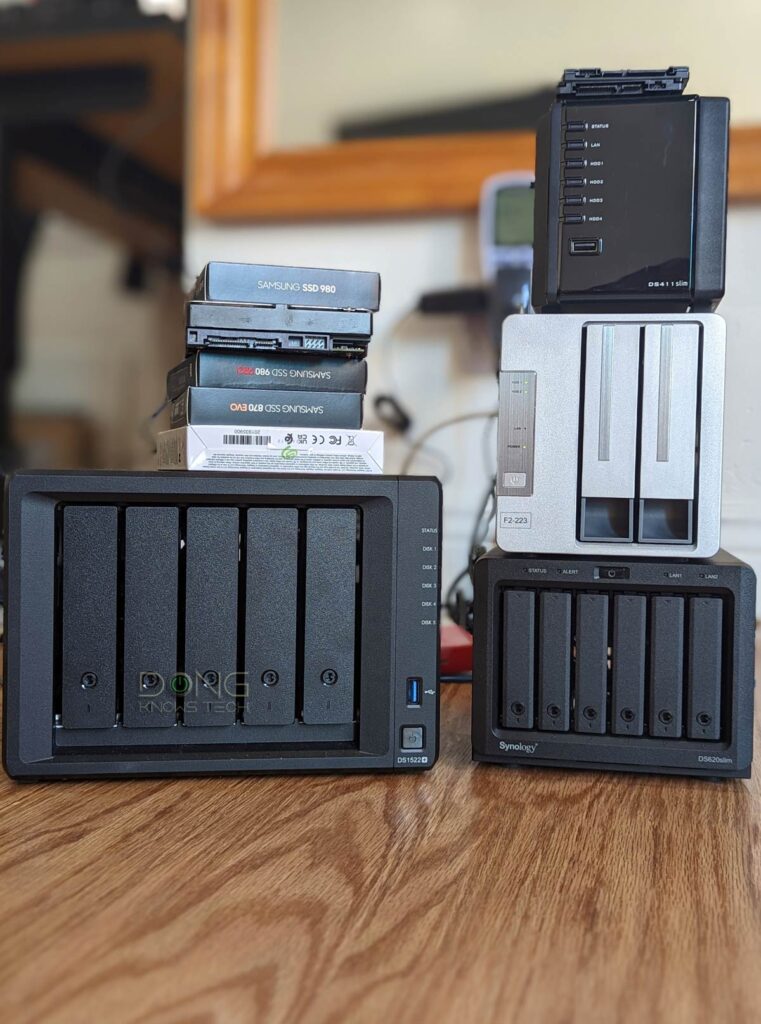
What’s a NAS device/server?
As you might have noted, NAS is not a name—it would be a terrible one—but an acronym for network-attached storage.
The concept of network-attached storage started in the 80s and, for home users, became viable around 2009.
Over the years, the NAS world has experienced many ups and downs, and its technology has greatly improved. Once crowded, the NAS space now includes only a handful of known participants, including Synology, QNAP, and TerraMaster. In mid-2024, UGREEN also emerged as a potential NAS contender.
In many ways, a NAS server is similar to an external storage drive. The most significant difference is that a NAS device connects to a network via its network port.
And that makes a world of difference. Let’s find out more.
NAS server vs. external drive: It’s NAS vs. DAS
An external drive connects directly to a computer, likely via a USB or Thunderbolt port—it’s a direct-attached storage (DAS) device.
For this reason, a DAS device works only with one host at a time, like those on this list of top portable drives. It generally just adds additional raw storage space and not much else—it doesn’t work by itself.
You can attach an external drive to certain routers via a USB port and make the information it stores available to the rest of the network. But that’s just a way to turn your router into a pseudo-NAS server.
A DAS device is generally plug-and-play. When you plug it in, it works like an internal drive permanently attached to the host.
On the other hand, you connect a NAS server’s network port to your router or switch via a network cable—you don’t connect a server directly to a computer.
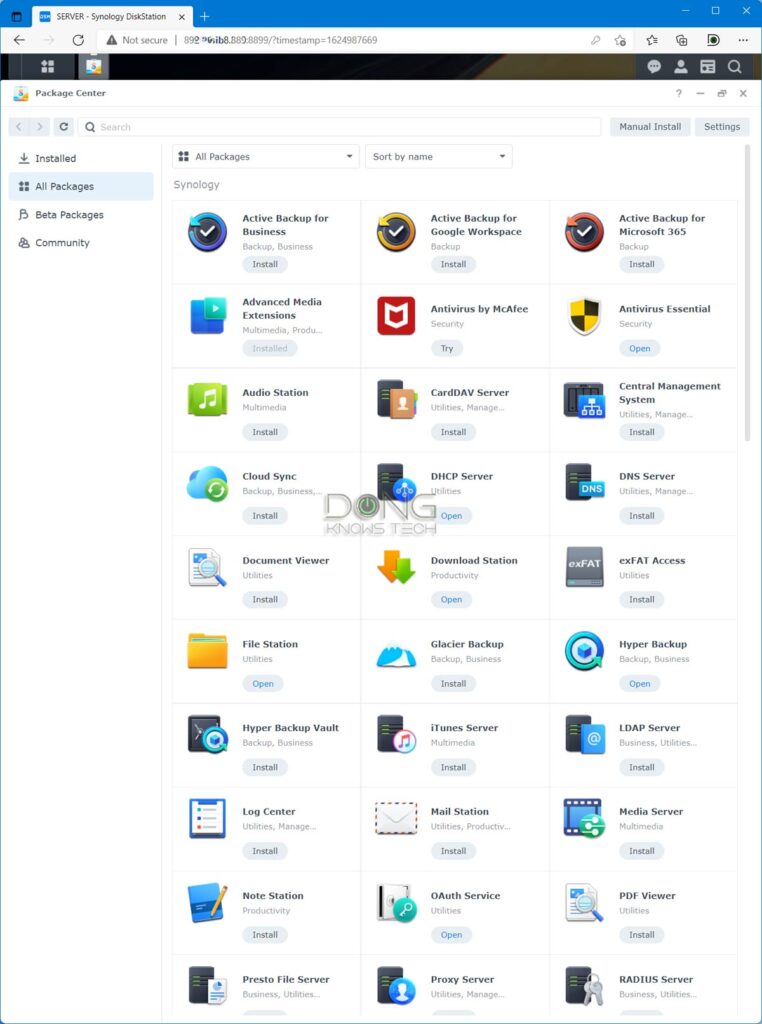
A NAS server can run multiple applications—often called “packages”—simultaneously. Like a desktop computer application, each package adds a function or service to the server.
Like all servers, a NAS server is available to the entire network—multiple devices can access the NAS device at a time. It can function just by itself, making storage and services available 24/7.
NAS server vs. traditional server
A NAS server is, in fact, a server—most NAS devices run on the Linux open-source operating system.
While a traditional server, such as a domain controller running Windows or Linux, requires a mouse, keyboard, and monitor—just like a computer—a NAS server doesn’t.
You control a NAS server via its web user interface, similar to how you manage most home Wi-Fi routers or switches.
Like most servers, a NAS server can provide multiple simultaneous services, such as serving content to streamers, hosting personal cloud storage or a backup destination, working as a mail server, running virtual machines, managing IP cameras, and much more—all at the same time. The possibilities are endless.
Take “endless” with a grain of salt. Different applications require different amounts of resources, and a server, NAS or not, can do only so much at a given time.
But generally, a NAS server handles your data for two primary purposes: keeping it safe and making it available for you to use. There are many applications and nuances between these two.
Let’s start with keeping your data safe.
Network storage: Keeping your data safe
A NAS server can house multiple internal drives. And when there are two or more, you have the option for redundancy.
Redundancy
In data storage, redundancy is the use of additional storage units that are not strictly necessary to provide storage space but to prepare in case one of them fails unexpectedly.
In such cases, redundancy allows the system—the server—to keep operating as usual. You can continue to use the data and storage space on the storage unit(s) while replacing the failed one.
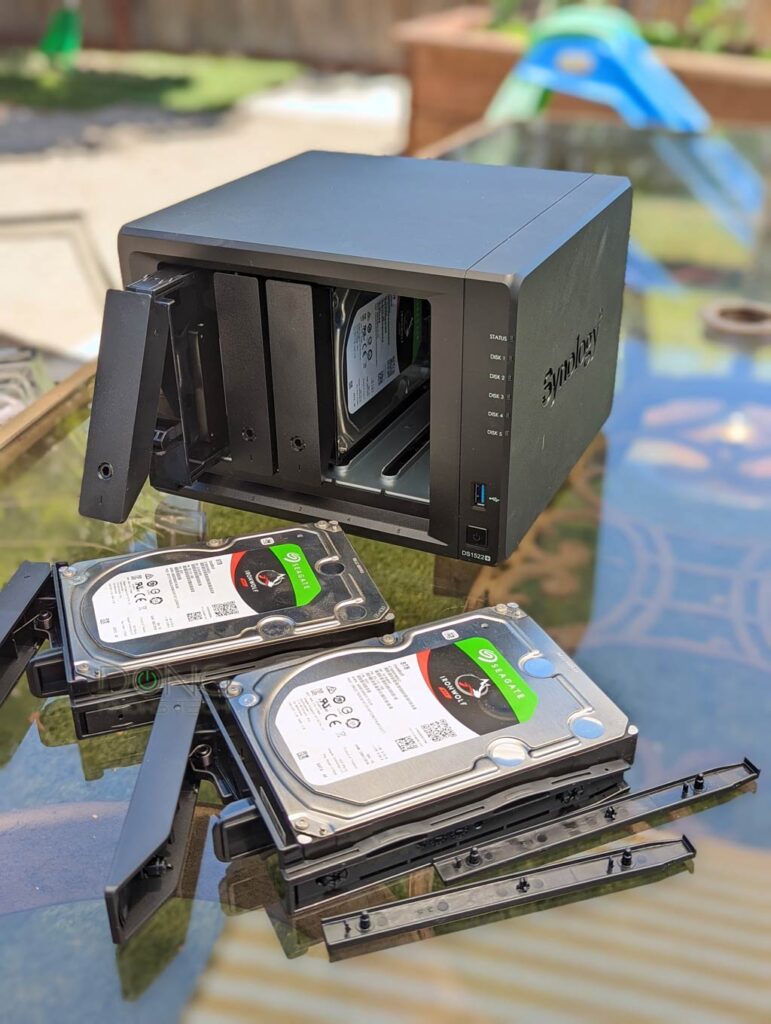
The most common and fundamental method is using multiple storage units called drives—hard drives (a.k.a. hard discs/disks) or solid-state drives—to create a single storage pool (or volume). Drives are the base of any redundancy system.
And that brings us to RAID.
JBOD
Redundancy is recommended but not required in NAS servers—or any type of server, for that matter. You can use the drives in the standard non-RAID architecture called Just a Bunch of Disks (JBOD).
In this case, each storage unit delivers its full storage space, but there’s no performance benefit. When a disk dies, you lose data on it and might have to take the server down to replace it and restore its data from backups, if applicable.
Standard RAID setups
RAID is an acronym for “redundant array of independent disks.” As the name suggests, RAID enables you to lump individual disks into a single storage entity.
Different RAID types deliver different levels of performance and resiliency—the tolerance against drive failures—depending on how much storage space you’re willing to sacrifice. However, all redundancy-enabled RAID allows the host system (such as a NAS server) to keep running when a drive fails and the drive to be replaced without losing any data.
Depending on the number of drives in use, the following popular standard RAID setups are available—there are other RAID types, but most home or SMB users don’t use them.
Also, if your server has many drive bays, you can use more than one RAID type within it—via multiple storage pools. For example, a 5-bay server can handle RAID 1 and RAID 5 storage volumes.
Generally, we use drives of the same capacities in standard RAID setups.
RAID 0
RAID 0 is the only non-redundant RAID.
Also known as disk-striping, RAID 0 combines two (or more) disks into a single volume (or storage pool).
This volume has the combined storage space of all the involved disks. For example, if you use two 2TB drives in RAID 0, you’ll get a 4TB volume; with three, you’ll get 6TB, etc.
RAID 0 delivers fast performance by writing one copy of data to multiple disks—each disk only needs to hold a portion of the data, therefore reducing the amount of writing each disk has to do.
In return, RAID 0 has no data protection. If one of the drives fails, the RAID is dead—you’ll generally lose data on all disks with no chance of recovering it in full.
RAID 1
Also known as disk mirroring, RAID 1 is the opposite of RAID 0. It combines two, three, or four drives into a single volume with the capacity of just one.
Again, if you use two (or more) 2TB drives in RAID 1, you’ll still get a 2TB capacity. For this reason, your data is intact even if just one of the drives in the RAID survives.
In return, RAID 1’s performance is slow since it has to write a full copy of data to each physical drive. The more drives you use, the slower the performance, but the more resilient the RAID.
RAID 5
This RAID setup requires three or more drives. It uses one of them as redundancy, so it has the capacity of all involved drives minus one.
For example, if you use three 2TB drives, you’ll get 4TB protected storage space; five will return 8TB, and so on.
RAID 5 delivers capacity, redundancy, and performance but favors speed over resiliency.
In RAID 5, the more disks you use, the faster the performance is since the less information the system needs to write to each disk. In a RAID 5 setup, your data is safe when one of the involved drives fails, no matter how many you use. So the more drives, the less resilient the RAID.
RAID 6
This RAID setup is similar to RAID 5 but requires four or more drives and sets two drives for data protection. In RAID 6, your data survives even if two drives fail simultaneously.
If you use four drives, RAID 6 is somewhat like RAID 1 mentioned above or RAID 10 below. For better performance, you should use at least five drives or more.
RAID 10
This standard nested RAID setup combines RAID 1 and RAID 0.
RAID 10 requires four or more drives—an even number—and delivers performance and data protection. It offers 100% data safety against the simultaneous failure of half of the drives involved.
Standard RAID arrays: Requirements and drawbacks
All standard RAID arrays are designed for drives of the same capacity. If you use a mix, the system will treat all drives as the lowest capacity among them.
For example, if you use 1TB, 2TB, and 3TB drives together, they will all be regarded as 1TB drives—you have access to a total of just 3TB of raw storage space, not 6 TB.
In other words, when combining drives of different storage sizes, only the size of the lowest drive is used in all units.
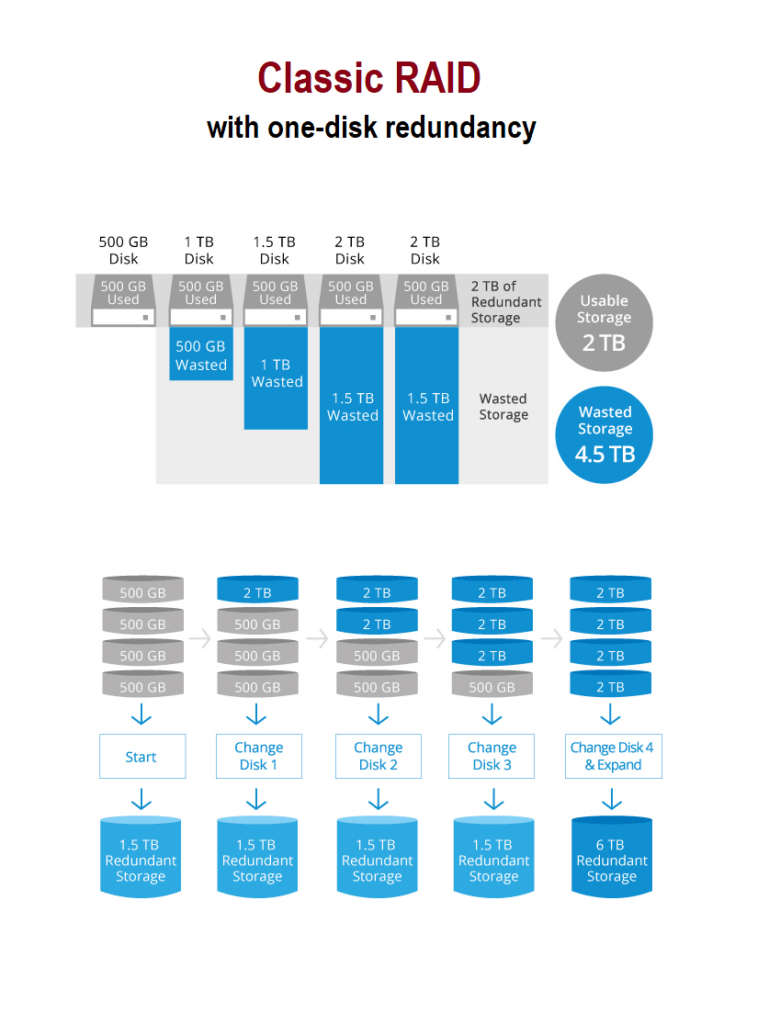
Furthermore, there’s no way to scale up the storage space in a standard RAID. If you want to increase the RAID’s capacity, you’ll have to follow these steps:
- Back up the RAID’s data to another device.
- Rebuild the RAID from scratch with higher-capacity drives.
- Restore the data from the backup.
The process is time-consuming and requires the host device (the NAS server) to be removed from service.
Proprietary flexible RAID
To overcome the shortcomings of standard RAIDs, some NAS makers have proprietary RAIDs designed to streamline the storage management for beginners.
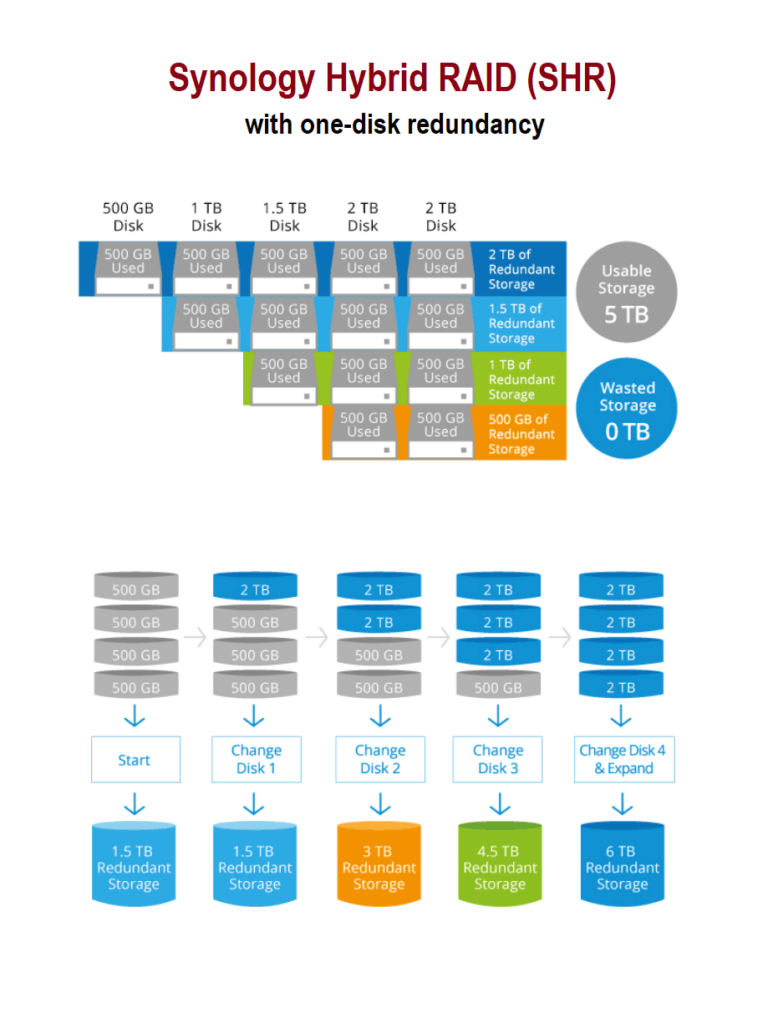
The most popular example of this type of RAID is Synology’s Hybrid RAID (SHR).
First available in March 2010, SHR is an automated RAID management system that allows mixing drives of different capacities without wasting any or very little storage space.
Specifically, when larger drives are mixed with smaller drives, their extra storage spaces are used for the entire RAID’s redundancy—they are not wasted.
Consequently, SHR enables users to scale up a server’s storage space by replacing existing drives with higher-capacity ones without having to rebuild the RAID from scratch.
In November 2021, TerraMaster also announced a flexible RAID called TRAID, which is similar to SHR.
Generally, proprietary RAID systems like SHR or TRAID are slightly slower than equivalent standard RAID systems. Still, their ease of use and simplicity more than compensate for the performance loss.
RAID rebuild
No matter what RAID configuration you use, when a drive in a redundant RAID fails, the RAID is now “degraded.” The host device—a NAS server in this case—will notify you via indicator lights, beeps, or email.
When a RAID is degraded, its redundancy or effectiveness is reduced. You must replace the failed drive for the RAID to restore its function via a “RAID rebuild.”
The rebuild process can take a long time—hours or even days—depending on how much data the RAID stores. You can still use the server during this time, just at (slightly) slower overall performance.
A RAID rebuild can be stressful for the rest of the disks in the array. For this reason, it’s a good idea to reduce the loads on your server during this time.
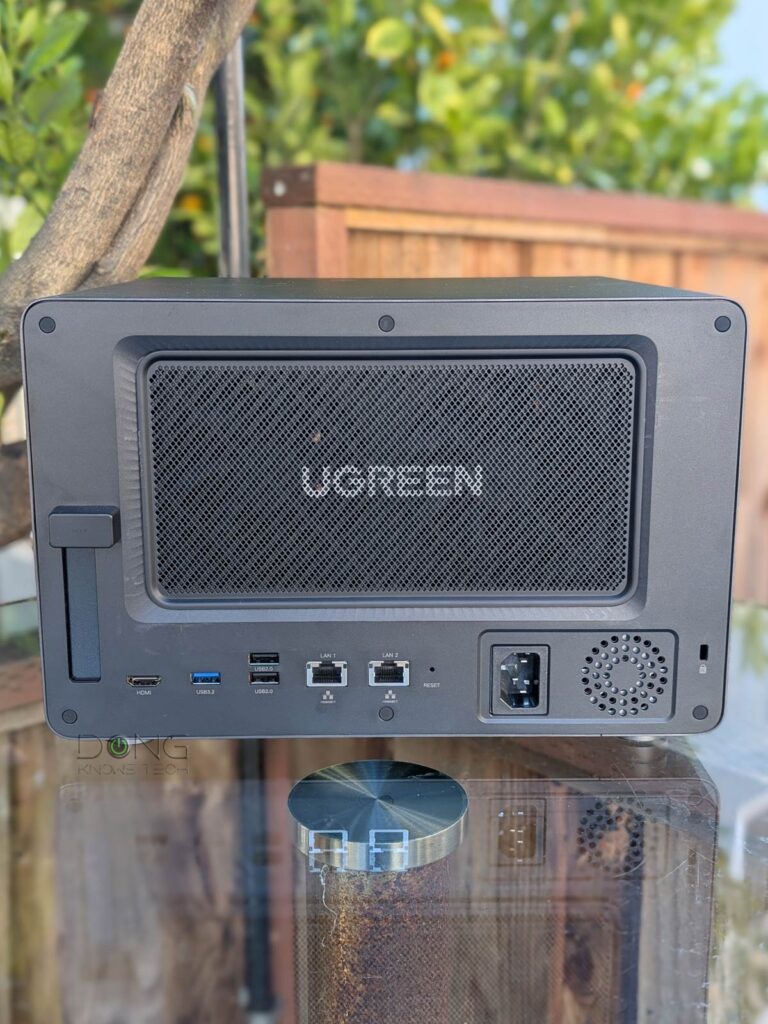
Network storage: How to access the shared folders (via SMB)
At the core of it, a NAS server holds a large amount of protected storage space.
What you do with this storage depends on the applications. As mentioned above, a server can do a lot, such as media streaming, data syncing, and backup.
However, data sharing is the most common application. It’s the base of most other applications.
Specifically, you store data on the server via shared folders and access it on different computers simultaneously. Most servers come with one or a few shared folders by default, such as “Public” or “Home,” and users can create as many as they want.
Data sharing can become sophisticated depending on the network. For example, you might want certain (groups of) users to access particular shared folders. You can also limit the access level, such as full (read and write) or read-only.
At the basic level, the way a network computer accesses a server remains the same. Generally, in a local network, you do that via the popular server message block (SMB) protocol, which can be done via the server’s name or IP address.
SMB is the most popular way to access data in a local network (or remotely via VPN) that uses TCP and IP protocols for transport. It’s also the most versatile. In addition to data sharing with the common file creation, viewing, writing, and deleting, you can use it for media streaming and many other applications.
How to access a NAS server
A server’s name is assigned during the initial setup process. Unless you can change it, it will remain the same.
Like all network devices, a NAS server gets its local IP address from the router. This IP might change each time the server restarts unless you reserve a specific address.
Generally, IP reservation is recommended when using a server. This post on IP addresses explains how to handle that.
For this post, let’s use an example where the NAS server’s name is HomeServer—the server name is generally not case-sensitive—and its IP address is 192.168.88.100.
Let’s find out how you can access this server in a home network.
How to access a NAS server on a Windows computer
On a Windows computer, the standard application for accessing a network-shared folder is the File Explorer app. It also allows you to view the computer’s files and folders.
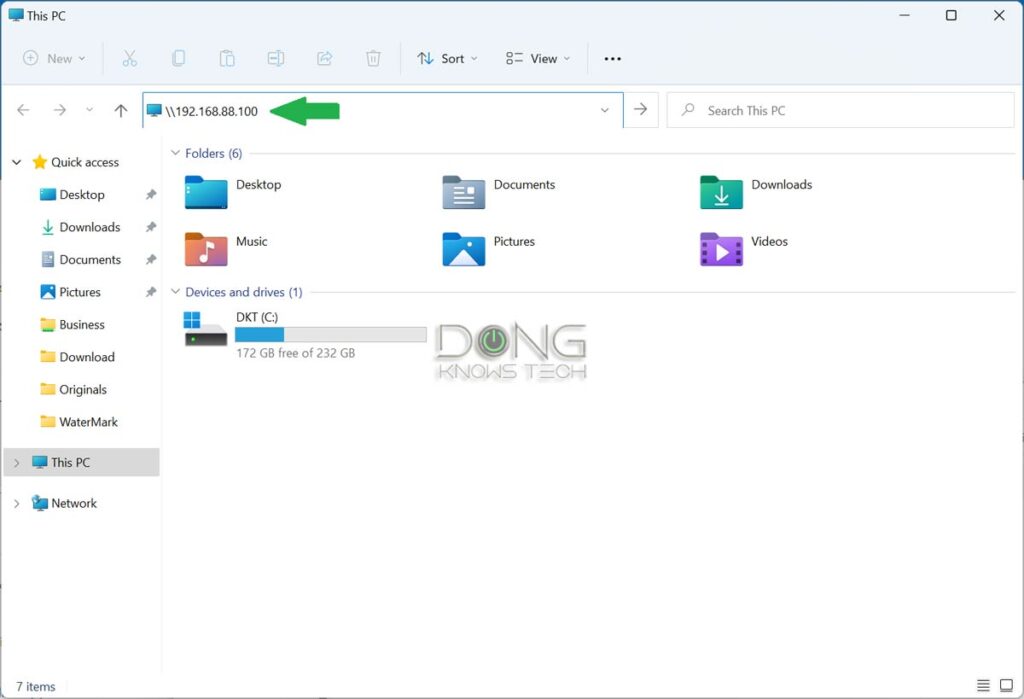
Here are the steps:
1. Launch File Explorer by opening any existing folder. You can also search for it on the Start menu.
2. On File Explorer’s address bar, type in the server’s IP address or name before hitting Enter on the keyboard:
(I used the IP address and server name of our example, so change them to yours.)
\\192.168.88.100Or
\\HomeServerNote double back-slashes (\\) that precede the IP or server name. Also, there’s no space.
3. If prompted, enter the username and password. It’s the same as the username and password of a user account on the server itself. Then, you’ll see a list of the available shared folders.
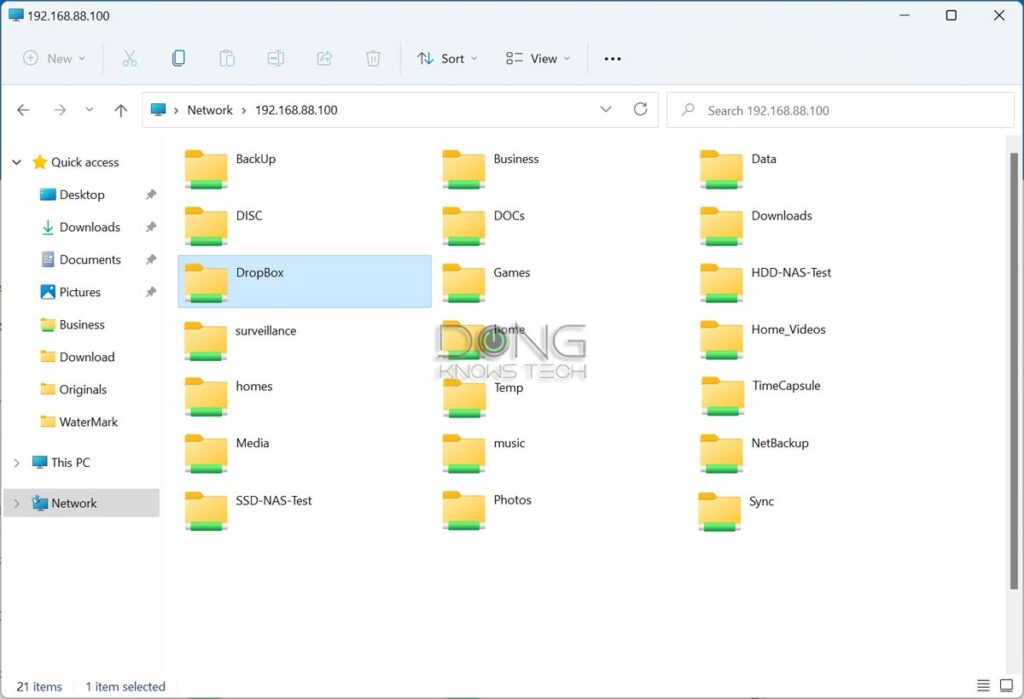
And that’s it. Mission accomplished.
File Explorer will now display the list of available shared folders. You can interact with them like you do on the local computer. Right-clicking on one will give you more options, including creating shortcuts or making a network drive.
Accessing your NAS server on a Mac
On a Mac, things are a bit different but still simple enough.
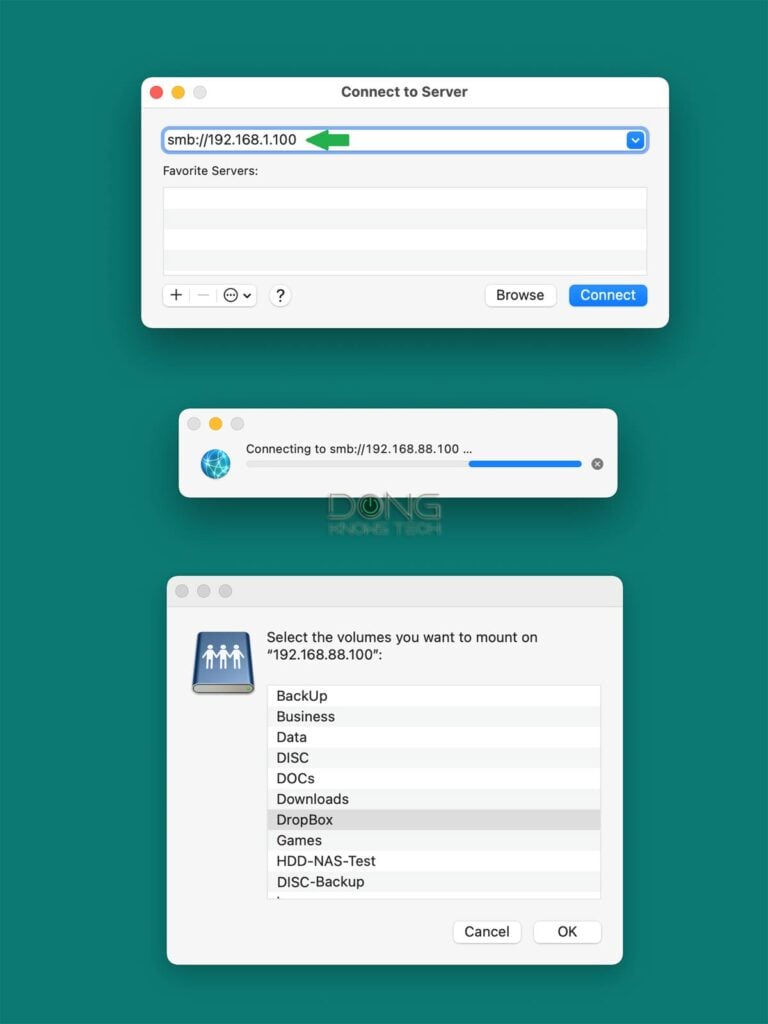
1. Click on an empty spot on the desktop, press Command + K, and the “Connect to Server” window will appear.
2. Under Server address, type in the server’s IP address or name as shown below:
(I used the IP and server name of our example—change them to yours.)
smb://192.168.88.100 Or
smb://HomeServerNote the smb:// prefix—double forward-slashes in this case.
3. Click on Connect and enter the username and password (of the account you’ve created or the router’s admin account) if prompted.
Mission accomplished.
You’ll see the list of available shared folders. Pick one and click OK to create a shortcut on the computer’s desktop. Repeat step #1 if you want to access another shared folder.
Understanding how to create and access a shared folder on a NAS server will help with other applications.
For example, when applicable, you can dedicate a folder as the backup destination for Time Machine. The server will now work as a Time Capsule for backing up multiple Macs in a network.
Backing up from a Windows computer is much easier. You only need to pick a shared folder as the network location for File History.
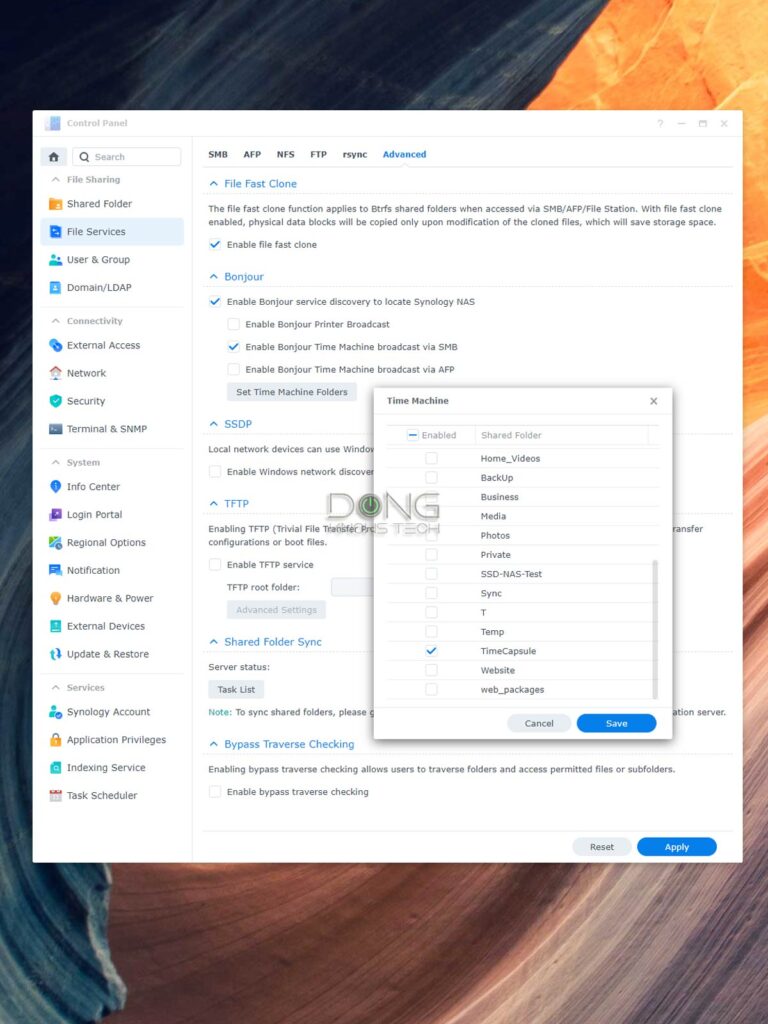
In addition, you can also set up data sync with a specific shared folder to keep files synchronized between the server and multiple computers.
Last but not least, enabling shadow copies of a shared folder is an excellent way to safeguard data against accidental deletion or malicious alteration (such as ransomware).
The possibilities are endless with a NAS server.
The takeaway
While not everyone’s cup of tea, a NAS server means much better data sharing and safekeeping. That’s not to mention many other valuable applications.
The more advanced the server, the better your experience. So try one today. Not ready for a real dedicated NAS server? Maybe try turning your Wi-Fi router into one. That’s an excellent way to start small on network-attached storage.


Hi Dong
I know you don’t have time to give individual advice, but I’m hoping you can point me to a good source.
I have an AX89X router, Zyxel XGS1250-12 switch, 10Gb fiber ONT from my ISP, and DS-923+ NAS.
I’ve looked at lots of posts and tried dozens of “fixes” but I can’t get my NAS to be found with find.synology.com or Synology Assistant. Windows troubleshooter says the computer appears to be configured correctly but the device is not responding. I’ve done resets on the NAS, tried without the switch, etc.
By the way, on the AX89X > Network Map > Clients, the Server shows up 3 times. 1 is named Synology. The other 2 are named using my street address as the name. They all have unique IP addresses. Their MAC addresses are the same for the first 3 pairs and unique for the last 3.
I read in one of your posts that getting set up was tricky, but anyone with technical skills should be able to figure it out. I’ve done quite a few PC builds over the years, but I guess I don’t have the chops for this one.
The Synology FAQs and Knowledge base have not been helpful. There’s lots of information on how to use the server but little to none on setting it up for first use.
Thanks for any help you can offer.
You might be using a special DNS server, Edgar. I’d check on that.
For advanced users, not to be tied down by proprietary hardware, what we call a “software RAID” is what powering our enterprise cloud services today. Recommend to read up on the copy-on-write (C.O.W) file system like OpenZFS. The gold standard in data protection and storage.
I actually stopped using raid back in the 1990s. Why? Because while the disks are the main focal point of failure, there is also another one–the raid controller.
When using a nas unit, this means the nas unit itself. Sure, you can buy another one and then put the drives in, but what if you need the data now? It’s all right there on the drives, but locked behind a proprietary raid format.
This is why I always forgo raid systems and simply make jbod volumes. Then I can copy the data to both (like a normal backup), and because it’s just a jbod drive in a normal linux format, you can pull the drive and boot a linux live cd on a computer after putting the drive in it and access all your data immediately.
Remember folks that a good part of a backup strategy is testing your restore strategy. You don’t want to be testing your restoration procedure when you actually need the data. 😉
Hi Dong:
Are you saying that you save all your data to RAID and JBOD?
Is that done automatically or with periodic backups?
Why would you use both? To access the JBOD disks if the RAID fails?
I thought you were a big fan of RAID. This has me rethinking getting a NAS. Now I don’t really understand.
Thanks.
I always use RAID, Edgar, but you can you JBOB, which has no redundancy. It’s a matter of personal preferences. Give the post a good read.
OK Thanks. I was responding to the wrong post – my bad.
👍
Hi Dong,
I think it is JBOD, not JBOB
Thanks, Georgiy. Next time, you can just highlight the typo and hit the red box that jumps out.
Hi Samir,
“normal linux format” now includes reasonably matured btrfs filesystem, which has raid included, beyond extN filesystems.
My 2013 ReadyNAS based on Debian Jessie uses it. I checked (before having problems, please) NAS drives plugged in my mdadm/btrfs-capable fatdog64 linux MacbookPro were recognised with mdadm –scan and mount /dev/md127 commands.
“testing your restore strategy” Yes, that’s proven free-cost non-proprietary post-crash raid support with the community’s btrfs-tools and helping hand blogs = nice.
I enjoy having
+ ordinary NAS services (redundant home, file/media share, time machine..)
+ app/package services (docker, torrent, plex..)
+ ssh to NAS linux access to its connected local drives : internal bays with btrfs snapshots (protects against user/virus deletion but should not be considered a backup) + external usb drive backup (protects against corruption from failed hardware controller)
+ hot swap after 1 of 4 drive crashed from Raid10, and keep going during rebuild (where your JBOD would fail, IMHO. Linux btrfs still recommend Raid10 over Raid5/6).
With this info, Samir can now have his post-crash resilience results without losing Raid1 redundancy protection and with Raid0 performance multiplier.
Hi Dong:
What would be a good way to put Windows OS on the NAS server and use it for 3 different PCs?
Or is this a bad idea?
You can’t use Windows OS on a NAS server, Edgar. What you can do is use a Windows virtual machine inside a NAS, in which case you have another Windows computer/server in the network which can work as a NAS but not exactly a NAS server.
In short, what you mentioned is not an idea — it doesn’t exist. Microsoft once had its own version of NAS OS, which only worked on particular hardware, but has been out of the home NAS business for a long time. But you can use any Windows computer as a server. It’s just a matter of what you want to serve the rest of the network, how you build/manage it, and how much you want to spend.
Thanks for that. Now that you you reminded me, I think I recall you saying the NAS would run on a Linux based system (not sure but it probably wouldn’t matter).
So I’ll keep my (3) OS’s the same when I get my NAS up and running.
Thanks again. You’re the best.
Sure, Edgar! 🙂