Domain name system (DNS) is the first thing you must use—whether or not you’re aware of that—before you can get “online.” It’s so valuable that many companies want to provide you with this service for free.
So what’s DNS, exactly? This post will answer that question and explain in simple terms the enthusiasm behind DNS hosting, how not all DNS services are created equal, and why you should pick the right one for your network. I’ll also include a list of useful and free DNS servers.
When through, you’ll know how to make the most out of these seemingly random numbers. In more ways than one, it’s an example of how little things can make a huge difference.
As usual, paying attention is the key. While simplified, the information in this post is somewhat advanced and applicable only to those comfortable with the idea of IP addresses and who understand the home networking basics.
Domain Name System: What it is and the real-world role of a DNS server
When one network device connects to another, it needs to know the IP address. That’s the case at the local area network (LAN) and wide area network (WAN), a.k.a the Internet.
You can manually enter the target’s address, such as when you want to quickly access a local NAS server or build a computer’s hosts file. But that’s tedious and prone to mistakes.
Using a DNS server is generally the norm, especially when accessing the outside world. None of us want to remember the actual IP address of a website or a streaming service. It’s hard even to remember their names. So, DNS servers are synonymous with the Internet’s existence.
What are DNS servers?
In a nutshell, a DNS server is similar to a public directory. It points you to where you want to go among millions of online websites, applications, and services.
A DNS server is not to be confused with Dynamic DNS, which works somewhat the opposite way.
Here’s a specific example of the role DNS plays:
Let’s say you want to access this website directly and enter its domain name, DongKnowsTech.com, on your browser, such as Chrome, Firefox, or Edge. The following will happen:
- The browser queries the system’s designated DNS server about the user-provided domain name.
- The DNS server looks up the domain to verify that it exists and is attached to a website. If so, it returns the website’s unique IP address, which is a string of seemingly random numbers.
- The browser follows that IP address to load the page you’re viewing.
This process is necessary because computers only understand numbers, while humans are bad at remembering them. In a way, the domain name is the vanity moniker of a website’s IP address. “DongKnowsTech” is much easier to remember than 73.124.79.110 or any other random string of numbers.
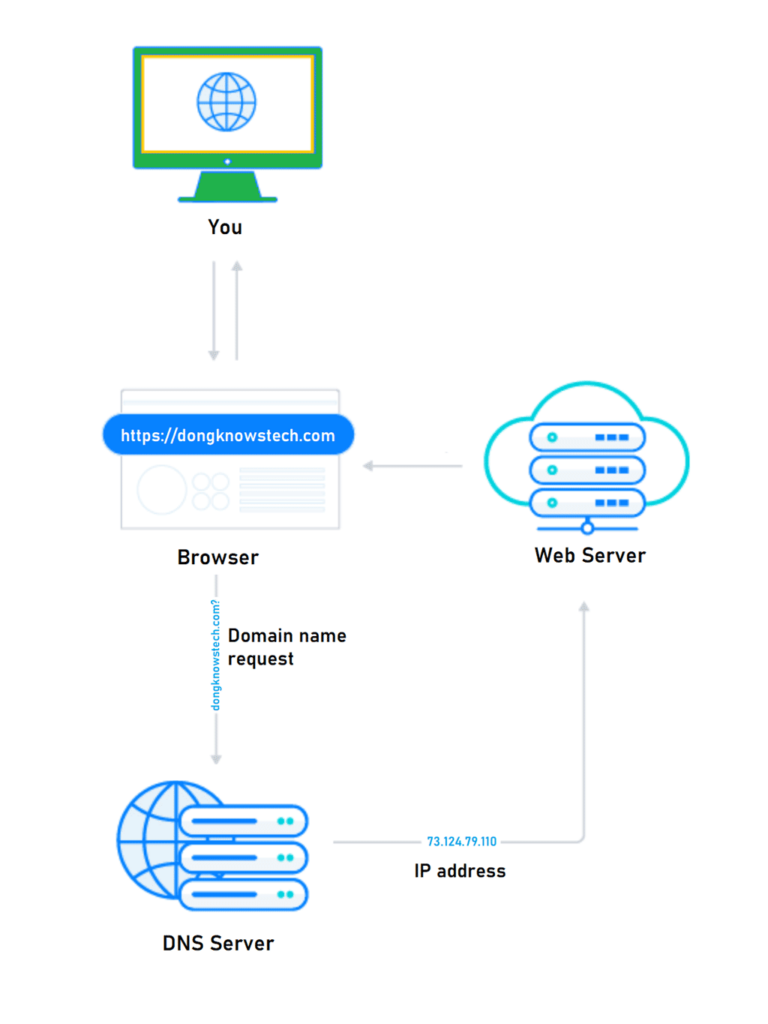
And you’re reading this page on your screen because such a process has worked. A similar procedure occurs whenever you want to reach an online party using any application.
In many ways, a DNS server is similar to the once-commonplace telephone directory service, where you only need to remember a person’s name, not their phone number. It’s the first thing that must happen before a connection can be established.
The faster a DNS server is, the less time you need to wait to reach a domain. Technically, this results in a “faster” Internet experience—there’s less wait time before a webpage starts to materialize on the screen.
In reality, almost all DNS servers deliver the same speed. The look-up time is generally so short that even the slowest DNS server won’t produce a tangible delay considering the often more time-consuming subsequent processes, including the speed and quality of your Internet or Wi-Fi connection.
Still, an even shorter look-up time never hurts, and many companies use the perceived improved speed as a general premise to lure customers into using their DNS servers. That’s because, if true, speedier Internet access would be the least noteworthy thing about DNS.
DNS equals privacy, security, and control
Since you need to reach the DNS server before anywhere else on the Internet, the server’s owner, among other things, has the first say on your online activities and, at the very least, a log of what websites/services you use.
As the online usher, the DNS server makes the ultimate decisions regarding your online experience. Specifically, it can take you to where it wants, block your access to certain sites or services, or, conversely, keep certain content from your local network.
You can use DNS to effectively manage Parental Controls, adblocking, privacy, security, and more. However, using a bad server can also lead you to the wrong places or make you more vulnerable to malicious remote parties.
With all that power, being the DNS service is a well-saught-after privilege, so much so that many companies offer free servers.
Indeed, for ages, Google has been offering the popular DNS servers at the 8.8.8.8 and 8.8.4.4 addresses. In April 2018, Cloudflare joined the game with a new public server claiming to deliver faster speed and better security via an easy-to-remember address at 1.1.1.1. And since then, there have been even more free DNS providers.
And from the users’ perspective, picking a trustworthy DNS provider is extremely important.
DNS and DoH
As you might have heard, DoH is short for DNS over HTTPS—the “s” in HTTPS is for “secure”.
In short, DoH is a protocol for performing DNS resolution via a secure connection. It increases user privacy and security by preventing the possibility that somebody can intercept, eavesdrop on, or even manipulate the DNS request.
Generally, most Wi-Fi 6 and newer routers support DoH, which is just a matter of firmware. You can expect most, if not all, modern consumer routers to support DoH.
OK. What is my DNS server right now?
It’s more a question of who.
Generally, the router is a home’s DNS server of the local area network (LAN). It does the job of binding local IP addresses with friendly device names, such as “Server,” “John-Desktop,” “Van’s iPad,” etc.
As a result, in a home network, the default IP address of your router is also that of your local DNS server. However, the router is also a gateway to the Internet, and on the WAN side, it also holds the IP address of the public DNS server.
By default, if you don’t do anything—such as using a VPN server, tinkering with specific settings of an app, or have already done stuff this post is about to tell you—your WAN DNS servers are those of your Internet service provider (ISP). In this case, there’s no need to worry about them, nor do you need to know their IP addresses.
An ISP’s DNS servers are almost always generic and don’t do anything more than provide the directory service. Additionally, they work most of the time but are not necessarily the most reliable or the fastest.
You only need one DNS server, but to guarantee availability, there is always a secondary option in case the first server is unavailable. In some cases, you can specify more than two.
Changing these Internet DNS servers allows you more control over your Internet access and adds flavors to your broadband connection, including the privacy and security features mentioned above.
Popular and useful DNS servers
The table below includes some popular free DNS server addresses and their features. There are many others, but I’ve tried these for a long time and found them safe and reliable.
Again, a generic DNS server does nothing other than provide directory services. A server with web-filtering capability will prevent certain types of content from entering the party that uses it, be it a network, a particular device, or an app.
| DNS Provider | Server Addresses (primary/secondary) | Notes |
| CleanBrowsing (family filter) | 185.228.168.168 185.228.169.168 | These servers block access to all adult, pornographic, and explicit sites. They also block proxy and VPN domains that are used to bypass the filters. Mixed-content sites (like Reddit) are also blocked. Google, Bing, and YouTube are set to Safe Mode. Malicious and Phishing domains are blocked. |
| CleanBrowsing (adult filter) | 185.228.168.10 185.228.169.11 | These servers block access to all adult, pornographic, and explicit sites. It does not block proxy or VPNs, nor mixed-content sites. Sites like Reddit are allowed. Google and Bing are set to the Safe Mode. Malicious and Phishing domains are blocked. |
| CleanBrowsing (security filter) | 185.228.168.9 185.228.169.9 | Blocks access to phishing, spam, malware, and malicious domains. |
| Cloudflare (no filter) | 1.1.1.1 1.0.0.1 | Reliable generic DNS servers |
| Google (no filter) | 8.8.8.8 8.8.4.4 | Reliable generic DNS servers |
| Quad9 (security filter) | 9.9.9.9 149.112.112.112 | Blocks malicious content, including malware and phishing. |
| Quad9 (privacy filter) | 9.9.9.11 149.112.112.11 | Collects no information about users based on Swiss privacy law. |
A couple of things to note when using a DNS server with filtering options:
- Some websites or services might not work as intended since no blocking mechanism is perfect. There can be false positives or negatives.
- You cannot add a website or service to the allowed list unless you pay for a premium DNS service. In this case, #1 above remains. (Some Parental Control solutions are DNS-based.)
- When you need to troubleshoot connection issues, using a generic DNS server with no filter, or that of the ISP, is recommended.
DNS servers: IPv4 vs. IPv6
All DNS service providers use IPv4 addresses. Some also offer the optional IPv6 addresses. There’s no difference in terms of effect between these two. IPv6 is only for the distant future when some devices might not support IPv4 or prefer IPv6 in their DNS server settings.
IPv4 vs. IPv6: What is an IP address?
And that brings us to how we can manage these servers.
How to change DNS settings to better your Internet
There are two popular levels of DNS server settings that you can change: at the device and at the router. In both cases, we’re talking about the DNS used for Internet access.
The former works well for mobile users since the DNS settings remain the same no matter where the user is—it’s a good option for a laptop. The latter is useful for the entire network hosted by the router—by default, all devices within a network will automatically replicate the router’s DNS settings.
Tip
You should only change the DNS at the device level when Internet access is all you care about, which is the case for home users.
Suppose you have a special local network, such as one with a domain controller. In that case, you should leave the device’s DNS setting at the default so that it automatically uses the settings of the network’s DNS server (the router, in most cases).
Using device-specific DNS settings, which supersede those of the router, might cause certain local services—such as file-sharing or network printing—to stop working.
There’s a third, not usually used, level of DNS settings: some software applications also allow users to pick particular DNS servers for themselves. In this case, the app DNS settings superseded that of the device or the router.
In any case, as mentioned, there are two DNS server IP addresses. The secondary (alternate) server takes effect only when the primary (preferred) one is unavailable. In some situations, you can even add a third or fourth server address.
For the steps below, I’ll use the 1.1.1.1 address (Cloudflare) as the primary and 8.8.8.8 (Google) as the secondary. But you can pick your own from the table above. It’s OK to use two servers of two different providers, but you must enter the IP addresses correctly, or you won’t able to go online.
Steps to change DNS settings in a Windows computer
On a Windows computer, open then the Network Connection in the Control Panel. The fastest way is: Click on the Start button, type in ncpa.cpl in the search field, and press Enter.
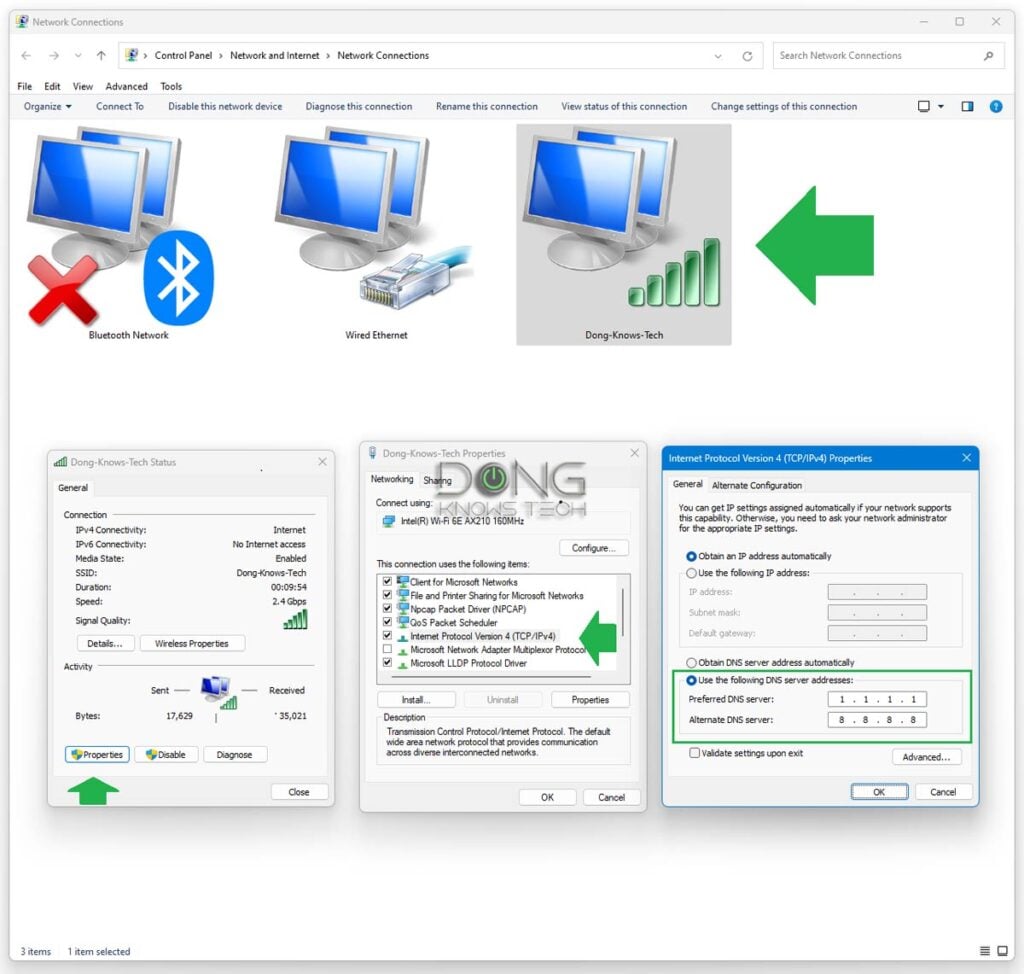
- Pick the network connection you’re using—if you’re on a laptop, it’s likely the Wi-Fi connection—and double-click on the icon to open the Status window. Then click on Properties. (Alternatively, you can right-click on the icon and then choose Properties.)
- In the Properties window, double-click on Internet Protocol Version 4 (TCP/IPv4)
- In the next window, check the Use the following DNS server addresses box and enter the addresses for the Preferred DNS server (you can use 1.1.1.1 here) and Alternate DNS Server (you can use 8.8.8.8 here).
Optional: Repeat step 3, but this time double click Internet Protocol Version 6 (TCP/IPv6) if you have that information (if not, you can skip this step). Then click on OK to close the windows and apply the changes.
The change should be in effect immediately, but restarting the computer to make sure is a good idea.
Steps to change DNS settings on a Mac
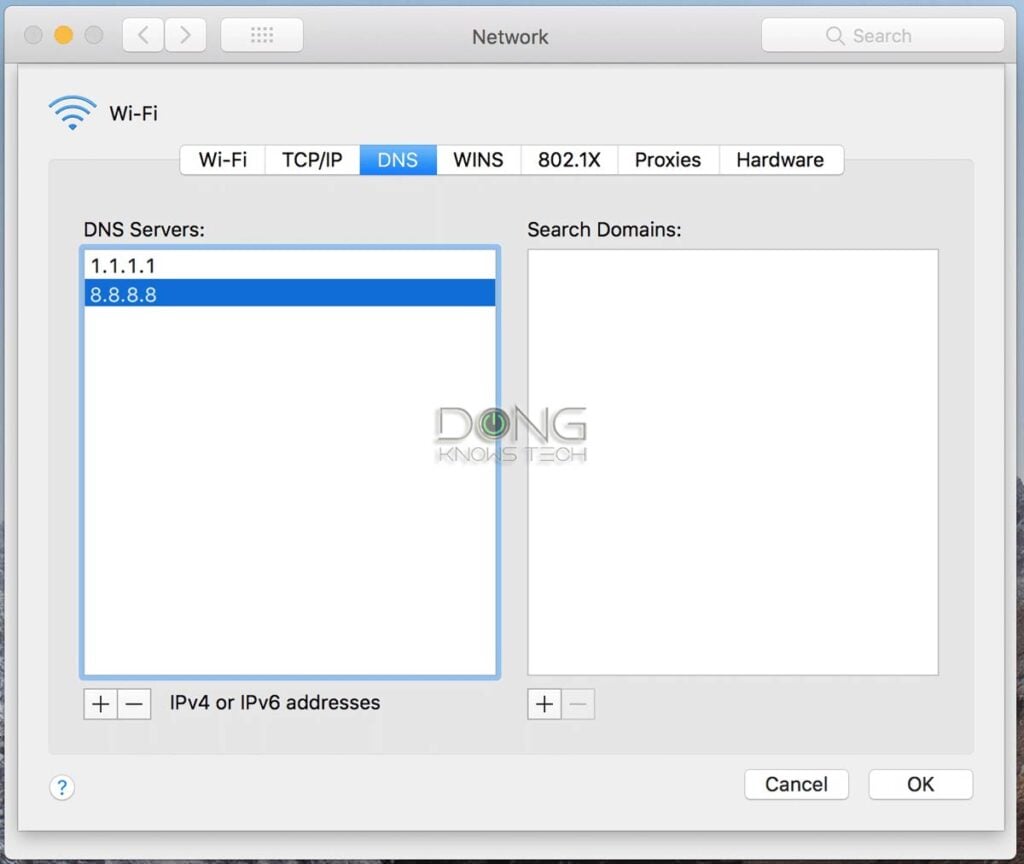
- Click on the Apple icon (top left corner), then on System Preferences, and then on the Network icon.
- Select the current network connection (it’s likely the Wi-Fi connection if you’re using a notebook), then click on Advanced…
- Click on the DNS tab.
- Use the plus (+) button under DNS Servers to enter the addresses of your liking. For example, you can use 1.1.1.1 for the first server and 8.8.8.8 for the second one.
Restart the computer, and the new server settings will be in effect.
Steps to change DNS on a router
Use the step below to change the DNS servers of the router’s Internet connection, which are different from those used for the local network.
You should change the latter—generally found in the LAN section of the interface—when you want the router to dictate which DNS server all connected devices use. This is applicable only when you have a special network, such as one with a domain controller or a separate purpose-built local DNS server.
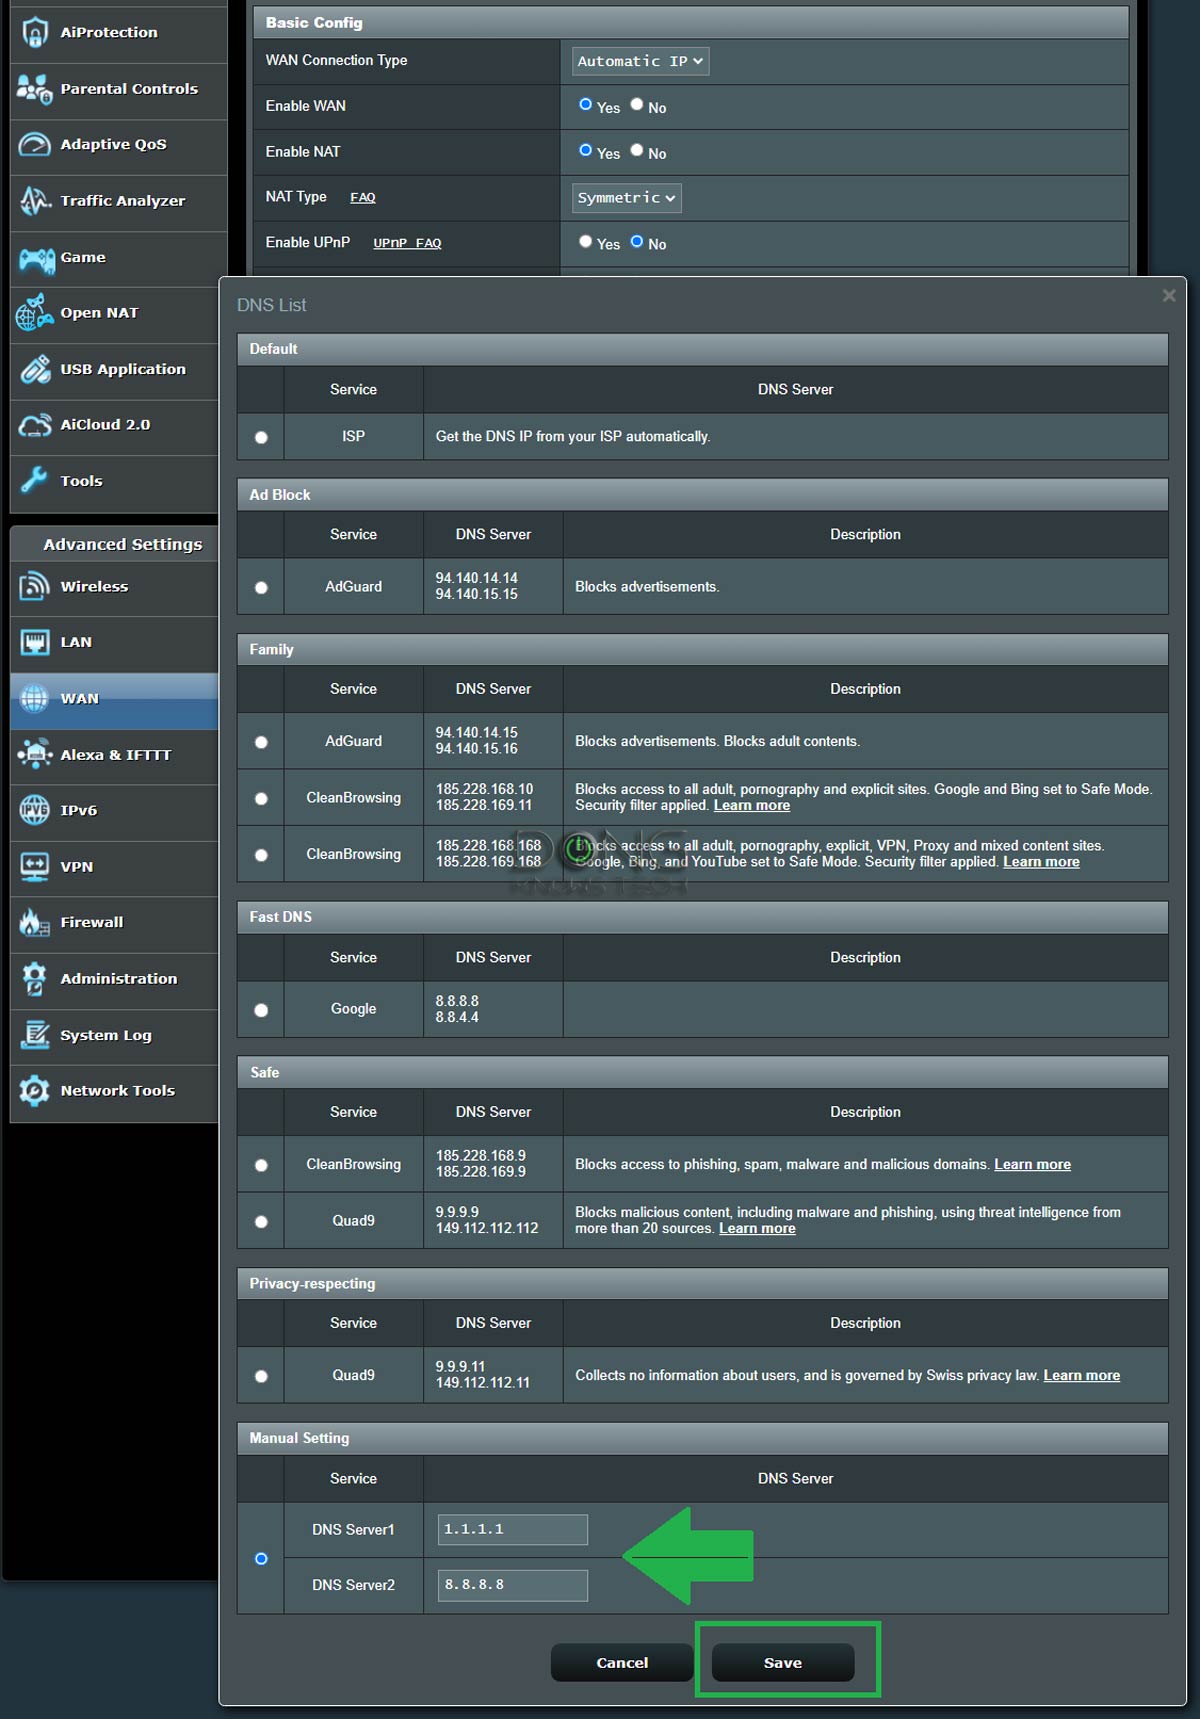
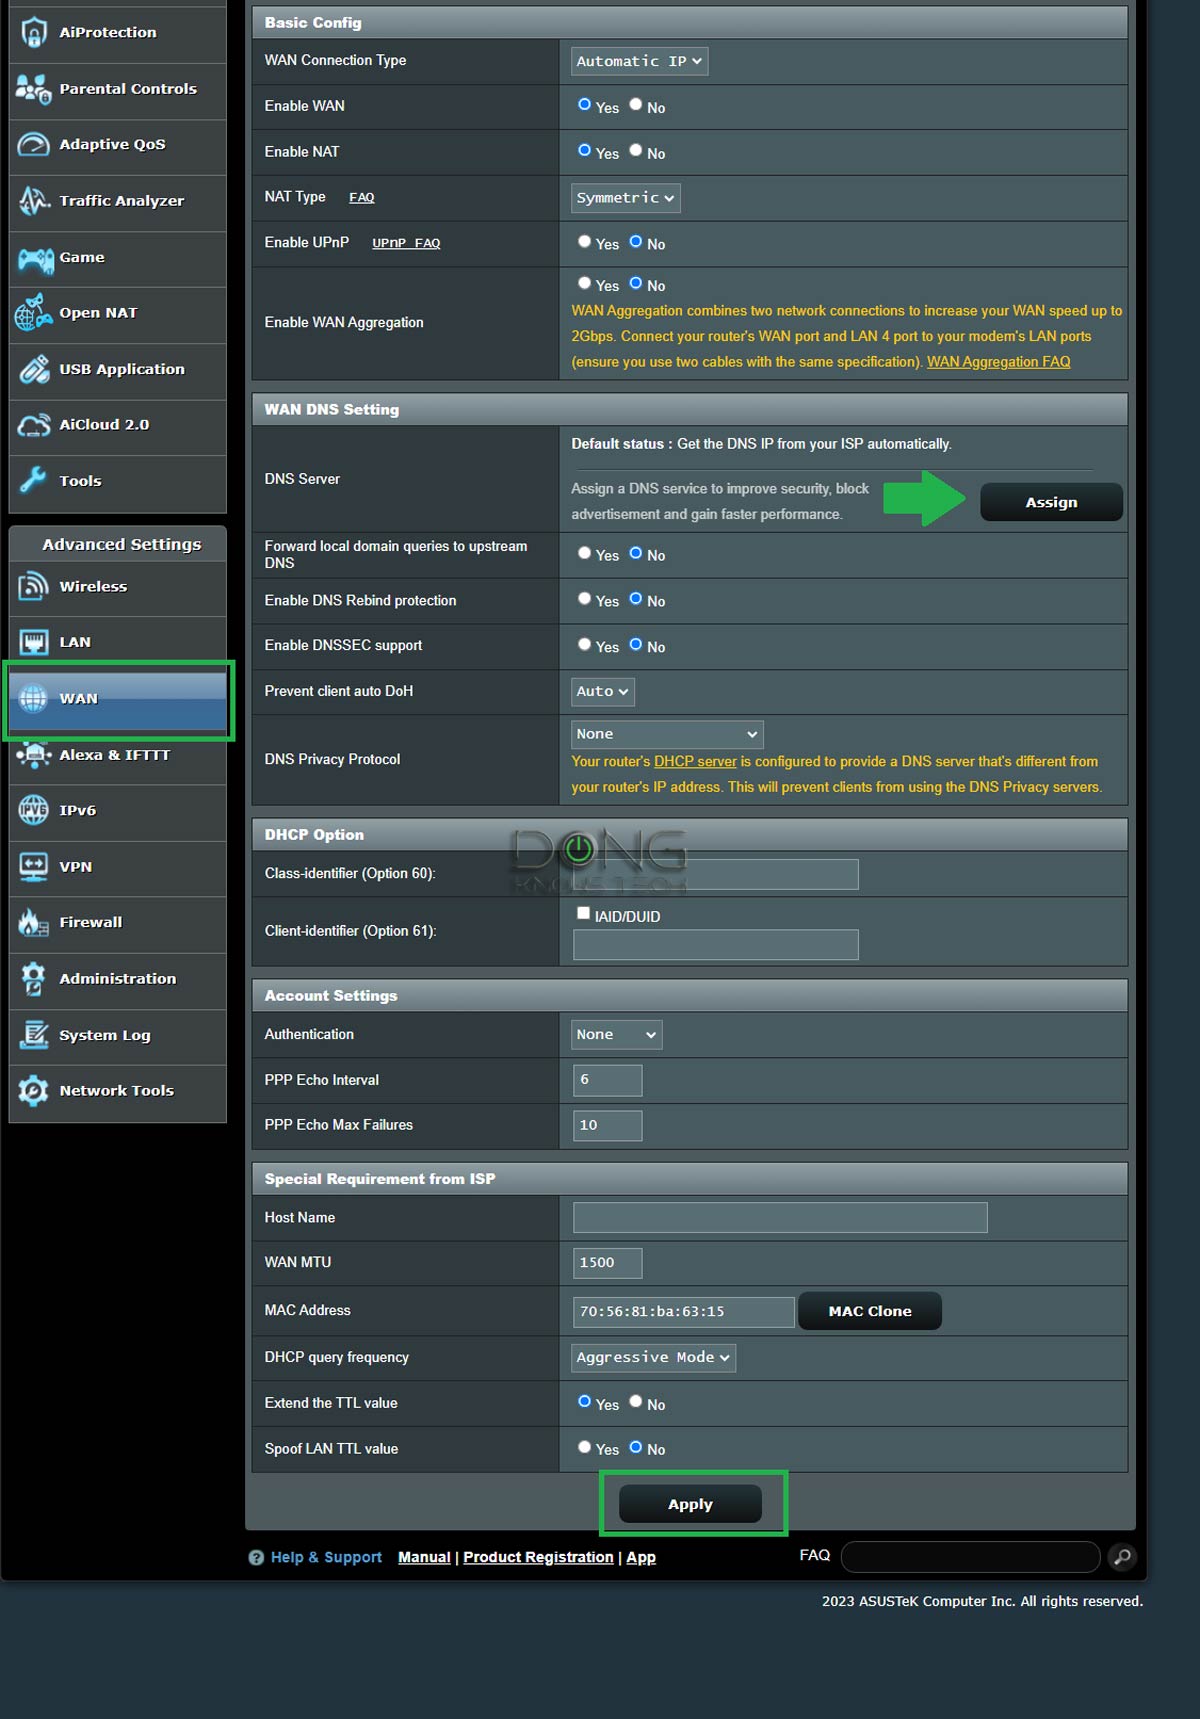
- Log in to the router’s web interface.
- Navigate to the interface’s WAN (or Internet) section; every router has this section.
- Choose to manually enter DNS server addresses (you want to change the default value, which lets the router automatically use the service provider’s DNS servers).
- Enter the DNS addresses of your liking, such as 1.1.1.1 for the primary server and 8.8.8.8 for the secondary (backup) server. Some routers, such as those from Asus, have a list of DNS servers and their features for you to choose from besides the manual option.
- Apply the changes.
Some routers will restart themselves when you apply the change, or you can manually restart them. After that, the new settings will be put into effect.
Domain Name System: The takeaway
Again, considering your DNS’s significant role, it’s imperative that you pick one you can trust when changing the values manually. When in doubt, leave the setting as Auto, and the system will use the default, generally that of your Internet provider.
Changing the DNS setting is also a popular way to “hack” a system. In this case, the bad guys capture your DNS requests to send you to phony destinations or services. Ensure you know your DNS settings, especially at the router’s level.
Dong’s note: I first published this post on April 1, 2018, and updated it on March 9, 2024, with additional relevant information.


Any thoughts/opinions on Control-D?
It’s just another DNS service with all that implies.
They are the same thing. The server (the computer) holds the software that resolves the DNS query, and we’re taking about the IP address of the server itself.
Your example uses domain names, which requires a DNS server to resolve. Read the post!
While you can split a hair, it’s generally unnecessary to do so. And if you focus on that, you’ll forever be tangled.
You can’t enter the domain into the DNS server fields, Paul. You must use the IP address, and that’s the point. And they are all labeled as “servers” as you can see in the screenshots. Maybe you should go to all of the hardware/software vendors and argue semantics with them. I guess you’re stuck at the state of tech 30 years ago. At some point, the things you think you know becomes irrelevant. In any case, your meandering input, if right, makes things more confusing than necessary. It doesn’t help.
No offense, Paul, but you remind me of my high school classmate who tried so hard to appear smart and ended up being a buffoon his entire life. Still is. All these are above me, but following Dong’s instructions, I got my network to work as intended, i.e., with no ads, etc. That’s all that matters, no?
Considering you clearly didn’t pay attention, Paul, I’ve made it so that your future comments won’t be published. We’ll see to it if we’ll remove your existing ones. This is a no-nonsense zone.
Hi Dong
Great article!
I have only recently signed up to your weekly emails and find them very interesting.
Do you have any articles on emails. I am mainly interested in blocking spam. I’ve applied filters blocked emails S spam & still get hundreds a week. My biggest issues is Google only has a setting to remove trash after 30 days in my case I would like it removed daily. Do you know of a script etc I could apply
Kind regards T
Use Chrome to check mail and mark the email(s) as spam or choose to block the sender using the Report Spam icon, Terry. You can empty the trash manually via a few clicks. It’s easy enough.
OpenDNS offers simar capabilities as the above and should be includes in the table.
There are many others, too, Sanjay. As mentioned, I only listed those I’ve had good experiences with.
The article needs an update: on desktop operating systems we can also specify DNS in each web browser. My experience on Windows has been that the DNS specification from the browser, over-rides the DNS specification in the operating system.
Also, VPNs. An active VPN connection, will typically change the DNS environment.
Finally, an FYI: Windows has separate DNS configurations for Wi-Fi and Ethernet.
You are totally correct! Chrome overrides my OS settings. This bit of info should have been highlighted. Thanks so much for the critical info!
That’s always the case, Chris. Generally here’s order of DNS setting superseding effectiveness: app -> device -> local sever (if any) -> router -> ISP. Chrome is an app. Looks like neither of you read the entire post.
Hi Mr. Mgo,
Your information has been helpful to me. As I have just recently been introduced to all this technology and have been more interested as I use it. recently I have wonder about wifi and Internet in the sense of how rare it is for me. Is there any way to receive or gain use of it for free? As some people like I get free tv service via antenna? Or is that a bad thing for me to continue to be curious about? I’m sorry I bother you as for I live in a rural area and I am basically a 32yr old caveman. I’m talking seriously on the primitive knowledge I have. and what is the best advice for private, safe, no restrictions on Internet use? lastly when it comes to finding something do I type in exact words or is there a trick to find anything more accurately and quickly? I’m just trying to figure out lots of things from rebuilding my identity from last years mess to legal aspect with foreclosure and probate, sueing water co… etc I’m hoping this new tech can help a lot. thank you for your time. any info will be huge deal of assistance
You can call me Dong, Shawn.
To answer your questions, no, nothing is free. You have to pay for stuff one way or another. Often the things you (want to) get for “free” is what that will cost you dearly down the line. Having the tendency and discipline to contribute, work hard, and take responsibility is generally the biggest assistance one’d need.
Good luck!
Hello Dong.
I currently use OPENDNS for my Router ipV4 {…}.
My LAN Aimesh is (3) GT-AXE16000 UNITS (all setup up with your great info and using 10G Ethernet backhaul) and, for lack of any better method, I set my Router ipV6 using the same service selected for ipV4.
What do you use for selecting ipV6?
I found that trying to mix two services, one primary & secondary for ipV4 ( both OpenDNS) and another service primary and secondary (say both from Google) didn’t work and I didn’t get any ipV6 address assigned to my clients. Thus I used the same DNS service for both IPV4 and ipV6.
You don’t need to use IPv6, you can always disable it for the local network and there’s just no point in using it for DNS. More on IP addreses here.
Hi Dong,
Thank you for all the information you publish, it’s been very helpful. My DNS situation is a little different. Foreigner based in Shanghai. I use China Telecom their ISP DNS sucks, probably optimized for local use and google type DNS servers are blocked. Most of my browsing would be on foreign sites and only 10% local. Other than using a VPN. How would I be able to determine the fastest DNS servers for my particular case even in combination with a veep?
China is a difficult place to know, Celso. I’d try the addresses mentioned here to see if any works. If they do, you might no longer need a VPN. But that depends.
Happy Sunday Dong,
Perhaps I am dense, but didn’t see a solid recommendation on which DNS to use. I see you hint at 1.1.1.1 as primary and 8.8.8.8 as secondary.
Speed is not my primary concern as they all seem to be pretty fast, at least for me, but, safety is.
So tell me, 1.1.1.1 and 8.8.8.8 is it, right?
Best,
Luis
I’d go with 1.1.1.1 and 8.8.8.8 one as the primary and the other as secondary, no particular order, Luis. Other DNS server options tend to be less reliable, with bad intentions, or require a payment. But that’s just me.
Hi Dong-
Thanks for the great info. I hope I didn’t miss this specific situation covered elsewhere… If so, my apologies. I have a question regarding DNS setup. My current stack is this:
400MBps Xfinity Cable Broadband
Netgear CM700 main connection
AIMesh with 2x RT-AX3000 w/ wired backhaul
I’d like to test some other DNS configurations and was wondering whether I could update my primary wireless router config or if I needed to access the cable modem and perform the changes there.
You can follow the steps mentioned in this post, Fara. If you’re thinking of Dynamic DNS, check out this post instead.
Hi Dong,
What is your input in using Unbound DNS with RMerlin firmware? Its available to use thru AMTM.
Also, would you recommend Unbound DNS overall over ISP DNS? any pros and cons you can provide?
Any input is greatly appreciated!
It’s similar to Google’s or Cloudflare but supposedly more transparent, Joe. Just another generic option.