Dynamic DNS, or DDNS for short, is one of the most powerful features available in Wi-Fi routers. Though not router-exclusive, when coupled with port forwarding, DDNS is the basis for hosting many services within your home network.
Examples of these services are VPN servers or remote desktop connections. At the very least, DDNS lets you independently manage your standard router when you’re away from home via the familiar web interface, provided it’s not a NETGEAR router.
This post will explain dynamic DNS in simple terms. Though this is in the realm of advanced networking, DDNS is straightforward. Still, before continuing, make sure you’re familiar with IP addresses, especially the WAN IP.

Dynamic DNS explained
To understand DDNS, you first need to understand DNS, which stands for Domain Name System. You can find out more about DNS in this post, but in a nutshell, DNS is a mechanism that associates a label, such as a domain name like dongknowstech.com, with an IP address.
A quick refresh: DNS is helpful because it’s much easier for us to remember a label than a string of numbers. Open the cabinet below for some highlights.
DNS server in brief
In a nutshell, a DNS server is similar to a public directory. It points you to where you want to go among millions of online websites, applications, and services.
A DNS server is not to be confused with Dynamic DNS, which works somewhat the opposite way.
Here’s a specific example of the role DNS plays:
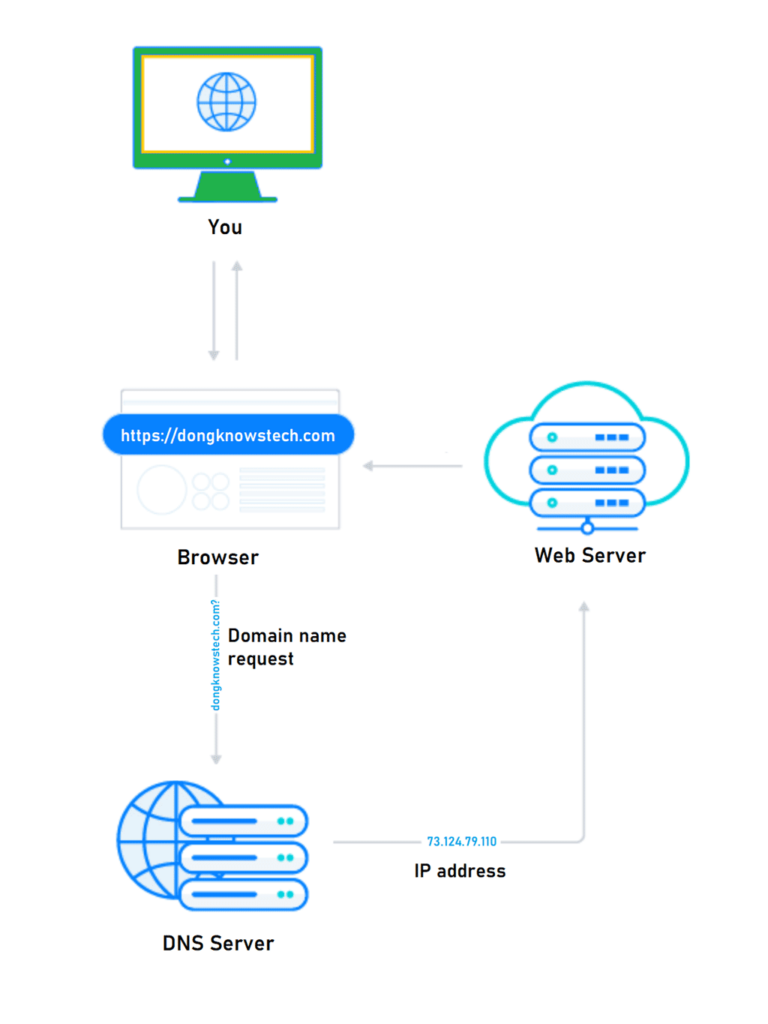
Let’s say you want to access this website directly and enter its domain name — DongKnowsTech.com — in your browser, such as Chrome, Firefox, or Edge. The following will happen:
- The browser queries the system’s designated DNS server about the user-provided domain name.
- The DNS server looks up the domain name to verify that it exists and is associated with a website. If so, it returns the website’s unique IP address, which is a string of seemingly random numbers.
- The browser follows that IP address to load the page you’re viewing, while showing https://dongknowstech.com or another meaningful URL in the address bar.
This process occurs because computers only understand numbers, while humans are bad at remembering them. In a way, the domain name is the vanity moniker of a website’s IP address. “DongKnowsTech” is much easier to remember than, say, 73.124.79.110, or any other random string of numbers.
And you’re reading this page on your screen because such a process has worked. A similar procedure occurs whenever you want to reach an online party using any application.
In many ways, a DNS server is similar to the once-commonplace telephone directory service, where you only need to remember a person’s name, not their phone number. It’s the first thing that must happen before a typical network connection can be established.
What is Dynamic DNS?
Dynamic DNS is the same concept as DNS, but applies to a periodically varying, or “dynamic”, WAN IP. Additionally, while a DNS server helps us reach a remote party, such as a website or a streaming service, Dynamic DNS is often used in the opposite direction — when we want to dial home while out and about.
The majority of home broadband plans don’t include a static WAN IP — it’s expensive to have a fixed WAN IP address that remains the same at all times, which makes DDNS a much-needed feature when you want to use your home as an online destination for outside parties, including you when traveling, to reach.
You can easily find out your WAN IP right now. However, recheck it in a week, and you’ll likely get a new address. You often get a new WAN IP address when you restart your router or terminal device, such as a cable modem or a Fiber-optic ONT.
In other words, even if you write down your current WAN IP address — or remember it by heart — you probably can’t rely on it to dial home. That address might already have been moved to someone else’s home network when you do.
That’s where DDNS comes into play: It associates your current WAN IP address — no matter what it is at any given time — with a consistent domain name of your choice. Now, instead of having to fumble with the IP itself, all you have to do is remember that domain name, and you know you can reach home when necessary.
Dynamic DNS requirements
To take advantage of DDNS, you need three things: A private WAN IP, a Dynamic DNS service, and a DDNS updater device.
1. A private WAN IP
You need an exclusive WAN IP address to set up an online service or dial home. While this IP might change from time to time, it must be unique and assigned to your location by your Internet provider.
Generally, that’s the case for most residential Internet plans — the WAN IP is assigned to your terminal devices, such as your cable modem (or gateway) or fiber-optic ONT, and then given to your router.
But there are situations where you can access the Internet but have no WAN IP of your own — one that you control. Here are some examples of unusual situations where DDNS is not an option:
- You live in a condo (or hotel room) where the building’s central location provides everyone with Internet access. In this case, your local network has no WAN IP of its own. It just has access to the Internet.
- You have an Internet service that uses large-scale NAT (CGNAT).
- You need to keep your ISP-provided gateway and add another router on top of it. (In this case, check out this post on a double NAT setup.)
In short, if you have a typical broadband service, chances are you have your own (dynamic) WAN IP address, but there are situations where Internet access is available, but the WAN IP is not.
2. Dynamic DNS service
This service is the provider of the domain you want to use. Many third-party DDNS services exist, such as NoIP, FreeDNS, and Dyn. Some require a small annual fee, but most give you one domain for free, and you don’t need more than one.
Better yet, known networking vendors, such as ASUS or TP-Link, also include a free DDNS domain with a router. While it’s convenient to use the networking vendor’s DDNS, it’s not necessary. Use the service you can trust or are comfortable with.
3. Dynamic DNS updater device
A DDNS updater must reside within your network, and it does the job of persistently binding a domain name to your WAN IP. We need this because, as mentioned, a dynamic WAN IP address, though unique, changes periodically.
This device updates the domain with the new WAN IP each time it changes. The dynamic WAN IP address almost always changes when you restart your router or terminal device (modem or fiber-optic ONT). So, it’s a good idea to have this updater device running at all times.
Most routers and NAS servers have a built-in DDNS updating function. Since your router is the gateway to the Internet, it’s best to use it as the DDNS updater device, which is essentially its Dynamic DNS feature. If a router doesn’t support DDNS, it’s probably not a good router anyway.
Alternatively, you can use any device on your network that supports DDNS updates, such as a NAS server. You can also turn a computer into an updater by installing a DDNS updater software client. To be sure, you can use more than one updater within a network. However, in most cases, the router’s Dynamic DNS feature is enough.
Important: Do not use a device that you often move out of your network, such as a laptop, as the DDNS updater. As you can imagine, that will cause your domain to be synced up with a foreign WAN IP address.
In this post, I used an ASUS router as the DDNS updater, using a free domain provided by ASUS. However, if you use a different DDNS provider with a different DDNS-enabled router, the same principles and general steps apply.
But before that, let’s address the elephant in the room: DDNS and online security.
Dynamic DNS and security
Dynamic DNS has little, if anything, to do with how secure your network or router is.
DDNS does not affect your home network’s security. It doesn’t make your system safer or more vulnerable. The WAN IP — all home networks have one — is all hackers would need to attempt evil deeds.
However, a DDNS domain name makes it easier to access your home network and keeps it consistent, since it remains the same even when the WAN IP changes. Additionally, keep in mind that your DDNS domain provider can also know your WAN IP.
So, for security reasons, it’s a good idea to keep your DDNS domain name secure. Don’t reveal it to anyone willy-nilly — in a way, it’s like your home address. If a party knows only your WAN IP, that doesn’t mean they can hack you immediately. Additionally, use a DDNS provider you can trust.
In a way, your WAN IP (or DDNS domain) is like your home address. Just because somebody knows it doesn’t necessarily mean you’re in danger, but it’s generally a good idea to keep it private.
Follow these good practices to keep your router safe. At the very least, use a secure admin password and avoid using default port numbers for any remote access application.
Steps to set up Dynamic DNS on a router
No matter what router you use — clearly, we’re talking about one that supports DDNS here — the steps to set up DDNS are mostly the same.
- Check that your router has the WAN IP address. If it’s the only router (or gateway) you use, then that’s always the case. On the other hand, if you use a router on top of another router, make sure you follow these steps to get the WAN IP to the router first.
- Check the router’s web interface to see which DDNS services it supports — most routers support at least a few — and pick one for yourself. The location of the DDNS feature within a router’s web interface varies from one networking vendor to another. Still, it’s generally in the WAN (a.k.a. Internet), Advanced, Administration (Admin), or System section.
- Sign up for an account with the DDNS service and pick a domain of your liking. After signing up, you’ll get an account (username and password) and a domain name. Write down this information and keep it secure.
- Go back to your router’s interface and enter the information you have written down in the DDNS section. Apply the changes, and you’ll see a message that the association is successful.
From then on, the domain name will be the persistent address of your home router.
Dynamic DNS via ASUS’s free server

If you use an ASUS router and want to use ASUS’s built-in free DDNS service, here are the more specific steps:
- Log in to your router’s web interface, navigate to the Advanced Settings menu item, click WAN, then click the DDNS tab.
- Change the value of Enable the DDNS Client to Yes and Server to WWW.ASUS.COM.
- Enter a Host Name value of your liking. Your DDNS domain will be in the hostname.asuscomm.com format, with the hostname being whichever you choose that hasn’t already been taken by someone else.
That’s it. Your DDNS domain name is ready and in effect. You can use it for any remote access services hosted within your home network. To implement these services, you’ll need the help of a router’s second important feature: port forwarding.
The takeaway
Again, for advanced users, Dynamic DNS is a valuable feature that a router offers. It allows users to control their network for advanced applications, even when they are out and about. Give it a try today! It doesn’t cost anything.
Dong’s note: I first published this piece on April 24, 2019, and updated it on May 16, 2025, to include additional relevant information.
The article about DDNS is helpful.
The problem with: hostname.asuscomm.com
is that when one searches the user reports, there are issues as well as vulnerabilities.
You can use other host provider, Liv. That hostname is widely used and sometimes by bad parties so browsers often market it as “suspicious”.
hello Dong ok I have followed ddns steps you showed us, I am using Huawei HG8546M router, after setting up ddns, I was unable to access my router remotely via web interface.it displayed error. any suggestions please
Not sure what the error is, James, but if it’s a browser security warning then you can ignore it and continue as mentioned in the last screenshot of this section. Pay a bit attention and you’ll figure out.
Doug,
Thank you for this most comprehensive and informative summary. While I have used port forwarding for years, it was a great “refresher”. Doug, is DDNS still valuable if one has a static IP address ?
It is if you don’t want to remember the static IP, Albert, but it’s no longer necessary.
The name is Dong, by the way. 🙂
I just tried ASUS Instant Guard on my Wifi-6 router. It does connect but yet to try it on a public wifi.
Is it safe to use the ASUS DDNS address/name?
I tried to turn of an on the ddns setting but the long –
(EXAMPLE) EC298CH99C72YBC99328645.asuscomm.com Never changes, is it default to the router IP or something even if I do a factory reset? is there any risks with it being the same name all the time?
Also when turning on the Instant Guard (macOS iPad app) I have to CMD-V the password each time, I cmd-v it into notes and the password is the same even after reinstalling the vpn configuration and reinstalling the app..
I don’t really have any use for it, and would probably just buy a proper VPN sub if surfing random wifi on Starbucks etc. But wanted to try remote access for the router, if needed in the future.
You can change the DDNS domain via the router’s web user interface. Give this post another good read! After that check out this post on VPN. If you don’t have use for VPN then don’t use it. Paying attention is the key.
If I am setting up remote access via a ddns I should not use default ports. Am I correct to conclude that I can use any Port within this range 49152-65535. Also how do I determine if a given Port in this range is already in use.?
You can use ports as low as two digits, Ryan. Generally, the router will tell you if a port is used for something else already, or not applicable.
Great so any of the ports I mentioned will work Thanks
Hi, I have my own domain. The method that it uses to update the DDNS is Cpanel, webcall URL. I am looking for a cable modem ( Docsis 3.0) to which you can add a custom DDNS url. Not noip dyndns etc. Do you know of any ?
What you talked about is not a modem, James, but a router. More here.
As for your need, the best way is this:
1. Set up a Dynamic DNS as described in this post, such as janes.DynamicDNS.domain
2. On your customize domain, such as abc.com, maps the CNAME to point to your DDNS domain. So abc.com -> janes.DynamicDNS.domain
In short, unless you have a static IP address, you still need to use a Dynamic DNS account.
Hi Dong, read up on your post a few times. There’s one thing I’m not sure of. If I am just happy accessing my router from ‘outside the house”, no port forwarding/VPN/NAS etc. why should I configure this, as with the ASUS app (GT11000 + AX92’s) I can do that already?
I’m asking because I had to grant permission for data collection to Alexa and IFTTT.
Thanks in advance, Henk
The Asus router app would turn on the router’s DDNS, Henk, using a randomly picked domain. That’s the only reason you don’t need a login account — like the case with all other vendors. (But there’s also an option to use an Asus account now which you shouldn’t use.)
There’s no other way for any type of remote access. It’s not like your phone can magically find your home router among all others.
By the way, if you change the DDNS domain to something you like, as I mentioned in this post, the app will automatically use that, too, instead of the one it created on its own.
👍🏻
Dong, many thanks for another excellent tech write-up. As I understand it, moving to a DDNS set up allows me to access my Asus XT8 AiMesh setup remotely from outside my private home network. Unfortunately, I seem to be missing something after following your steps because I am unable to access my Synology 220+ NAS running DSM 7.0.1 (even within my home network) after enabling my router’s DDNS feature. I know the NAS’s DSM has a port forwarding feature, but after looking through your discussion of port forwarding, it’s not clear to me what (if any) additional steps I need to take to resolve this issue. By any chance, would you have any plans to write an update to this article to explain how to integrate a Synology NAS into a DDNS-enabled Asus router environment? Asking for a friend.😁Thanks!
If you haven’t messed up a lot, you need to add “:5000” (no quotes) to the DDNS domain and forward port 5000 to the server’s IP within the router, Tom. You need to understand the principles — just read the post closely again — there’s no way one can write you a 1-2-3 step guide for every port forwarding scenario. There are 10s of thousands of them.
Thanks for the additional explanation. Also, FWIW, I’ve re-read your excellent article several times as you’ve suggested with the goal of sussing out the magic process. My hope is that when I apply your teachings later tomorrow I will be able to sort what is, from my liberal arts and non-tech perspective, a very difficult subject to grasp, much less implement. Perhaps in my next life I will be lucky enough to graduate cum laude with a technical degree.
I hear you, Tom. But I’m sure you can do it. Just remember you have to do it 100% correctly, you can’t ballpark this. Here are some extra for you.
1. Make sure you have your WAN IP at your router, meaning you’re not using a router on top of a gateway. In that case, deal with the double NAT first.
2. Set up DDNS, you can do that either on the router or your NAS server. Assuming your domain is now tom.dongknows.com (it will be something else.)
3. If you haven’t changed anything on your NAS server, here’s how to call it from outside your home (you have to do step #4 first): http://tom.dongknows.com:5000 That’s because 5000 is the default port for Synology NAS. If you want to change it, on your NAS go to Control Panel -> Login Portal and change the port to whatever you want. Just make sure you remember it.
4. On your router, forward the port 5000 (or whatever you use) to the IP address of your NAS server.
That’s it. Good luck! 🙂
Got it! Many thanks!! Your site is the best for “stuggling non-STEM guys” like me.😁
Sure, Tom. 🙂
I’m using a VPN to access my local network from abroad. I have enabled the Free Server Certificate in the Asus router. Do I need to configure/import this certificate to my device or VPN server to make it work?
No, Donny, and you can’t anyway. The cert is only on the server side.
So is the DDNS certificate working with my vpn by just enabling “Free Certificate from Let’s Encrypt” on the router? Reason for asking is since I see an export button for the certificate assuming I need to import this file elsewhere to make it work.
Yes, Donny. The import option is for when you have one of your own.
Thanks Dong
While setting up DDNS on my ZenWifi AX6600 Mesh sytem, it shows:
1. The wireless router currently uses a private WAN IP address.
2. This router may be in the multiple-NAT environment and DDNS service cannot work in this environment.
My XT8 is connected to the ISP provided ONU with a PPoE connection in router mode. Further I have other mesh nodes connected to this main node.
I’m not able to setup DDNS henceforth
I mentioned that in the post, Parth. Also, check out this one for your situation. Make sure you read closely.
Um, actually, one correction: Netgear is screwing over its customers still with the nagware NoIP DDNS option only.
Anyhow, one other question…. in the article above, it says something about DDNS not working with another router on top of your own ISP modem/router, yet that’s exactly what I have with my Cox ISP modem/router connected to my Asus router, which has an Asus DDNS account made for my webcams to communicate to. It works fine. Am I missing something?
That’s correct, you need to turn your ISP gateway into the bridge mode. More in this post about how to use a router on top of another. And by way, if you go wth NoIP, it’ll nag you every 30 days to pay or “confirm” the account. If you miss confirming, it’ll disable the DDNS domain. Quite horrible.
Oooohhh. Right. I just assumed everyone did that. Might want to clarify in the article above that DDNS is a no go with a router on top of the ISP router IF you don’t enable bridge mode.
Why wouldn’t anyone enable bridge mode under those circumstances? It doesn’t make sense why someone would choose not to do that. Then again, I’m a neophyte. Also, as long as y’all are so quick to answer, Asus mesh systems don’t get great reviews (not the AiMesh thing… that’s too tricky for me), is there a reason for that? No way am I changing from Asus and their free DDNS service.
Spend some more time on this website — use the site search — before asking further questions, JK. I don’t have comments on stuff you have learned elsewhere.
So, just to be clear. In a 2015 posting, someone asked about Netgear vs Asus for their DDNS service. Asus has provided a free DDNS service for me since I started with their routers in 2015 (they probably offered it before). It’s why I keep buying Asus. Netgear, from my understanding, only offers a ‘free’ DDNS through No-IP, which requires logging onto the NoIP site every month to renew it…. hardly free (from effort). Asus’s is truly free. Hence I refuse to buy Netgear. Does anyone know if Netgear got their act together, or for my new Mesh system, do I stick with Asus? I use webcams and want a DDNS to access them from the road.
You should stick with Asus, especially on the DDNS front. Netgear has gone the vendor-assisted route with a login account etc.
Thank you for this clarification. Do you have any idea how hard it was to get this answered? The NetGear forum sites have people complaining, but I’m stunned it’s not more clearly stated when people are reviewing routers. Is Asus the only company that provides a free DDNS with their routers? Why isn’t Netgear being slammed more for this gross deficiency?
Your technical notes are very helpful and very well written. Thank you.
You’re very kind, Wilf. And you’re welcome. 🙂
Yup. Very nice, but doesn’t work. My provider uses CGNAT :-(. I didn’t know when I signed up. It is this with 500MBit or 30MBit ADSL.
Yeap, Sven, unfortunately, that’s a form of double NAT. You’re in a pickle there.