The head says it. This post is part of a series that helps you set up a home network like a pro. It’ll work you through the detailed steps to get a home Wi-Fi router up and running using the web user interface.
If you like using the phone’s mobile app to manage your home network, this post will still help to some extent, but the “pro” notion doesn’t apply.
When through, you’ll be able to figure out how to hook the hardware pieces together in the correct order and configure the Wi-Fi network to your liking. Additionally, there are also a few tips on maintaining the network for the best performance and security. Need more help? The related post in the box below will give you answers on the finer points.
Dong’s note: This post was originally published on March 21, 2022, and was last updated on January 27, 2025, to add up-to-date information.
Home Wi-Fi router setup
Generally, in a home network, we have the following:
- The service line: The line coming into the house from the street. It can be a phone line (for a legacy DSL service), a coaxial cable (Cable), or a fiber-optic line. (If you use cellular or satellite, that would be the line or a network cable connected to the receiver.)
- The terminal device: This is the Internet receiver. Chances are it’s a modem for a DSL or Cable broadband or an ONT for a Fiber-optic plan, but it can also be any Internet receiver (such as one for a satellite service) with a LAN port to connect to your router’s WAN port. Most terminal devices have only one network port. If yours has more, you still use only one at a time unless:
- You use a cable broadband plan with WAN Link Aggregation. In this case, you can use two ports to create a 2Gbps connection.
- You have a plan with multiple static IP addresses — this is quite rare. In this case, you can simultaneously assign one IP address to a specific port.
- Your service provider offers speeds ranging from below to above Gigabit and uses a terminal device with a Gigabit and a Multi-Gig port. In this case, use the port associated with your broadband plan.
- The Wi-Fi router: That’s the device you’re learning to set up by reading this post. In some cases, you have a gateway in place of this router. A gateway is a combo device that includes a terminal device (#2) and a router (#3) in a single hardware box.
- Optional devices: These are additional devices — such as patch panels, switches, mesh satellites, etc. — that help expand the network.
The task at hand now is how to connect all the above. They’ll fit physically either way you plug them, but there’s only one way they’ll work properly. The key is that, aside from the terminal device, the router must be the first device in your network, with everything else connected to it.
A typical home network diagram
Let’s repeat this important notion: In a network, the router must be the outermost device that connects to the Internet. Other than the terminal device, everything in your network must be behind, or “on top of”, the router in terms of connectivity — regardless of their physical locations.
Let’s use the arrow (➡) to represent a network cable or cables and square brackets ([]) to describe optional devices. We have the following simple diagram:
Service line ➡ Terminal device ➡ Wi-Fi router ➡ [ Switch] ➡ [ patch panel] ➡ Wired devices / [more switches] ➡ More wired devices.
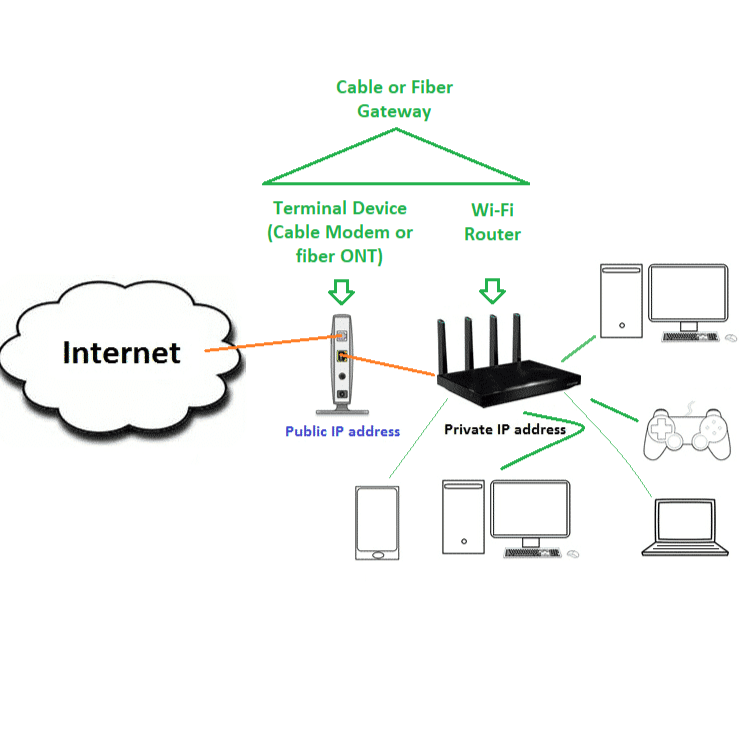
If you have a gateway, often the ISP-provided equipment, keep in mind that you will handle it like you do a standalone router, or you can put it in the bridge mode to make it work simply as a terminal device if you want to use another router to avoid double NAT.
Tip
There is no such thing as the “best” routers or Wi-Fi systems for a particular Internet service provider or type — Fiber-optic, Cable, or whatever.
Any standard router, including the primary unit of a mesh Wi-Fi system, will work at its full potential with any standard Internet broadband terminal device — modem, Fiber-optic ONT, or others. That’s true as long as the two can connect via a network cable, which is almost always the case.
Compatibility is generally applicable only between a terminal device and the ISP. For example, certain modems or gateways work with Comcast Xfinity, while others might not.
In relatively rare non-standard cases, some Fiber-optic lines might require a router that supports VLAN tagging (a.k.a IPTV). The majority of Wi-Fi 6 and newer routers support this.
Home Wi-Fi router setup: The hardware hookup
Now that we know which is which, let’s connect them. This step is as simple as plugging the cable into the hardware units and turning them on. The only thing to remember here is which cables go into which ports and the correct order.
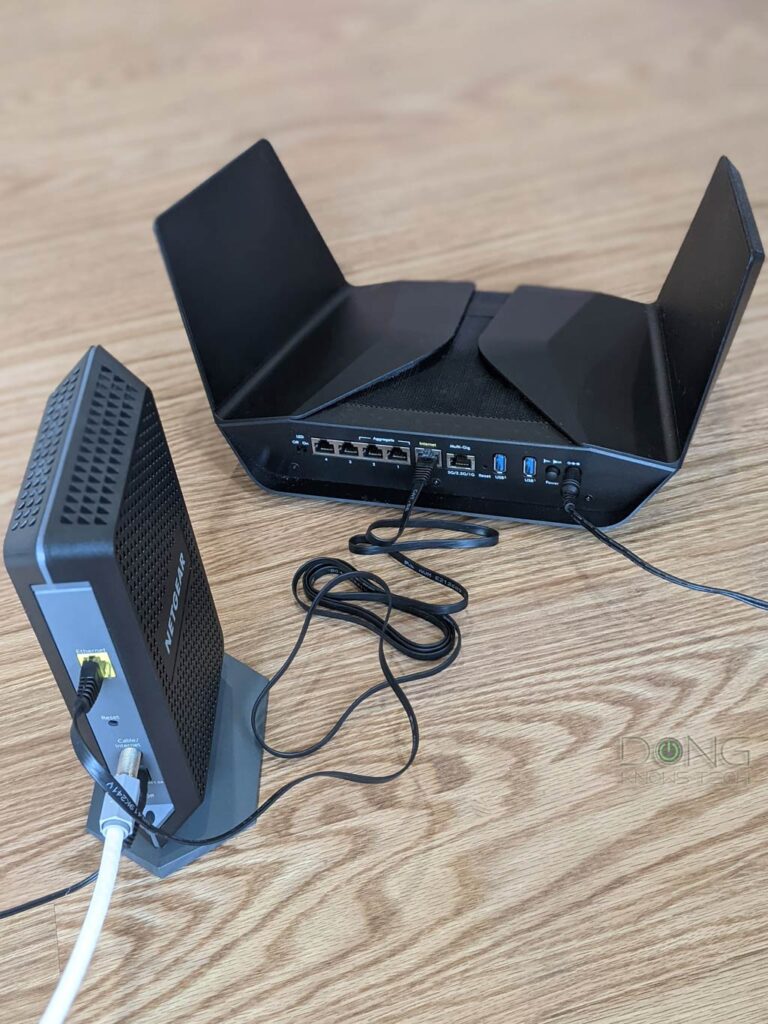
1. Connect to the Internet source
First, connect your terminal device to the service line. Specifically, connect your cable coax line to the back of your modem or the optical line to be fiber ONT. (In the latter case, the provider often already does it when installing the ONT in your home.) After that, connect the router’s WAN port (a.k.a. Internet port) to the terminal device using a network cable.
Note: If you use cable Internet, I assume you’re using a modem (or gateway) that has already been activated. If it’s a new cable modem, you will need to call the service provider to activate it first.
2. Connect your computer to the router
If you use a computer with a network port (most desktops do), connect that port to a LAN port on the router (most routers have four or more LAN ports) using a network cable. If your computer doesn’t have a network port, in the case of most laptops, you can get a USB network dongle, or you can use the router’s default Wi-Fi information — generally found on its underside.

3. Power on
Plug all hardware devices into power and turn them on. First, the terminal device, then the router, in that order. Now, give them a few minutes to boot up fully. And that’s it. You have finished with the hardware setup part. Connect all wired devices to the router’s LAN ports, and you’re game on the wired networking front.
Chances are, though, your router has the Wi-Fi function, too. Let’s continue with that.
Home Wi-Fi router setup: The customization
Routers for a home Wi-Fi network come in all shapes, sizes, and costs, but as far as this post is concerned, there are only two types: Those with a web user interface and those that don’t.
The former gives you a lot of customization and settings, while the latter generally doesn’t give you much more than naming your Wi-Fi network and picking a password for it. As mentioned at the beginning, if you’re into apps, you’re stuck at the novice level of things.
Apart from dumbing down the idea of networking, app-operated routers — such as the Google Nest Wi-Fi router, TP-Link Deco, or Amazon Eero — can potentially be severe privacy and security risks.
That said, this post focuses on standard routers with a local user web interface. In this case, a browser — Chrome, Firefox, Edge, etc. — is the only app you’d need. Below are the detailed setup steps applicable to standard Wi-Fi routers.
1. Log in to the web interface of the router
You can access a router’s web-based interface by pointing a web browser (such as Firefox, Chrome, or Safari) to its default IP address. In fact, in some cases, when setting a new router, you’ll be greeted with this interface the first time you launch the browser. In any case, the table below includes the default IP addresses of popular router brands.
| Friendly URL (Internet connection required) | Default IP (a.k.a Default Gateway IP) | Username (no quotes) | Password (no quotes) | |
| Asus | http://www.asusrouter.com | 192.168.50.1 or 192.168.1.1 | “admin” | User-created during initial setup |
| AT&T Gateway | n/a | 192.168.1.254 | n/a | Access code printed on the hardware unit |
| Comcast (Xfinity) Gateway | n/a | 10.0.0.1 or 10.1.10.1 | “admin”, “cusadmin” | User-created during initial setup |
| D-Link | http://dlinkrouter.local | 192.168.0.1 or 192.168.1.1 or 192.168.200.1 | n/a | “admin” or printed on the hardware’s underside |
| MSI | http://msirouter.login | 192.168.10.1 | “admin” | varies (printed on hardware) |
| Netgear | http://routerlogin.com | 192.168.1.1 or 10.168.168.1 | admin | User-created during initial setup |
| Linksys | http://myrouter.local | 192.168.0.1 or 192.168.1.1 | n/a | “admin” (must be changed during the initial setup process) |
| TP-Link | http://tplinkwifi.net | 192.168.0.1 | “admin” | |
| Ubiquiti (UniFi console) | https://unifi.ui.com | 192.168.1.1 | User-created during initial setup | |
| Most Cable Modems | N/A | 192.168.100.1 | n/a | “admin”, “password”, “default” |
Those mentioned above don’t work? The router you use might have a new IP address. In that case, you can always quickly figure out its IP yourself.

Once you’ve logged in for the first time, most new routers require you to create a unique username or password during the initial setup before you can access the entire interface and the Internet.
After that, the rest is relatively self-explanatory. Though the web user interfaces vary from one networking vendor to another, they all share similar sections, including Wi-Fi (or Wireless), WAN, LAN, Admin, etc.
Most importantly, they all have a password for the interface that you need to change right away from the default value.
Extra: That dreadful privacy/security notice
When logging into the web-based user interface of a home router or most devices, you might encounter a privacy/security error notice in which the browser suggests the webpage is potentially unsafe, similar to the screenshot below.
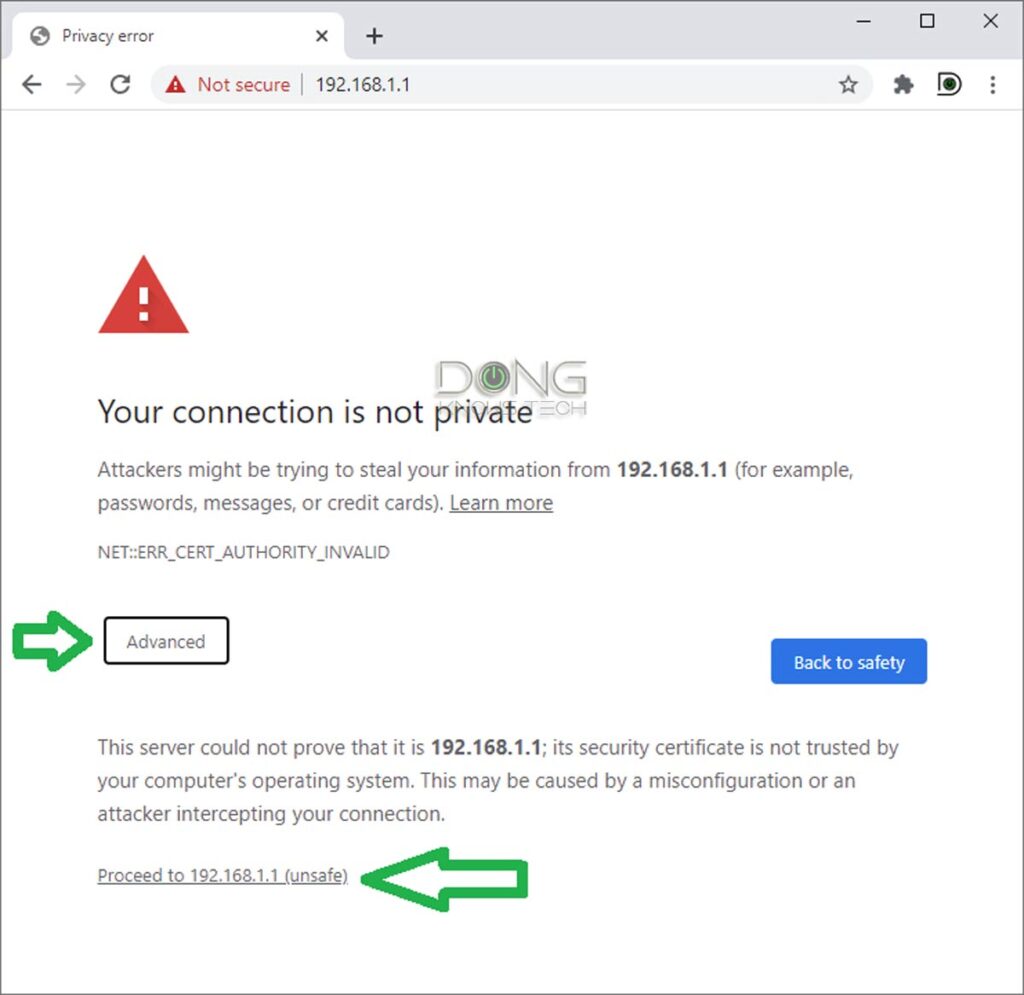
The reason is that the device’s built-in web server doesn’t have a mechanism to prove that it supports the now-required HTTPs protocol. For that, among other things, it needs to be signed by an external party.
It’s safe to ignore this notice and proceed to the interface when accessing a device within your local network.
Different browsers have slightly different warnings and ways to bypass them, but they all require clicking a few extra times. Pay close attention, and you’ll find out the way to proceed.
2. Change the router admin password
The router’s admin password is a crucial step in keeping it and your network safe from unauthorized access.
Pick a strong password that’s hard to guess. You’ll need to use this password only when accessing the interface. Note: Make sure this password is different from the Wi-Fi password.
3. Customize your Wi-Fi network
A Wi-Fi network includes a Wi-Fi name (or SSID) and a password. Like any proper name, the SSID is public. So, by default, everyone will see it unless you choose to hide it. Still, pick one of your liking.
The password, on the other hand, needs to be a secret. Choose a hard-to-guess one but easy to type in, especially on a small screen like a printer. Generally, a string of random numbers (and letters) will do. Again, ensure this password differs from the router’s admin password above.
Tips
When it comes to passwords, it’s always about keeping them a secret. Complexity is not always a positive attribute. The goal is to create a password that is both difficult to guess and easy to remember and use.
A Wi-Fi password that includes letters, numbers, uppercase and lowercase, and special characters can be a real pain, especially when you need to enter it into an IoT device, such as a printer or a media streamer — even a modern one like the Fire TV.
Generally, when it comes to Wi-Fi, it’s best to use a digit-only password. Here’s a way to make a password effective and easy to remember:
Pick an eight-word-or-longer phrase and use each word’s letter count to form the password.
If you use the previous sentence, the password would be 422063345652438 — use a different phrase for yourself. If you think you can’t remember the password, write that sentence down instead of the password itself.
Use the most common encryption method — currently WPA2 or WPA3 — for the password. Note that some existing Wi-Fi clients won’t work with the newest WPA3. You might want to avoid using that or use it in the mixed WPA2/WPA3 mode.

All Wi-Fi routers have more than one band — Dual-Band, Tri-Band, or even Quad-band. You can use a single SSID for all of them or use multiple SSIDs among them to segment your network, which is helpful if you have devices of mixed standards. Details on how to handle the SSIDs and other settings can be found here.
4. Initialize the Internet connection
Depending on the router, you can do this on the Internet, WAN, or Setup part of the interface.
For most Internet connections, you can leave it at Auto (Automatic IP) and let the router detect the setting by itself. However, note that some ISPs have special requirements, such as a specific MAC address, a hostname, or DHCP query frequency. This information is generally provided to you by the provider.
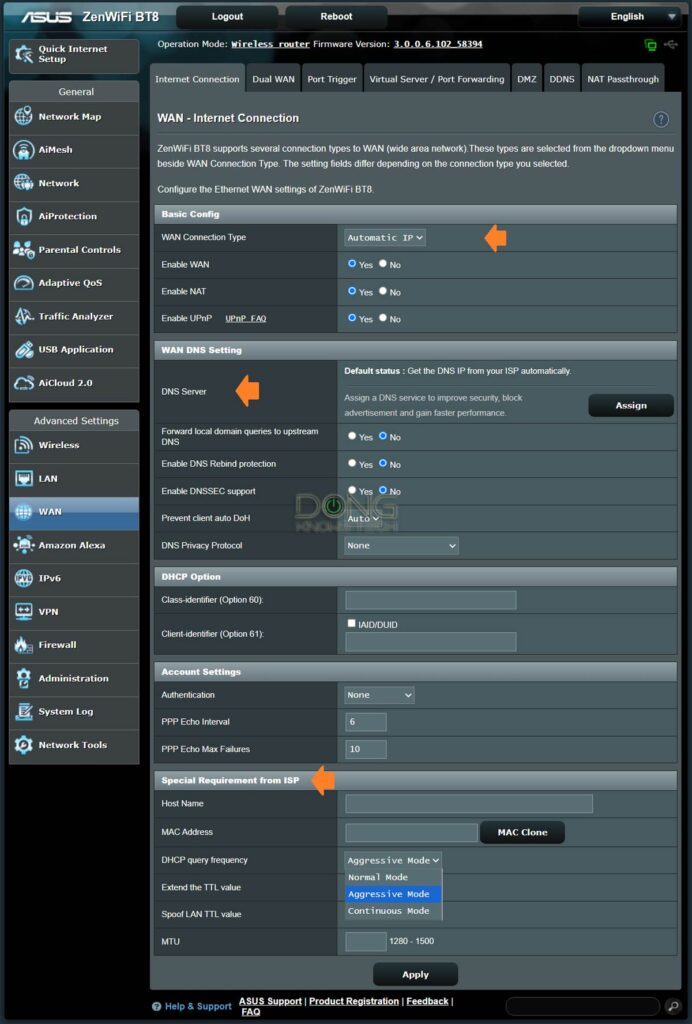
Most importantly, an Internet plan with a static WAN IP address will require you to enter the values of the WAN IP address, subnet, and Default Gateway information correctly. In this case, it’s generally best to copy and paste the ISP-provided information — one wrong digit will cause the connection to fail.
Some broadband plans still use a login account, such as PPPoE, or unique settings. In this case, again, you’ll need to pick the appropriate option and enter the information provided by your ISP.
Finally, you can leave the DNS setting as default (the router will use that of the ISP) or customize it according to your liking, as I described in this post on DNS.
Extra: Handling a router’s WAN port
Generally, a router comes with a default WAN port, and it will work. However, some routers come with more options for this port, such as using a faster port for the WAN connection.

If you have Gigabit or faster Internet, it’s a good idea to pick the best (fastest) port for the WAN role when that’s an option. If so:
- Complete the router’s initial setup process above first using its default WAN port.
- Log in to the interface and change the desired port into the WAN role — the router will restart.
- Move the cable from the default WAN port to the newly designated WAN port. (In most cases, though not always, the default WAN port now works as a LAN port.)
Some routers have auto-sensing ports. In this case, any of its ports will automatically work as the WAN when connected to the terminal device. However, in most cases, connecting a router’s LAN port to the terminal device alone will not automatically change its role.
***
Other than that, you can explore different interface parts to find additional features and router settings. Running into problems? Knowing how to reset a router will help. That brings us to the next part: maintaining a home Wi-Fi router.
Home Wi-Fi Router maintenance
A router works non-stop for days or even months on end — it might run into problems occasionally. So, knowing when to restart and how to reset it will come in handy.

Schedule a periodic restart
Like a computer, a reboot helps the router refresh and work better. While most routers can work 24/7, it’s a good idea to restart it once or twice a month.
Many routers have a reboot scheduler that you can use within their interface. In this case, set the router to restart itself every week or two. Pick a time that won’t affect any user.
Alternatively, you can also restart or repower the router manually. Unplug the hardware from the power, wait for about 10 seconds, and plug it back in. Then, give it a few minutes to be ready again.
Router firmware update
Firmware is the operating system of your home Wi-Fi router, and you should use the latest available. New firmware helps improve performance and security and often adds new features.
Generally, if a router has a mobile app, you can use the app to update the firmware. Firmware updates are generally a standard function of any router’s mobile app.
If a router has the auto-update function, you might want to turn that on. In this case, ensure you set the update time appropriately since the router will restart.
A firmware update takes up to 10 minutes, so pick the time accordingly. Generally, a router only has new firmware every couple of months, if at all.
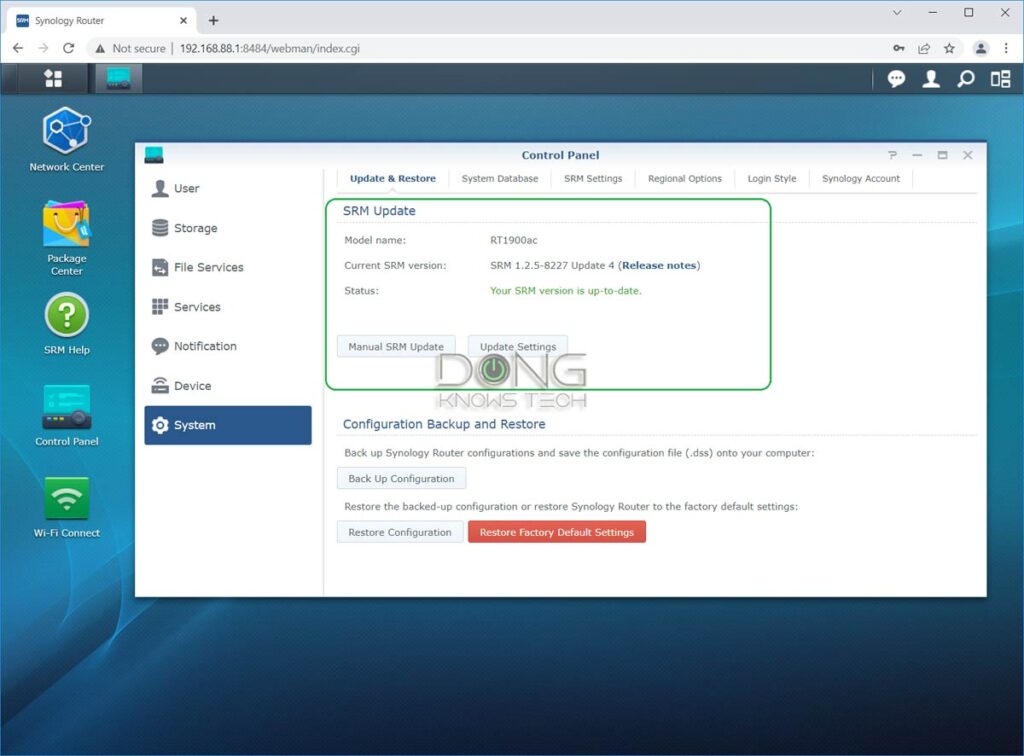
Alternatively, you can manually update a router’s firmware using the steps below.
Steps to perform a router firmware update
- Look for the latest firmware. The easiest way is to Google the router’s model and “firmware,” such as “ASUS RT-BE92U firmware”. Most of the time, the first result is where you can find the latest firmware.
- Download the firmware, which is often inside a zip folder. Open the file and drag the firmware to a location you know, such as the desktop on your computer.
- Log in to the router’s web interface and navigate to the firmware update section. The chart below shows how to find this section in the interface of popular routers. Note that in this section, you can also configure auto-update (if available) or perform the router’s self-update process. Some routers will notify you as soon as you log into their interface if new firmware is available.
- Proceed to upload the new firmware.
- Confirm the update and wait for the process to complete.
Note that the update process takes about 5 minutes and can’t be interrupted. Consequently, if you unplug your router during this process, you might damage it. Also, you cannot access the Internet or your local network during this firmware update.

Router reset
Resetting a router is the last-resort action that brings the router to the default factory settings.
That said, don’t mistake reset for a restart, as mentioned above — many folks call a restart a reset. Technically, a restart is a soft reset, and a reset is a hard reset. But take away “soft” and “hard,” and now you can confuse the two. The point is don’t.
When to do a router reset
Again, you’ll lose all the settings after a router reset. So don’t do this for fun. You only do that when finding yourself in one of the following situations:
- If you’ve lost the admin password to access its web interface, a reset will restore that to the known default value.
- You want to set up your home network from scratch or suspect that someone has hacked your router.
- The router has issues that a restart doesn’t solve.
- You no longer need it (before you give it away).
There are two ways to reset a router: using the reset button or via the web interface. You can reset a router as many times as you like. It doesn’t physically harm the hardware.
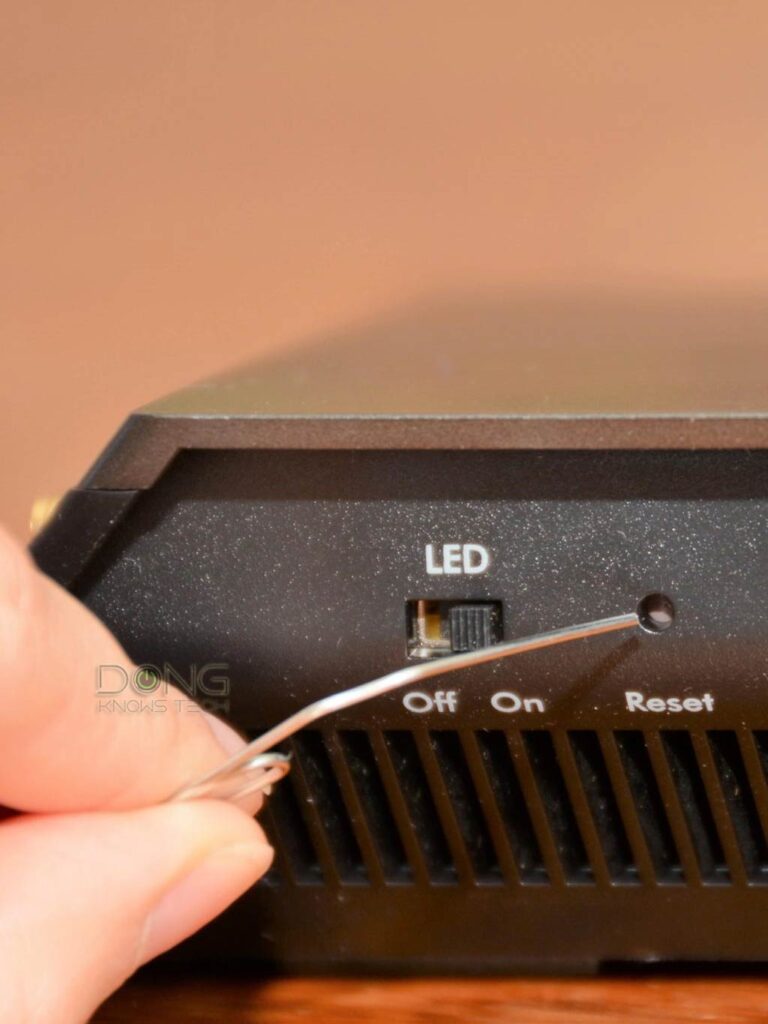
How to perform a router reset via the reset button
Every router has a reset button, often on its underside. You need a pointy object for this job. Here are the steps:
- Locate its reset button. This button is usually recessed to prevent users from pressing it by accident.
- Plug the router into power, and wait a few minutes for it to boot up fully. Now, use a pin (or a pointy object) to press and hold the reset button for about 10 seconds. You’ll note that the router will restart, and its LED status light will recycle. And that’s it.
If you want to ensure the router has reset, wait a minute or two for it to fully boot up again to see if the Wi-Fi network is gone and the default Wi-Fi network is now available.
Extra: The 30-30-30 router reset
With some old routers — those of Wi-Fi 5 and older — you might want to try the 30-30-30 reset method to ensure the router is fully reset. Here’s how:
- Press and hold the reset button for 30 seconds with the router fully powered on.
- Without releasing the reset button, unplug the power and keep holding the reset button for another 30 seconds.
- Plug the power back in and keep holding the reset button for another 30 seconds.
In this method, you press and hold the reset button for 90 consecutive seconds.
Router backup and reset via the web interface
You can also reset a router via its user interface — if you still have access. In this case, you also can back up its settings before the reset.

- Log in to the web interface, as mentioned above.
- Navigate to the reset function. The table below shows how you can find the Reset function within the web interface of popular routers. Generally, you can see this function in the Administration or System section of the interface.
- Here, you can back up the settings if you want to restore the router’s current condition after a reset.
- Click on the button (or link) to proceed with a reset. The process will take a few seconds to complete.
The takeaway
The first and most crucial step in maintaining a home network is to access its local web interface. That said, if you have a router that doesn’t have a web user interface, keep in mind that there’s not much you can do with it, and chances are a third party is remotely spying on you and those within your network.
Once you’ve familiarized yourself with one router’s web user interface, the next time, things will be self-explanatory to an extent, even when you move to a new brand entirely.

Hi Dong,
I found your information while I was looking for reviews for the TP-Link Deco BE25, then I read about the US banning TP-Link so I carried on reading as I saw it interesting and I saw your suggested Mesh systems from other manufactures. One of them is the Asus, of which I’m a great believer of and I have several devices from Asus including a ROG Laptop, 2 PC’s with ROG Maximus MB’s etc.
So, I’m now looking at the ASUS ZenWiFi XD5 as my Mesh system. From what I read in your info above, my question is, can I keep using my existing ISP Router, which is also the Gateway, by connecting the first XD5 Router to one of the LAN Ports of this Gateway? It is a Technicolor Router with the Wan Port connected to the ONT fibre box. The reason I have to keep using this is that it also has my landline plugged in one of the two grey telephone ports at the back as we do need the Landline! Besides, it also holds my credentials with my ISP, i.e. when I hard reset it, after it boots it goes back to my ISP setting without me having to put in all the settings and info, except of course going in its Web UI to change my SSD Username & Password from the default ones.
Thank you in anticipation for your help in this matter.
Yes, Anthony. After that log into the primary unit of the XD5 (the router) and change operation mode into AP mode. More on how to handle an ISP-supply gateway in this post (item B.3 applies to your case).
Thank you so much for your quick welcomed reply Dong!
At least now I know it can be done.
Since yesterday, I’ve been also looking at the ASUS ZenWiFi BD4 which is WiFi 7 rather than 6, but I’m not sure if it’s worth the difference between the two products? I know it’s up to me, but I wonder if you would have any preferences between the two? Thanks again and keep up the good work.
You can learn more about that in this post on Wi-Fi 7. For now, though, I’d say it’s fine to stick with Wi-Fi 6.
Thank you for your reply. That confirms what I was thinking as I already started reading one of your excellent posts. I’ll have a look at this Link you sent me though! Thank you again for your help!
Hi Dong,
Thank you for your help and guidance. I had posted a while back. Here is a brief summary.
I live in the mountains. Only have site to site Internet. Download speed is like 20mbps. Planning to move to Starlink but need to wait for a year. On your great advice i bought the Asus XD5. Got 3 of them and set up the mesh network in my home. I now bought another set of 3 XD5. So i not have 6. I am trying to get the Wifi reach my gate for open close but the range is not sufficient. I know speed is the biggest problem. What would be the best way to set up the 6 mesh system. One is the main one connected to modem how do i use the other 5 to maximize range. In the new set one of the devices has to become the router or can i use all of them as nodes? I tried this but cant see all of them on my app. Any advice from your would be great.
Thank you!
Sam
Your situation is mentioned specifically in the setup steps in this post, Sam. Good luck!
Hi Dong
It looks like (to me) that your example on tips for passwords has an extra 5 after the (2) 3s.
Counting each letter also seems like too much work and easy to make a small error like that.
For me, I like long sentences that mean something to me, but have no meaning to anyone else. Like an old girl friends name, address or phone number. Or something that happened once that sticks in my mind etc. I also use 1 for i or 4 for “for” etc. Easy for me to remember and easier to type in.
EG – from a fishing trip – WhatanicelargeBon1tacatch##
I could add the year of the trip if numbers were required, etc.
It’s just an example, Edgar. Your convention is excellent for passwords in general. For Wi-Fi, tho, it can be hard to use with certain devices that have no real keyboard.
Hi, Great information here and on your other posts. I have been reading your site over the past couple days but have a couple specific questions I can’t seem to find answers to. I have two ISPs, one is fiber and one is Spectrum cable (though I don’t have cable, only internet). I have a home office that I connect one service to and the rest is for my personal use. So right now, 2 netgear routers, one for office and one for home. The one for home has 4 ports on the back, one goes to a Netgear ProSafe 24 port Gigabit switch; one goes to a netgear wifi access point on the other side of the house; one goes to an AppleTV; one goes to other TV. The switch has about 11 unused ports. Spectrum needs to serve the home network because AppleTV has a Spectrum app that I watch channels through. Now I’m considering consolidating everything into a dual WAN Router and plugging all the wired devices into the switch. 1) Do you think the media devices (appletv) would be able to “find” the Spectrum WAN on a dual WAN router? 2) Is there a “best port” to plug the Switch into (type etc)? 3) Should all my wired connections be in the switch and none directly into the router? 4) Can the router handle more than one switch? (the 24 port one I have and a 4 port one in the office?)
Any help you can give (including just referring me to an answer) would be greatly appreciated.
Thanks,
Jonathan
You need a Dual-WAN setup as described here, Jon. After that you can program the two WAN accordingly. Though not neccssary, you can assigh a specific device to a particular WAN in a load-balance setup.
Hi Dong, thanks for all the sharing! 2 quick questions:
1, I recently bought an AX86U, in terms of connection reliability for many different devices among wifi5, wifi6, 2.4G, 5G, will you recommend using the SmartConnect feature to let the router figure out which band for which device? Or will you recommend to have separate SSIDs for 2.4G and 5G and manually assign to different devices?
2, will you recommend to create a separate guess network to connect all my smart devices like plugs, door bells and clocks? Or is it safe to connect them to my main network?
Thank you!
Hi Kai,
1. I’d always separate them. But this depends on what you want. It’s convenience vs control. Separating also allows you to handle older devices better — more in this post.
2. You might have to make them part of the main network sometimes. This is case by case and has little to do with security. More in this post.
Hi Doug,
Great piece. Where can I find the rest of: Home Wi-Fi Network Explained: How to Build an Entire System From Scratch? Please. I am particularly interested in the security aspect. I will be going to places where sharks are need all the help I can get. Thanks
It’s here and also in the related post box on top, Howard.