When configuring a home router, you’ll run into many Wi-Fi settings with cryptic names.
If you have no idea what they mean and find it hard to know the correct value to enter, you’re not alone. I myself have a hard time remembering all those acronyms or keeping tabs on various ways different networking vendors call the same things.
The point is, at the very least, we need to appreciate the inconsistent wording in home networking and Wi-Fi. There are also good and bad setting combos.
This post will explain the common ones among these pesky Wi-Fi settings in friendly language. When you’re done, you’ll be able to configure your home network more confidently.
It’s worth noting, though, that many of these settings are like switches and buttons under the hood of a car. And as such, you generally should leave them alone. But an inquiring mind will still find this post a satisfying read.
Note: In this post, we’re talking about Wi-Fi settings, not the features of a Wi-Fi router. If you want to learn what your router can do besides hosting wireless and wired connections—being a mini NAS server, managing Quality of Service (QoS), hosting a virtual private network (VPN), handling Dynamic DNS, etc.—check out the Related Posts box below.
Dong’s note: I first published this piece on September 26, 2022, and updated it on June 17, 2023, with up-to-date information.
Wi-Fi Settings: The not-so-common applicability
All Wi-Fi broadcasters (routers and access points) share the same principles of the Wi-Fi standard(s) they support. Yet, they don’t offer the same level of hardware customizability—you make some do more than others. However, they all have a set of common settings.
Beyond that, you’d need a standard router with a web user interface to access other Wi-Fi intricacies. Even then, different vendors offer different levels of in-depth customization.
So, it’s normal if your beloved router doesn’t have everything I’m about to mention or if it has something else that I will miss. In any case, I’ll update this post as I see fit.
Let’s dive in!
Common Wi-Fi settings
Again, these settings are available in most routers, but the details or even the naming of each vary.
Radio (a.k.a Wi-Fi band)
Radio is the hardware that broadcasts the Wi-Fi signals. Generally, each Wi-Fi band—2.4GHz, 5GHz, or 6GHz—is a piece of radio hardware. So a dual-band router has two pieces, and a tri-band router has three, etc.
In some broadcasters, this setting allows you to enable or disable a band. When all radios are turned off on a Wi-Fi router, it’s now a non-Wi-Fi router—or just a router. Others allow for turning these bands off on a schedule.
Why would anyone want to turn a Wi-Fi band off? To avoid interference (especially applicable in a double-NAT situation), reduce energy consumption, or just because you can.
In most cases, you don’t need to worry about this setting.
Wi-Fi standard (a.ka. Wi-Fi mode or Wireless Mode)
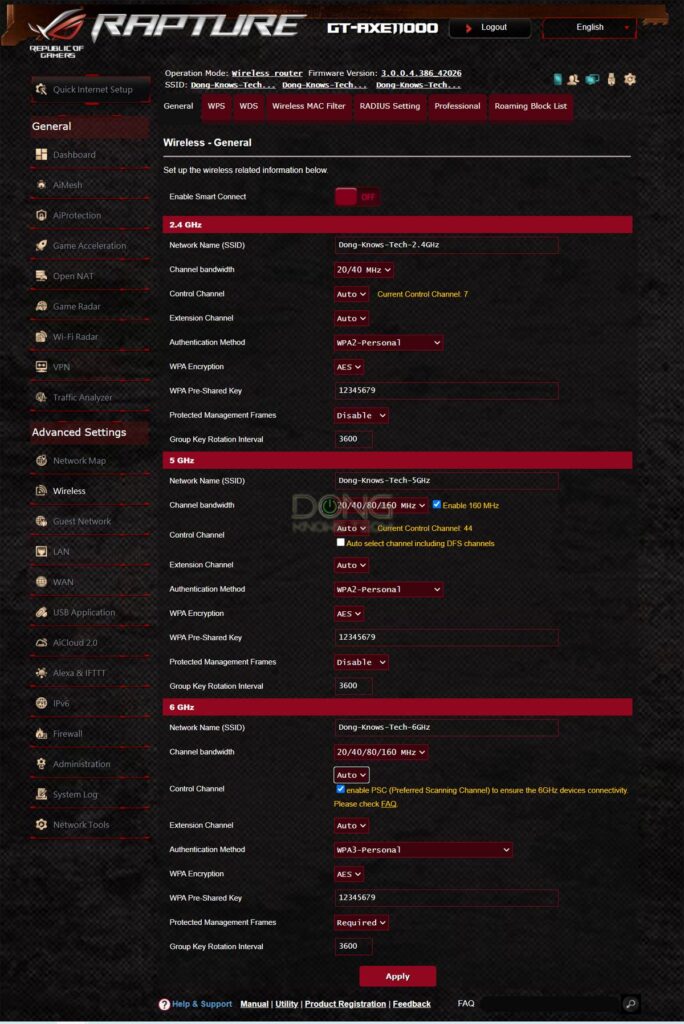
As the name suggests, this setting dictates to clients which Wi-Fi standard or standards a band accepts, including 802.11ax (Wi-Fi 6), 802.11ac (Wi-Fi 5), 802.11n (Wi-Fi 4), 802.11g, 802.11a, and/or 802.11b.
The recommended default value (Auto) means the band will handle all clients of all Wi-Fi standards it supports.
Forcing a band to work with one standard means it will not allow clients of other standards to connect.
In reality, this setting is only effective when you pick the latest standard to reserve the band exclusively for fast clients. If you enforce a lower standard, a client of a higher stand can still connect since it’s backward compatible, albeit at a slower speed grade.
Wi-Fi name (a.k.a SSID)
Wi-Fi name—often network name, wireless name, etc., or just name—is the friendly moniker of the Service Set Identifier (SSID) a Wi-Fi band uses to broadcast the signals.
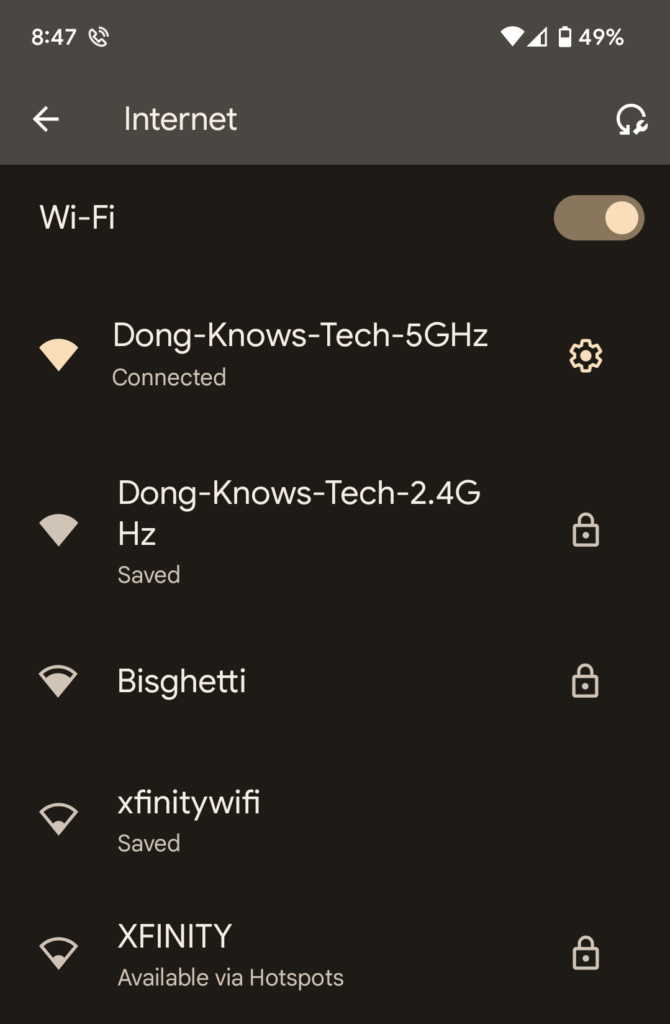
An SSID appears each time you want to connect a Wi-Fi client (like a laptop or a phone) to a new network for the first time. As a name, you can make it anything you want, but it’s best to use plain text with no space or special character and keep it short and sweet.
Dong-Knows-Tech is an excellent example of an SSID—you should use it!
By default, an SSID is shown publicly, but you can choose to hide it (for security or privacy reasons). If so, you’ll need to program the SSID into the device manually each time you connect a new client to the network.
An SSID can be open and allow any device to connect. But often, it has access restrictions, such as via a password. More on this in the Wi-Fi Security section below.
Virtual Wi-Fi networks (SSIDs): Guest, IoT, MLO, etc.
Generally, one Wi-Fi band has one SSID, but in many cases, you can create multiple virtual SSIDs for a single band. Following are the popular examples of virtual SSIDs:
- Guest Wi-Fi network: Often automatically formed by adding “-Guest” as the suffix to the main SSID’s name. This is an isolated network designed to allow Internet access but not local resources, such as shared folders or printers, as a local security measure.
- IoT network: Often automatically formed by adding “-IoT” as the suffix. This is a virtual, non-isolated Wi-Fi network supposedly designed for Internet of Things devices. An IoT network was first offered based on a half-truth pretense that IoT devices should be connected to an isolated network for “better security”. Later on, it was adopted as a handy practice to handle low-power Wi-Fi smart devices that require lower-security requirements or would otherwise hinder the performance of the primary SSID.
- MLO network: This SSID is often automatically formed by adding “-MLO” as the suffix when available as an option. Available only in Wi-Fi 7, it combines multiple bands into a single network and allows supported devices to connect using more than one band at a time, according to the standard’s multi-link operation feature.
Generally, you can rename these virtual SSIDs to your liking—the suffixes are not required. Some even allow additional settings such as bandwidth limits or scheduled availability.
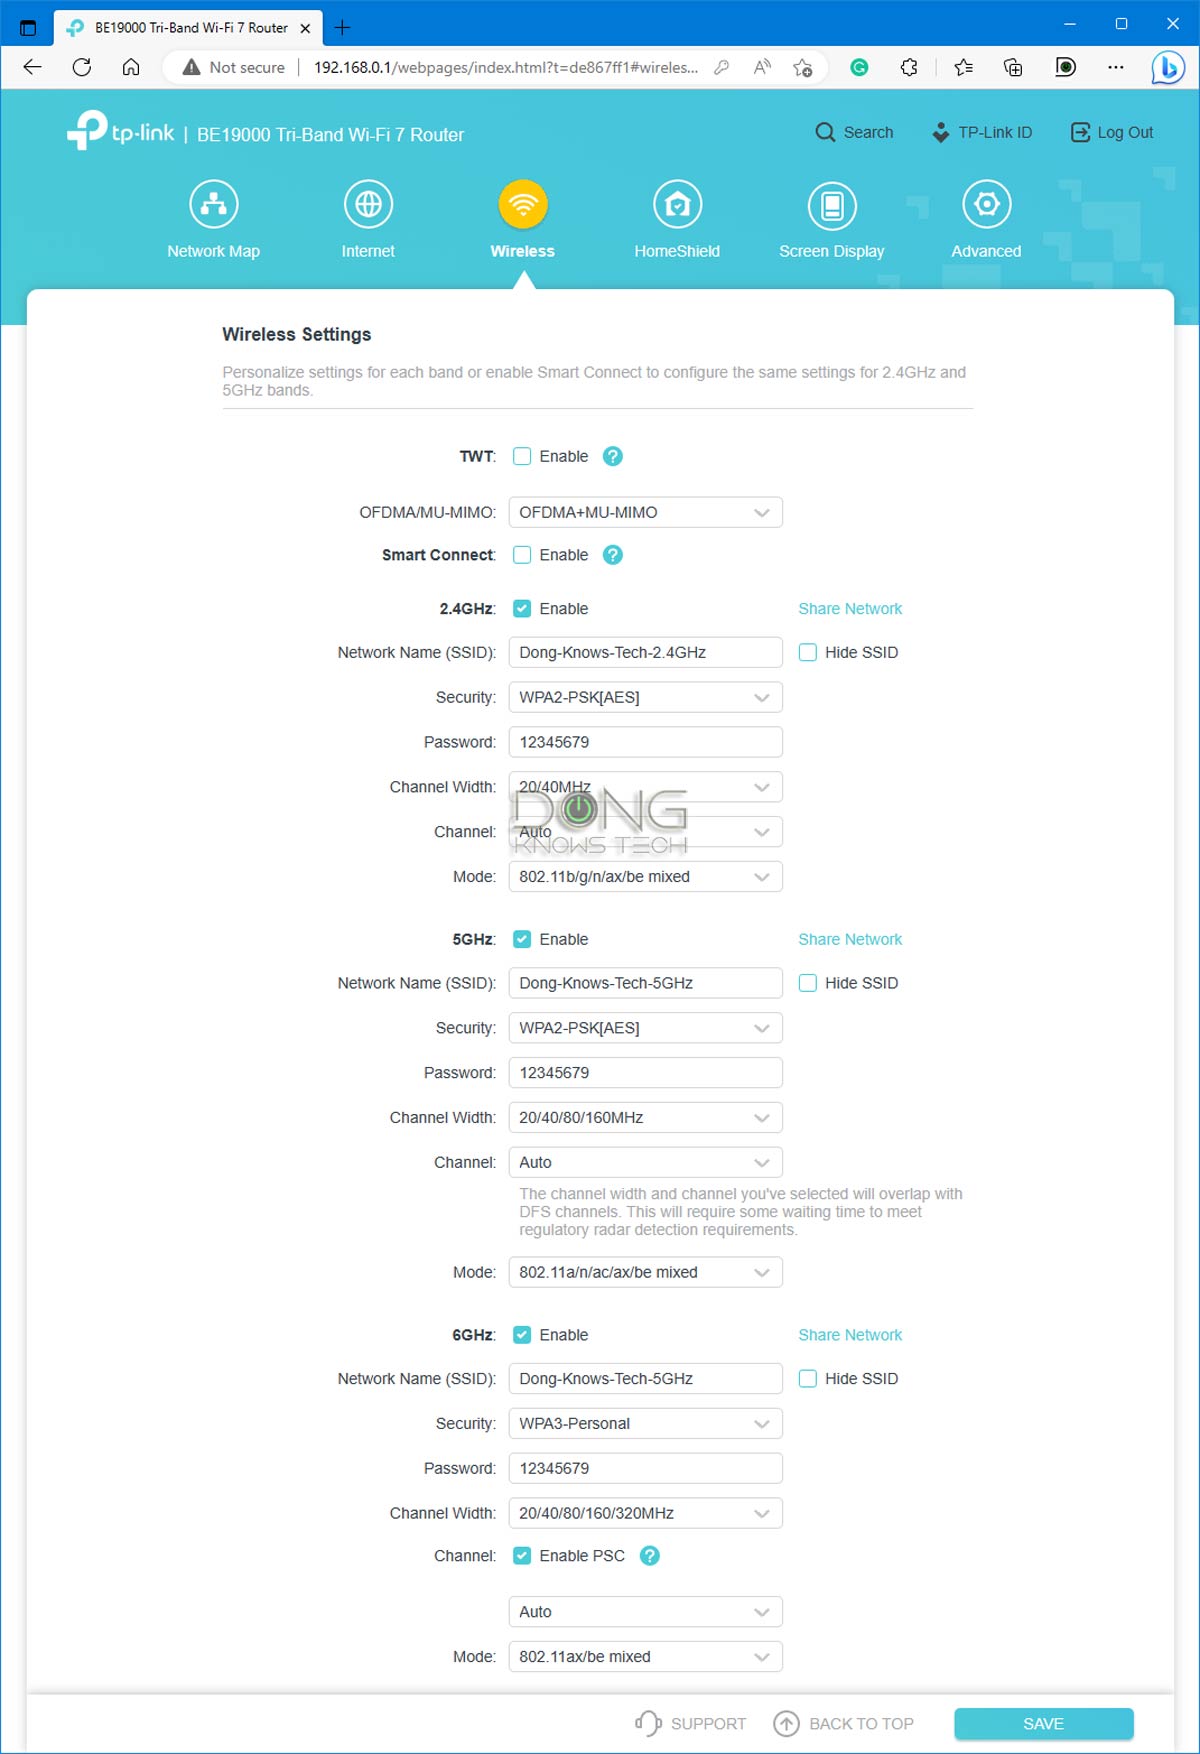
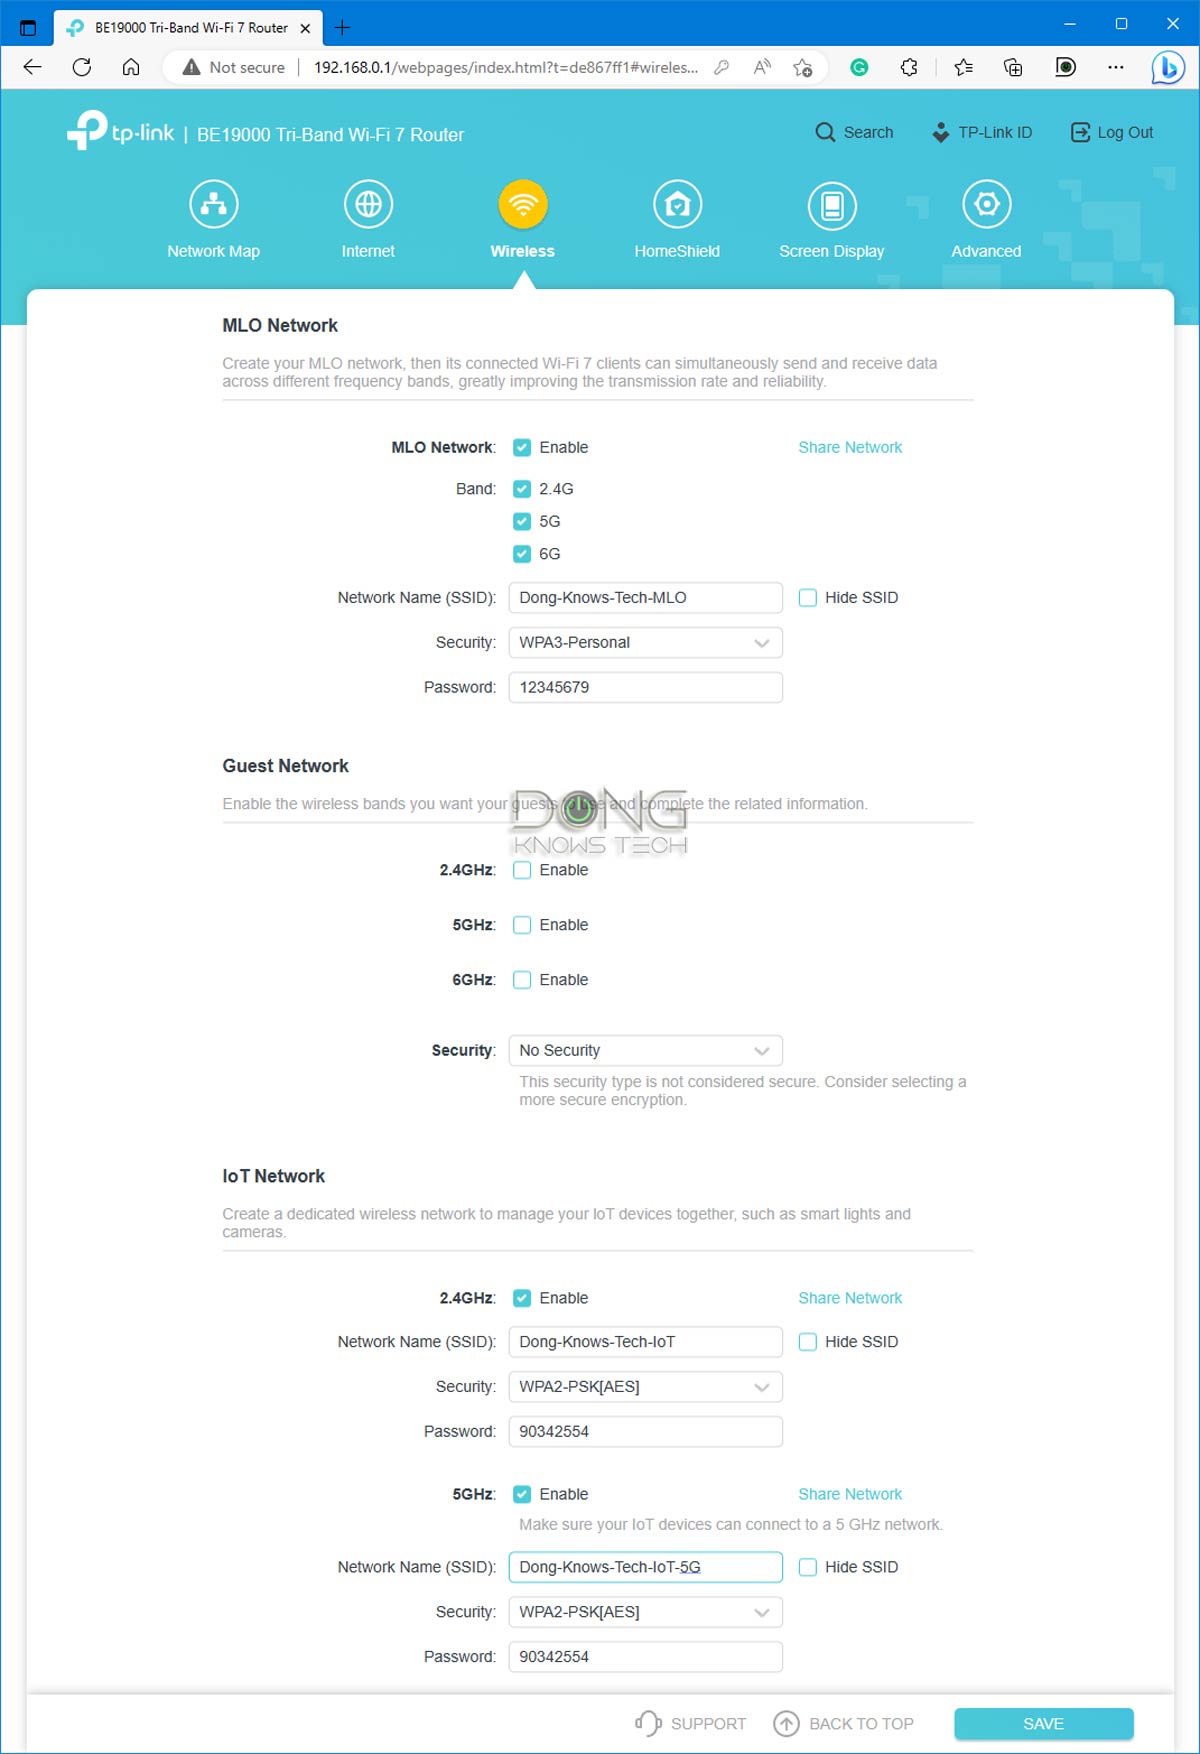
Except for MLO, all virtual SSIDs share the same characteristics set by the band’s main SSID, including channel and bandwidth—more below.
Wireless scheduler (a.k.a SSID schedule)
This setting allows users to turn off an SSID based on a schedule in case it’s not needed or wanted at a particular time, such as when you want the household to stay offline.
Smart Connect: Lumping all bands into a single SSID
Smart Connect is a technique applicable to broadcasters with more than one Wi-Fi band (Dual-band, Tri-band, or Quad-band), allowing the use of a single SSID for all of these bands.
For Smart Connect to work, the hardware uses Smart Connect Rule, a.k.a Band Steering, to determine which band a client will connect to.
Band Steering (a.k.a Smart Connect Rule)
Band Steering—applicable when Smart Connect is used or when you use the same network name (SSID) and password for multiple bands—automatically steers clients between the bands based on set parameters. Generally, the purpose is to optimize the usage of each band’s bandwidth.
The idea is that the clients will connect at the fastest speed possible by connecting to the best band in real-time.
In reality, Band Steering doesn’t work well among home routers, where clients might end up connecting to the slowest band (2.4GHz) simply because this band has the highest signal strength thanks to the extensive range.
Band Steering works better, albeit still far from perfect, in business/enterprise applications where the system can dedicate more resources to the task.
Generally, Smart Connect is a convenient way to stay connected if you don’t mind not connecting to the fastest band (5GHz or 6GHz) at all times. Additionally, in many cases (not all), Smart Connect doesn’t allow for customizing each band individually. If so, all bands will use compatibility-favored settings and not the settings optimized for best performance.
“Dumb” Connect: Using separate SSIDs across the bands
If you want more control over which band or bands your device uses, turn Smart Connect off and separate the bands using different SSIDs.
In this case, if you give two or more SSIDs the same name and password, you’ll get a similar effect as Smart Connect. Generally, a client would pick whichever band (sharing the same SSID) is faster and has stronger signals above a certain dBm threshold to connect. The success rate will vary depending on the clients.
Using a unique SSID for a particular band is the only way to make sure you can connect a particular device to it at all times. It also allows for the most in-depth settings, including the settings for the fastest performance.
Wi-Fi Channel
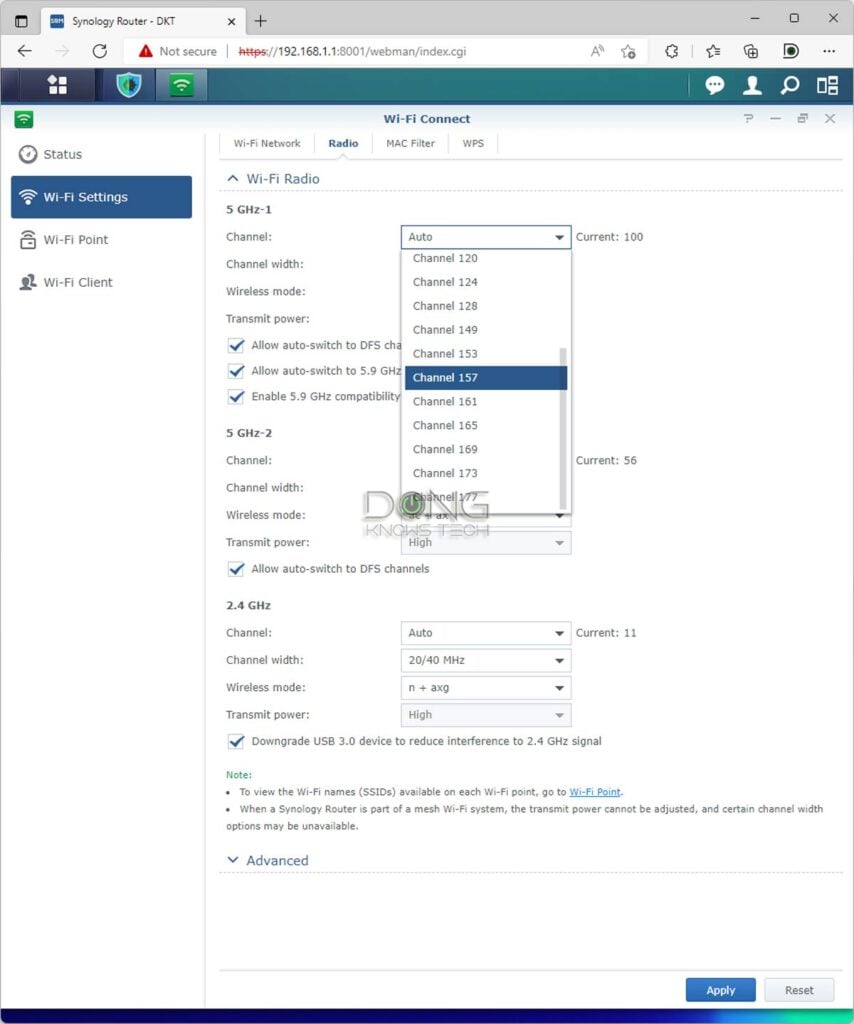
A Wi-Fi band is a large radio frequency segment divided into smaller portions called “channels”. By default, each Wi-Fi channel—often shown as an option represented by a number in a drop-down menu—is a 20MHz-wide portion. This is the minimum width supported by all broadcasters and clients—the support for higher widths determines the performance grade of the hardware.
That brings us to a few sub-settings:
Channel Width (a.k.a Bandwidth)
The name says it all. This setting determines the width of the channel being used, measured in MHz. The wider the channel, the larger portion of the Wi-Fi band it occupies, and the more bandwidth it has—it’s faster.
Depending on the Wi-Fi standards and bands, a Wi-Fi channel is 20MHz (default), 40MHz, 80MHz, 160MHz, 240MHz, or 320MHz wide. The wider, the more bandwidth, but the less compatible a broadcaster becomes—legacy clients can only use a channel of a certain maximum width. When possible, pick a width that fits your needs, or you can use the hardware’s Auto setting to apply the appropriate value in real-time.
A wider channel consists of a few contiguous narrower (20MHz) channels, which brings us to the Control Channel and Extension Channel settings.
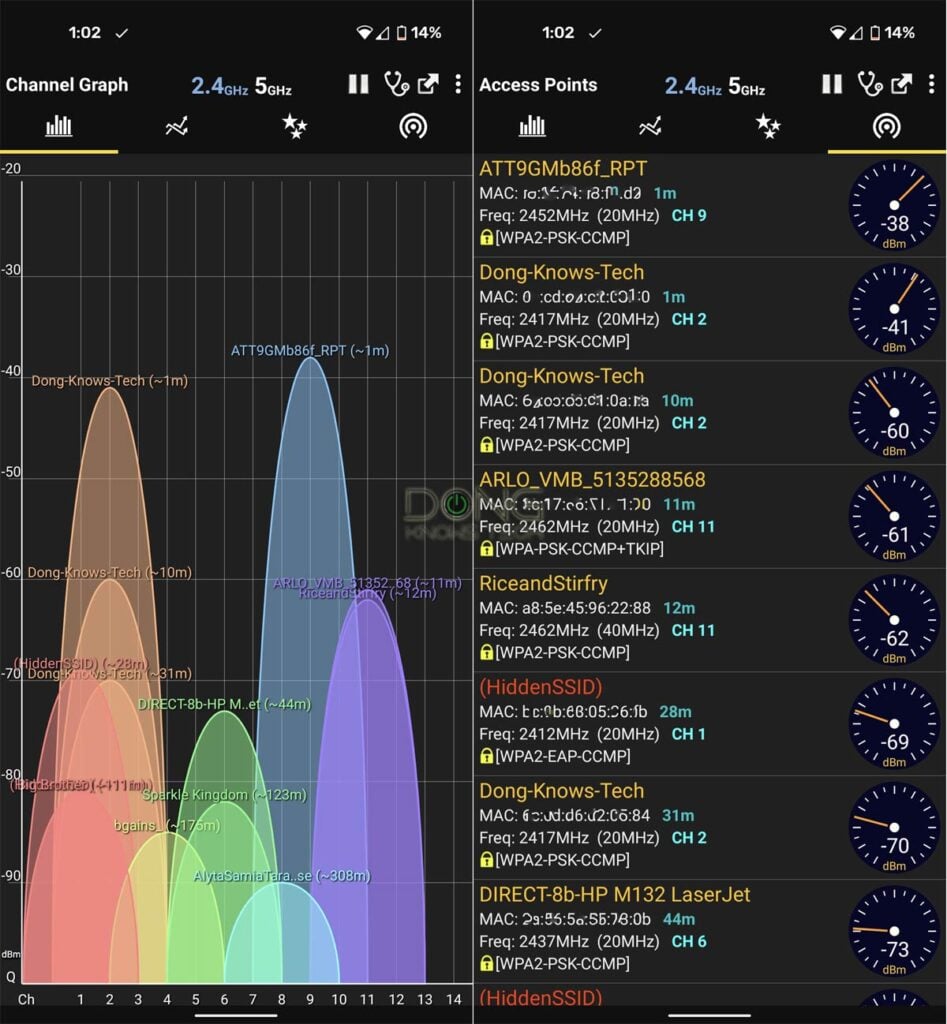
Control Channel
That’s the particular 20MHz channel that you pick on the list. If you leave the value at Auto, the broadcaster will pick one automatically for you.
Extension Channel
This setting dictates the direction—up, down, or both—the hardware will use to extend the Control Channel by combining it with adjacent channels to fulfill the Channel Width setting above.
When available—this setting is not common in all hardware—depending on where the Control Channel is on the spectrum, you can choose the value of the Extension Channel to be Above or Below, or you can leave it at Auto.
Generally, you want to pick the Control and Extension channels that form a channel whose width is not or least overlapped with other broadcasters within the vicinity—it’s a way to make your network more reliable. When in doubt, use the Auto settings to allow the hardware to pick the optimal one in real-time.
Important: Forcing a broadcaster to work at a specific channel or channel bandwidth might cause incompatibility with clients—that’s always the case if you use the UNII-4 portion. That’s because a 20MHz client can’t connect to a 40MHz or wider channel, a 40MHz client can’t connect to an 80MHz or wider channel, and so on.
By default, all broadcasters automatically use the compatible settings or warn you when you manually pick specific settings that are not applicable to real-world conditions. Generally, using this default compatibility setting, often shown as “Auto”, is the safest and should be the first thing to apply when there are connection issues.
DFS channel (a.k.a DFS channel selection or DFS)
Short for Dynamic Frequency Selection, DFS signifies channels shared with non-Wi-Fi applications, such as RADAR.
When the broadcaster is elected to use DFS channels, it takes the backseat, meaning it will automatically switch to a different channel if another application needs that DFS channel.
The use of DFS increases the width of the channel and, therefore, Wi-Fi bandwidth but can also cause intermittent brief disconnections.
Wi-Fi bands vs. channels vs. stream
Wi-Fi uses three frequency bands: 2.4GHz, 5GHz, and 6GHz. The width of each band is measured in MHz—the wider the band, the more MHz it has.
The 6GHz band is the widest of the three, with a total width of 1200MHz, ranging from 5.925GHz to 7.125GHz. Depending on local regulations, only a portion or portions of this entire spectrum are available for Wi-Fi applications.
In real-world usage, each band is divided into multiple portions, called channels, of different widths. Depending on the Wi-Fi standards and hardware, a channel can be 20MHz, 40MHz, 80MHz, 160MHz, or 320MHz wide. The wider a channel is, the more bandwidth it has. The number of channels in each Wi-Fi band varies depending on the channel width, but there can only be so many.
The 6GHz band has enough space for three 320MHz channels or seven 160MHz channels.
Data moves in one channel of a particular band at a time, using streams, often dual-stream (2×2), three-stream (3×3), or quad-stream (4×4). The more streams, the more data can travel at a time. Thanks to the ultra-high bandwidth per stream, Wi-Fi 6 and later tend to have only 2×2 clients.
Here’s a crude analogy:
If a Wi-Fi band is a freeway, channels are lanes, and streams are vehicles (bicycles vs. cars vs. buses). On the same road, you can put multiple adjacent standard lanes (20MHz) into a larger one (40MHz, 80MHz, or higher) to accommodate oversized vehicles (higher number of streams) that carry more goods (data) per trip (connection).
A Wi-Fi connection generally occurs on a single channel (lane) of a single band (road) at a time. The actual data transmission is always that of the lowest denominator—a bicycle can carry just one person at a relatively slow speed, even when used on a super-wide lane of an open freeway.
Wi-Fi Security
Since Wi-Fi signals are democratically broadcast in the air, by default, all devices can connect to them, which can be a security issue. To restrict the connections, all Wi-Fi broadcasters have a security measure that includes the following settings:
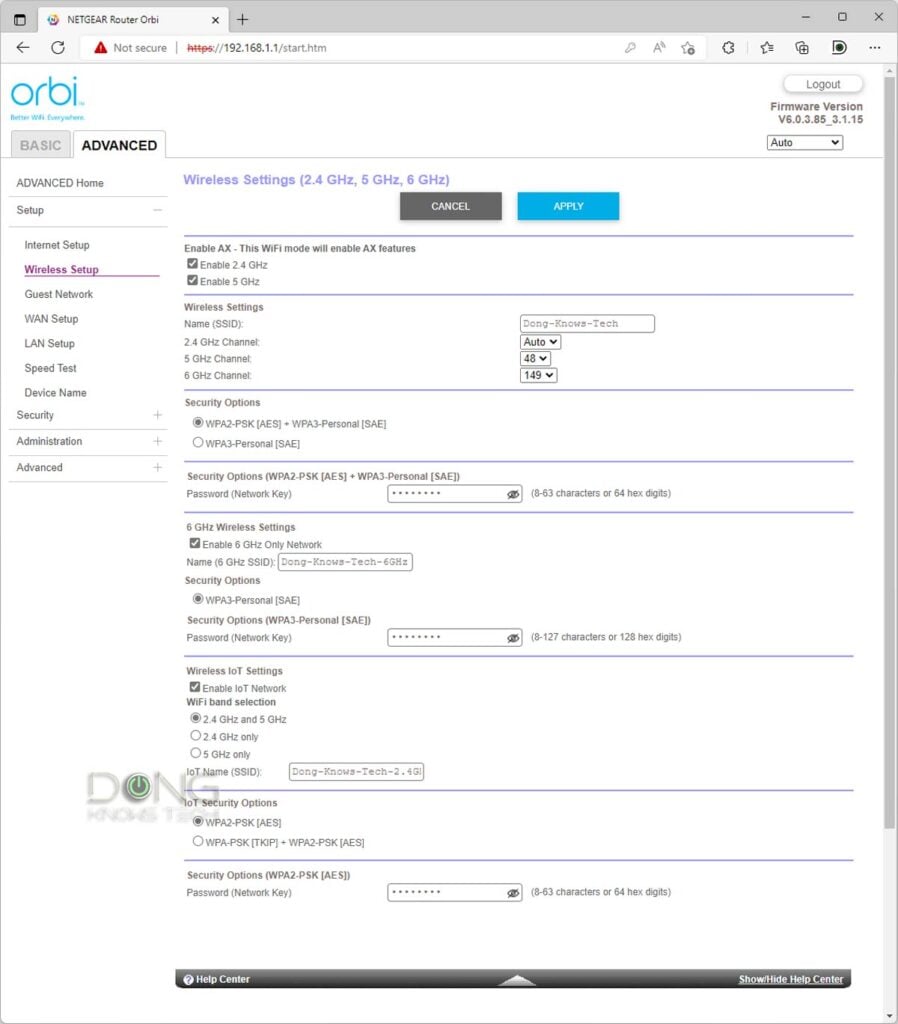
Authentication Method (a.k.a Security Standard, Security Option, or Security Level)
This is the type of security the hardware uses among these:
- Open (or Open System, or Enhanced Open): No security. This setting is available in all Wi-Fi standards and hardware and allows any clients to connect to the broadcaster. It’s applicable when you don’t need to restrict access to any client or if you have different types of restriction, such as SSID isolation (like a Guest network).
- WEP: Short for Wired Equivalent Privacy, which is a dated and obsolete security method used in legacy hardware (Wi-Fi 4 and older).
- WPA: Short for Wi-Fi Protected Access, which replaces WEP as a better security method. Starting with Wi-Fi 5, WPA is required. With WPA, we have the following sub-settings:
- WPA Encryption: When WPA is used, there are two encryption options: Temporal Key Integrity Protocol (TKIP) and Advanced Encryption Standard (AES). The latter is more secure and the only option in WPA2 and WPA3.
- WPA-Personal vs. WPA-Enterprise: WPA (all versions) works in the Personal (default) or Enterprise mode. The former applies to most situations and requires a Pre-Shared Key; the latter is for Enterprise applications and requires a RADIUS server. More on these below.
- Group Key Rotation Interval (a.k.a. Key Rotation) is a WPA security feature that automatically refreshes (renews) the encryption key to prevent “guessing”. The default value is 3600 seconds (1 hour), which is generally the ideal interval. Shorter values might seem more secure but unnecessary and can cause the hardware to overwork.
- WPA2: Commercially available in 2006, WPA2 is an improved version of WPA that requires the use of the AES encryption method and introduces the Counter Cipher Mode with Block Chaining Message Authentication Code Protocol (CCMP) as the replacement for TKIP. All Wi-Fi 5 and new devices support WPA2.
- WPA3: The latest security method introduced in 2018 to do away with WPA2. It was first introduced with Wi-Fi 6. Some Wi-Fi 5 hardware also supports this method as an option, while others don’t. Starting with Wi-Fi 6E, WPA3 is mandatory.
- OWE (short for Opportunistic Wireless Encryption): Introduced in 2018 as part of the Wi-Fi Alliance’s Wi-Fi Certified Enhanced Open program, OWE is the alternative to the Open type mentioned above. Applicable to public Wi-Fi hotspots, OWE provides a safer approach to a non-secure network by automatically isolating connected devices from one another.
When picking a security option, remember that the higher the WPA version, the more secure the Wi-Fi network becomes, yet the less compatible (with older clients) it becomes.
For example, WPA3 is only universally supported in Wi-Fi 6E and newer clients. If you use this standard, it’s a sure thing that many existing clients will not be able to connect to your Wi-Fi network. So, better security isn’t necessarily always “better” in real-world usage.
In most cases, you can and should choose a mix of these standards — WPA/WPA2/WPA3—and allow the broadcasters to use appropriate levels with applicable clients. When in doubt, pick WPA. It’s secure enough. Many Wi-Fi broadcasters offer multiple virtual SSIDs, each with its own security standard options.
WPA Pre-Shared Key (a.k.a Wi-Fi Password)
WPA Pre-Shared Key—often network key, network password, or just password—is a secret string of text and numbers that allows a client access to the Wi-Fi network. In short, it’s the password you’d need to type in before you can connect a client to a secure Wi-Fi network.
RADIUS
Short for Remote Authentication Dial-In User Service, RADIUS is a server that provides enterprise-grade authentication instead of a password. When RADIUS is used, a user will use a username and password to connect to a Wi-Fi network, similar to logging in to an email account or a business domain server.
WPS
Short for Wi-Fi Protected Setup, WPS is a quick method to add a client to a broadcaster—via a hardware button or a button within the router’s interface. This method is also often used to link a Wi-Fi broadcaster to an existing one to form a mesh system.
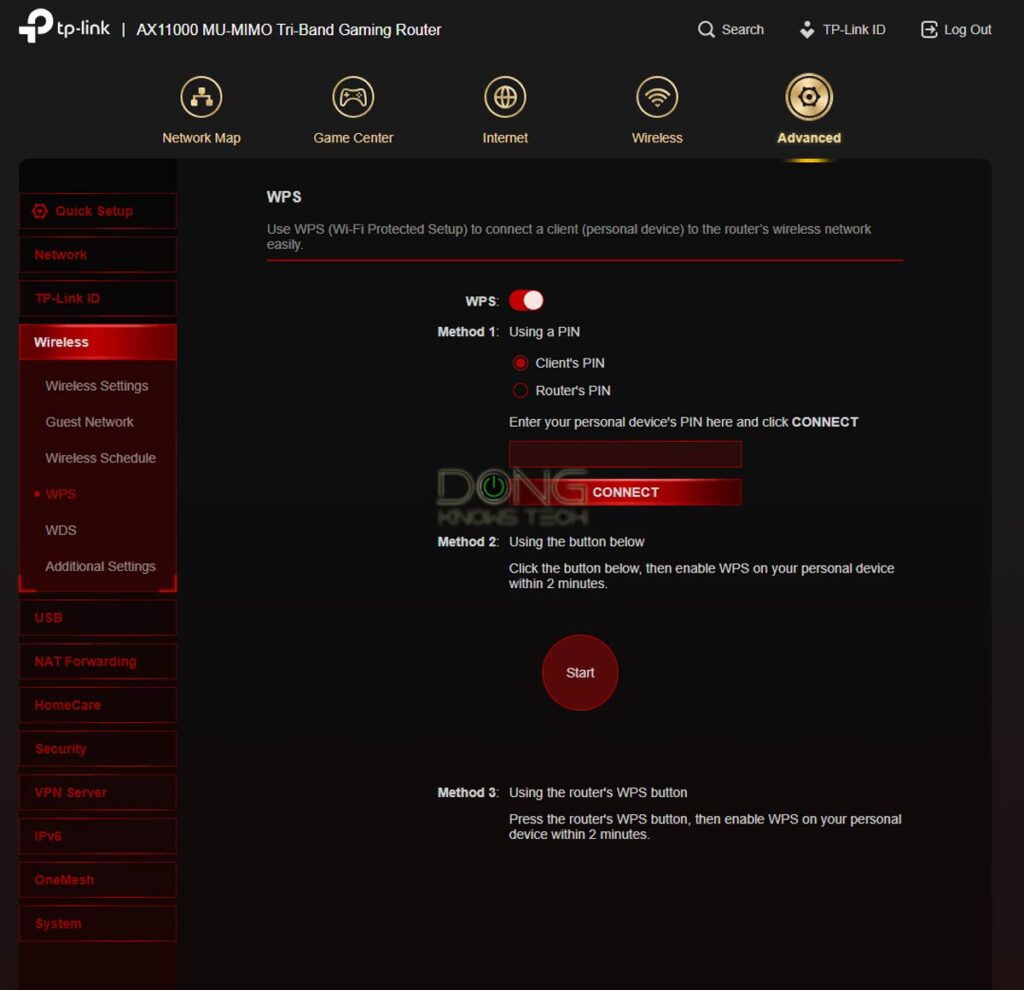
The idea is that you push the hardware or software WPS button on the router (if available) and, within 120 seconds, push the same button on a client. The two will automatically connect, saving you from having to enter the Wi-Fi password.
WPS makes life easier—especially when you need to add an Internet of Things (IoTs) device, such as a printer, to the network—but has been proven to be a security loophole in specific situations. When you press the button, you start a window during which the router’s Wi-Fi security can be compromised.
Thus, for practical and security reasons, the WPS button is unavailable and is obscure when available in modern Wi-Fi hardware. However, in most home Wi-Fi routers, it’s available as a soft option within the web user interface or mobile app—in this case, you can choose to disable it and, therefore, remove the WPS feature.
Less common Wi-Fi settings
Many broadcasters lack these settings, and in those that do, the default values are the “safest”—you might want to leave them alone.
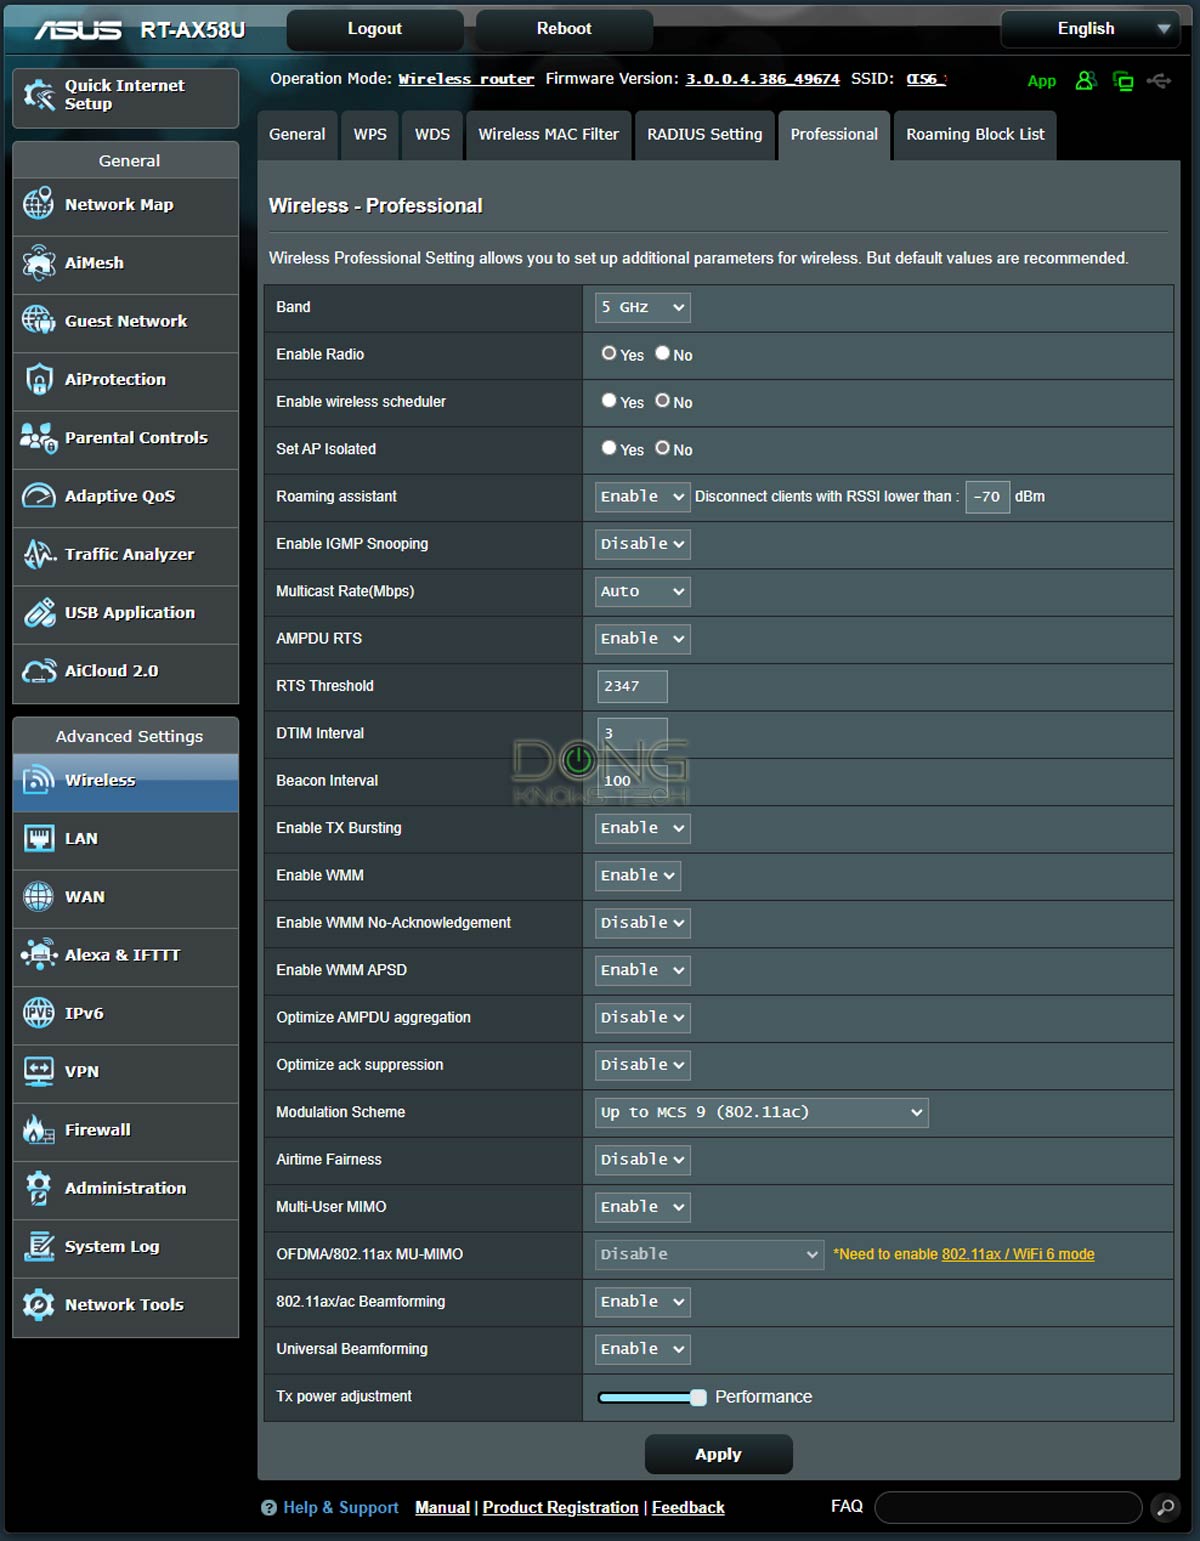
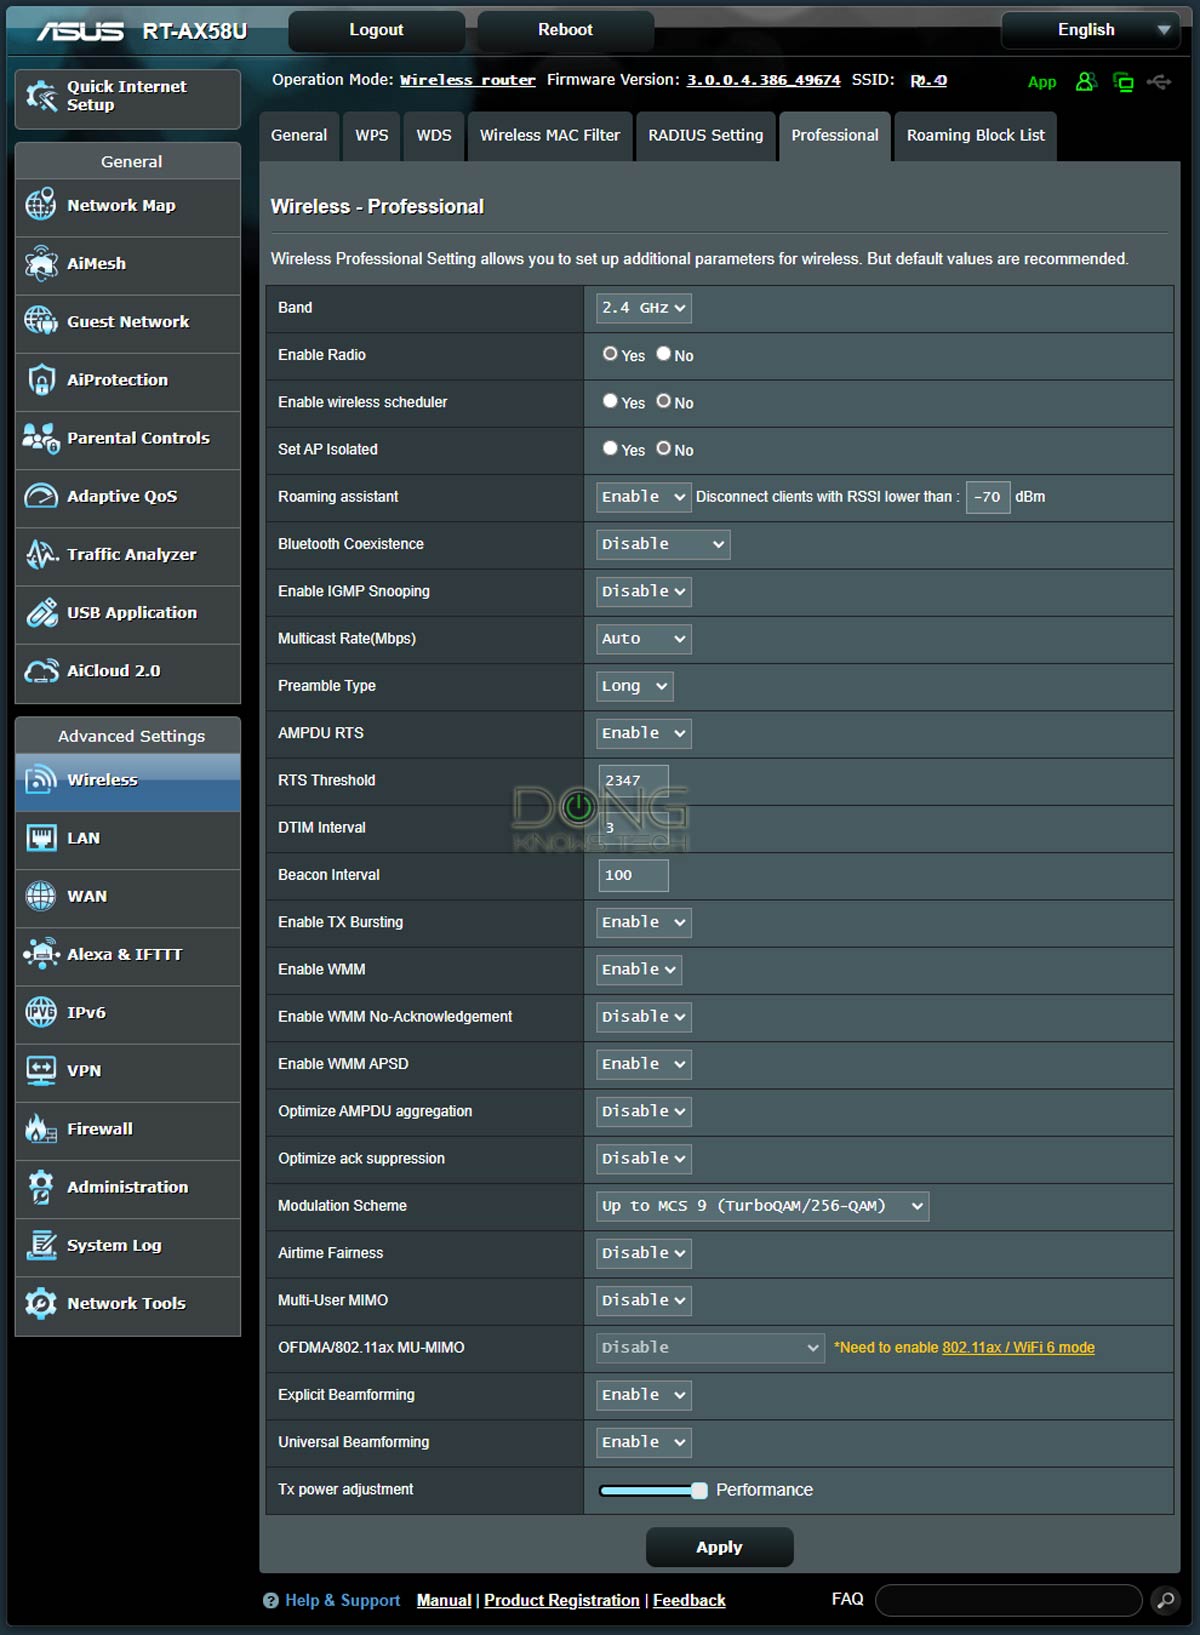
Airtime Fairness
This setting, when turned on, improves the performance of fast Wi-Fi clients at the expense of slower ones. Depending on the situation, it might also cause a broadcaster to overwork.
I detailed Airtime Fairness in this post. Generally, I recommend leaving this setting off (default), starting with Wi-Fi 6.
SSID Isolation (a.k.a AP or network Isolation/Isolated)
Isolation makes connected devices unable to talk to one another locally. All they can access is the Internet. By default, isolation is turned off, except for Guest networks where this setting is turned on.
Roaming Assistant (a.k.a Roaming or Handoff or Seamless Handoff)
This setting is similar to the Band Steering above but at the broadcaster level. It’s applicable only to a network that includes multiple broadcasters, such as a mesh Wi-Fi system.
Handoff is called differently between vendors, but the principle is generally the same—it helps a Wi-Fi device pick the best (often the closest) broadcaster to connect to as you move around a large area.
Here’s a detailed post on roaming assistants for those using an Asus AiMesh system. Generally, the default (best) setting for roaming is -70 dBm.
Broadcasting power (a.k.a TX Power, Transmit Power)
Generally, a Wi-Fi band broadcasts at the maximum power allowed by the region—in the US, that’s 30 dBm or 1 watt. This setting allows for adjusting the power to any level below that. Lower levels shorten the range of a broadcaster.
Wi-Fi 7 has the Automated Frequency Coordination feature that allows for higher broadcasting power for the 6GHz band.
USB Mode (a.k.a Downgrade USB…)
Applicable to a router with a built-in USB 3.0 port. This setting toggles between USB 3.0 mode (default) and USB 2.0. The latter helps improve the performance of the 2.4GHz band.
If you want to use a router’s USB port to host a storage device, USB 3.0 mode is recommended (at the expense of the 2.4GHz band’s performance.)
Other less common Wi-Fi settings
The table below includes less common Wi-Fi settings. In most cases, you should leave them alone.
| Setting Name | Default value | What it does |
|---|---|---|
| Wi-Fi Agile Multiband | Enabled | Wi-Fi Agile Multiband is a setting that improves Wi-Fi coverage and improved connection speed for low-power IoT devices. It’s part of Band steering and roaming mentioned above but geared towards slow devices. This setting has little effect in modern (Wi-Fi 6 and newer) broadcasters. |
| Target Wake Time | Enabled | Target wake time (TWT) is a new feature of Wi-Fi 6 and later that allows a Wi-Fi broadcaster (router or access point) to manage activity in the Wi-Fi network to minimize medium contention between connected clients and reduce the required amount of time a client in the power-save mode needs to be awake. |
| (Enable) IGMP Snooping | Off | A method that the router uses to identify multicast groups, which are groups of computers or devices that all receive the same network traffic. It enables switches to forward packets to the correct devices in their network. |
| Multicast Rate | Auto | The rate at which a router puts messages in groups to send out as multicast to avoid collisions. This setting boosts performance at the expense of latency. It’s best to leave it at Auto. |
| Preamble Type | Long | An error-checking utility or function that helps with data transmission. Long Preamble Type can improve the transmission if the wireless signals are weak. |
| AMPDU (a.k.a AMPDU-RTS)| Optimize AMPDU Aggregation | on|off | Aggregated MAC Protocol Data Unit (AMPDU) deals with congestion problems by aggregating multiple MPDU blocks together. When turned on, this setting improves performance in crowded airspace. However, you should have it off if you want to run critical applications such as video conferencing or voice-over IP. The Optimize AMPDU Aggregation further optimizes AMPDU. |
| RTS Threshold | 2346 (bytes) | The Request to Send (RTS) Threshold is the required packet size (in bytes) the broadcaster has to check if a handshake is required with the receiving client. If the value is 2346 or higher, RTS is effectively disabled. |
| DTIM Interval | 3 | This setting helps devices discover broadcasting access points to switch between them in a mesh system. High values (in milliseconds) can improve performance by saving resources, but they make it harder for clients to switch from one AP to another. |
| Beacon Interval | 100 (milliseconds) | The time between beacon frames that are transmitted by a Wi-Fi access point. The AP radio will transmit one beacon for each SSID it has enabled at each beacon interval. |
| Enable TX Bursting | on | A legacy setting that improves performance for 802.11b and 802.11g clients and has no effect on newer clients. |
| WMM APSD | enabled | The Wi-Fi Multimedia (WMM) Automatic Power Save Delivery (WMM APSD) helps mobile clients save battery while connected to the Wi-Fi network by allowing them to enter standby or sleep mode |
| Protected Management Frames (PMF) | 6GHz: Required 5GHz: Capable 2.4GHz: Disabled | Protected Management Frames (PMF) is a standard defined by Wi-Fi Alliance to enhance Wi-Fi connection safety. It provides unicast and multicast management actions and frames a secure method with WPA2/WPA3, which can improve packet privacy protection. |
| Fragmentation Threshold | 2346 (bytes) | The maximum length of the frame, in bytes, beyond which packets must be fragmented into two or more frames. The default value is 2346, which effectively disables fragmentation. Low fragmentation thresholds may result in poor network performance. |
| Modulation Scheme | Up to the highest possible | The level of Quadrature Amplitude Modulation (QAM) is being used for the band. The higher the number, the more bandwidth. |
| Turbo QAM (2.4 GHz only) | on | Better performance for this band but must be supported by the client and can cause issues for those that don’t. |
| Beamforming | on | Steers the Wi-Fi signals of both broadcaster and client for a better connection. Both ends must support this setting for it to take effect. There are different flavors of Beamforming—Explicit Beamforming (2.4GHz), 802.11ac Beamforming (5GHz), and Universal Beamforming—but they all vary from brand to brand. None is a universally standard feature. |
The takeaway
There you go. This post will come in handy if you want to tinker with your router. These are generally all of the Wi-Fi settings you’d need to know in a home network.
The rule is to back up your router’s settings before messing around.
When you’re at it, remember that the best can indeed be the enemy of the good. Not so sure? Leave the default values alone.


Is there a specific WiFi analyzer app on iPhone that you like / recommend?
Nowadays, I generally use WiFiman by Ubiquiti, Raghu, there are options for all platform, Windows, Mac, iOS, Android, etc. It works especially well when you have a UniFi console but it’s great even when you don’t.
Dong, as always, your knowledge and info is very much appreciated and have learned allot. I was curious though if by chance Aimesh has 802.11r and or 802.11s as part of Asus Aimesh capabilities? My scanner only shows 802.11k/v as the only capabilities of Aimesh technology. If by chance it doesn’t have the s/r protocols, is there a big disadvantage of this?
That varies by hardware, Matt. Those protocal are for roaming assisistance which is always hit or miss.
Hello Dong,
I’ve read that selecting WPA2/WPA3 could cause connectivity issues with WPA2 devices. Is that true, and do these settings impact speed at all?
Thanks!
Jeff
That’s not true, Jeff, unless the router’s firmware has issues. And these two don’t affect speeds.
Hi, Dong,
I recently purchased an ASUS ET12 at your recommendation, switching from Plume WiFi Super Pods which don’t cover my 4000sq house well.
I’m curious why the 6Ghz band isn’t managed by SmartConnect. What’s the best practice for my devices that support WiFi 6e? Shall I set them to auto connect to both SSIDs generated by the router and let the devices individually decide which SSID to connect to when?
Thanks!
That’s normally the case of 6E broadcasters, Hussein. You can name the SSID the same as the other band (with the same password) to get the same effect or give it a separate name if you want to control which band you want to connect to.
Dong, I find your technical knowledge and willingness to share same at a level many networking enthusiasts like me can absorb and build upon as refreshed based on industry standard changes unparallel. You are very much appreciated by me and I am many others. Thank you
👍
Great information for when I get one. I need your help please. I’m looking for a whole home mesh system with a lot of range.
The Deco systems sound good but as you said, the lack of security is an issue and there is no web interface.
You said you can’t pick a channel on them as well. I do that now to try and not use the same channel as my neighbor.
You can’t set a band to work in a particular Wi-Fi standard.
Can you suggest a future proof mesh system like this that has these missing options?
They are installing 1gig fiber (ONT + router) at my house soon and I want a good mesh system. I will have them shut off the router side.
It’s only being run to the house so the inside will be Wi-Fi no wires in the walls. 2 Story house with 4400 sqft. Sheetrock walls.
We stream movies from a Fire stick, Prime and Netflix. We get buffering and hate it. How do I get the best range throughout the house?
The current router is in my office (3 laptops and a wi-fi printer is in the office) on one side of the house and the main TV is on the opposite side of the house.
Wi-Fi devices – 7 smart TV’s, 7 DirecTV cable boxes, 4 cell phones, 2 fire sticks, 6 laptops, Printers, 2 Portals, 3 Echo Dot, 2 Stereos connected to TVs, Nintendo switch and one more gaming console.
There’s no “future-proof” mesh, Lionel. Generally, you want to get just the ONT but if possible turn the gateway into the bridge mode. For more on how to deal with the ISP-provided gaetway, check out this post.
It’s almost impossible to get Gigabit via wireless mesh, so maybe you should run a network cable. More in this post.
I generally don’t comment on specific situations.
Please sign me up to your newsletter
Thank you 🙂
You can do that yourself, Rory, via this page.
What are the PHY rates shown on the backhaul channel on the Asus routers in the AIMesh part of the GUI? Is this the maximum potential data transmission rate for backhaul? Having trouble finding the definition on the internet.
My 6 ghz PHY backhaul rates on my ET12 are showing 1.9 gbps transmit and 1.7 gbps receive, which I’m guessing is pretty good? Especially given the walls and distance it has to go in my house given the limited range of the 6 ghz band.
That’s the physical rates that change in real time depending on the connection speeds AND data transmission. It’s irrelevant to good or bad, or even fast or slow; that’s like you’re looking at the traffic, which changes and can be at zero if there’s no car passing by, to determine if a freeway asking is freeway is well-built.
Thanks for the great article. I just switched to the Asus ET12 from the Nest mesh and man is it so much better in so many ways!
While the SmartConnect generally works well for me, my bedroom TV likes to connect to the 2.4 ghz despite signal strength being nearly similar for 5 ghz. I’m thinking the only way to force it to the 5 ghz is to separate the SSIDs. Are there any issues with having separate SSIDs as far as my home network devices communicating with each other? Like if my printer is on 2.4 ghz band and my laptop is on 5 ghz band…will laptop still be able to see the printer on my network? Or if Alexa is on 5 ghz and wants to communicate with a home IOT device on the 2.4 ghz band?
Thank you for the great resourceful site. Your review of the ET12 is what got me to decide to get it.
Looks like all I needed to do was scroll down the comments a bit as Robert W asked a similar question and my question would’ve been answered. Thank you!
I found another way I can deal with it (and keep the single SSID) was to block the TV from the 2.4 ghz band using the wireless MAC filter.
Either that or you can use the Smart Connect rules. But yes, you’re on top of it. 🙂
Well the MAC filter option didn’t last. Was working fine, then all of a sudden I discovered that the Asus had changed the filter from one frequency to all 3 frequencies so any devices with a filter for one frequency got completely blocked from all frequencies. Not sure why that happened as I hadn’t changed anything further (perhaps a bug?). Went ahead and separated the SSID’s instead.
Generally, MAC filtering is not reliable, James. Most devices use virtual MACs these days by default when connecting to a Wi-Fi network for the first time. But what happened in your case could be a bug, too.
It makes no difference in terms of connectivity whether or not you use Smart Connect or separate the SSIDs, James — more here. I personally separate them since that gives me more control.
For: Control Channel
On the 2.4 GHz band; a user should select channel 1, 6 or 11. Anything else is un-neighbourly! Setting to “Auto” is not good as it chooses non-standard channels. Wi-Fi is designed to work with co-channel interference (multiple users on the same channel); but adjacent-channel interference is heard as so much noise. Someone on “auto” on, for example, ch 2, 3, 4, or 5; just splatters “noise” over adjacent users and gets “noise” back from them, degrading everybody’s communications.
Spelling:
Band Steering works better in enterprise applications where the system can dedicate more recourses to the task.
Probably: “resources” not “recourses”
Thanks for the report, Mike. Next time you can just highlight the text in question and hit the red button that jumps out from the top right corner. 🙂
Neat – thanks. Have a great day.
Hey Dong, about setting up separate 2.4 and 5.1 networks. Will homekit function correctly if the AirPod or AppleTV hub is connected to the 5.1 network while the other homekit devices connected to the 2.4?
I don’t know what you’re talking about, Robert.
Please give this post a serious read and follow related links before asking more questions. And when you’re at it, please ask the question as though you cared, as noted in the comment rules.
wow. So sorry I thought I was asking a serious question. I love you website that made me purchase my current Asus routers and also installing Merlin. Maybe I wasnt clear on the question but it wasnt meant to be offensive,
No worries, Robert. I appreciate your sincere response. We get *many* questions and messages daily — not all are friendly and well-intentioned…
Anyhow, I reread your message, and it seems you were asking if devices connected to the 2.4GHz band and the 5GHz band would work (together). If so, the answer is generally yes; Wi-Fi is just an alternative to network cables. That said, unless you use some restrictions or VLAN (Guest networking,) with the bands, the connected devices will behave as standard parts of the network and therefore can communicate as expected.
Hope this helps.
Thank you Dong, very informative!
Now I know the reason why my iPad didn’t see my Printer when both were connected to the Guest network!
Following your advice, I recently created a Guest network and moved most devices to it.
Thanks!
Sure, Luis. More on Guest network in this post by the way.