You might have heard of a computer’s hosts file. If not, you didn’t miss much. Literally, that’s a file named “hosts”.
Unlike computer files in general, this file has no extension that determines what type it is. So, the file itself is generally inconsequential. You can create one for the hell of it.
However, when placed at a particular location within your computer, it can be an effective tool to control a computer’s access to the outside world—the Internet. In this case, I’d refer to it as the HOSTS file (cue spooky music). The file is not case-sensitive, but most of the time, you’ll find it in all lower case.
If you’re interested in simply and effectively blocking certain websites from a computer or are curious about what sort of sorcery this is, you’re reading the right post.
I’ll explain how the HOSTS file works, its location, and a quick way to edit it on your computer, whether it’s Windows or Mac.
Dong’s note: I first published this post on April 12, 2022, and last updated it with the latest information on April 10, 2025.
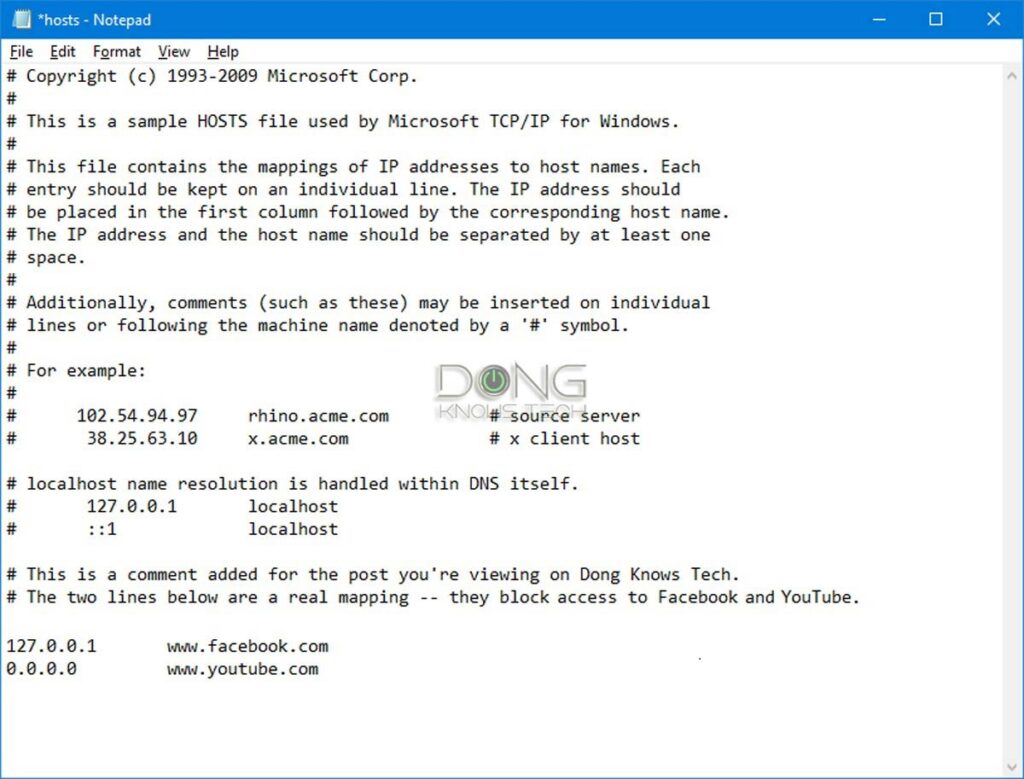
The hash sign (#) in the HOSTS file signifies commenting.
In programming, commenting is a way to explain what a line of code does without affecting the code itself. The computer ignores the # symbol itself and the text that follows it on each line.
If the HOSTS file has # at the beginning of every line, which is the default, it’s as good as a blank file from the computer’s perspective.
What the HOSTS file is, and how to handle it
Every computer running Windows, macOS, or Linux has its HOSTS file. By default, this file is not in effect. It’s there, but it doesn’t do anything other than contain brief information on what it is and how to use it.
In other words, you can delete the default HOSTS file, and nothing will happen. We don’t need it. And we can always recreate it.
Understanding the HOSTS file
When edited in a certain way, the HOSTS file works as the computer’s local DNS mapper. It’s a manual way to map a domain, such as facebook.com, to a particular IP address of your choosing.
The HOSTS file was the original way of binding a domain with an IP address in the early days of interconnected computers—the foundation of the Internet—before the DNS server came into existence.
Extra: DNS server in brief
In a nutshell, a DNS server is similar to a public directory. It points you to where you want to go among millions of online websites, applications, and services.
A DNS server is not to be confused with Dynamic DNS, which works somewhat the opposite way.
Here’s a specific example of the role DNS plays:
Let’s say you want to access this website directly and enter its domain name, DongKnowsTech.com, on your browser, such as Chrome, Firefox, or Edge. The following will happen:
- The browser queries the system’s designated DNS server about the user-provided domain name.
- The DNS server looks up the domain to verify that it exists and is attached to a website. If so, it returns the website’s unique IP address, which is a string of seemingly random numbers.
- The browser follows that IP address to load the page you’re viewing.
This process is necessary because computers only understand numbers, while humans are bad at remembering them. In a way, the domain name is the vanity moniker of a website’s IP address. “DongKnowsTech” is much easier to remember than 73.124.79.110 or any other random string of numbers.
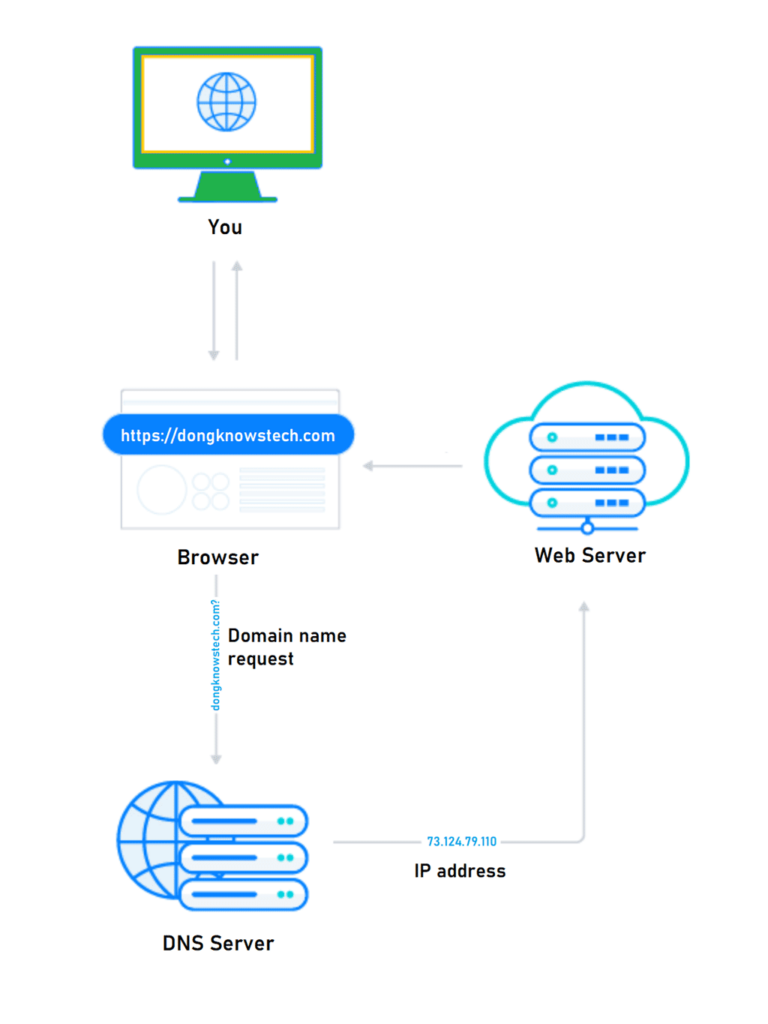
And you’re reading this page on your screen because such a process has worked. A similar procedure occurs whenever you want to reach an online party using any application.
In many ways, a DNS server is similar to the once-commonplace telephone directory service, where you only need to remember a person’s name, not their phone number. It’s the first thing that must happen before a connection can be established.
So, when you map a domain to a non-existing IP address or that of the computer itself, you effectively block the domain for the computer’s users.
Here’s an example of an entry in the HOSTS file:
127.0.0.1 www.facebook.com #facebok is a waste of timeThe format of the line is known as the command syntax. In this case, it’s:
IP address (space) domain (space) #(optional)
A couple of things to note:
- The part starting with # is optional. It’s a comment.
- We only need a single space to separate the IP address and the domain, or the domain and the optional comment. But for clarity, you can use multiple spaces or the Tab key on the keyboard.
- The domain should match that of the actual website—some include the “www.” part, others don’t, as in www.facebook.com vs. facebook.com. To be sure, you can use a separate entry for each.
This particular example entry binds www.facebook.com to the IP of the localhost, the computer itself, and in effect, blocks the computer’s access to Facebook. Specifically, when you go to facebook.com, you’ll get a message that the website doesn’t exist or is unavailable.
Alternatively, you can also use 0.0.0.0 as the IP address to get the same effect. And if you use the IP address of another website, the entry becomes a mean prank or a (malicious) hack.
This mapping takes effect system-wide and immediately, meaning it will affect all user accounts of a computer, and you don’t even need to restart the computer.
The way it works, every time you want to reach a domain, such as entering it on a browser, the computer will check its HOSTS file for the mapping, and if the domain is manually mapped, it’ll use that and no longer query a DNS server for the domain.
And you can manually map as many domains as you’d like—as long as you know what you’re doing and don’t abuse it.
Within the HOSTS file, each mapping entry (each domain) takes one line. You can map multiple domains to the same IP. So use 0.0.0.0 or 127.0.0.1 if you want to block all of them.
With that, let’s find out where this glorious HOSTS file resides on your computer and how to edit it.
How to handle the HOSTS file on a Windows computer
On a Windows computer, the HOSTS file always resides at this location:
c:\windows\system32\drivers\etc\In the rare case where Windows is installed on another drive instead of c:, change the drive letter accordingly.
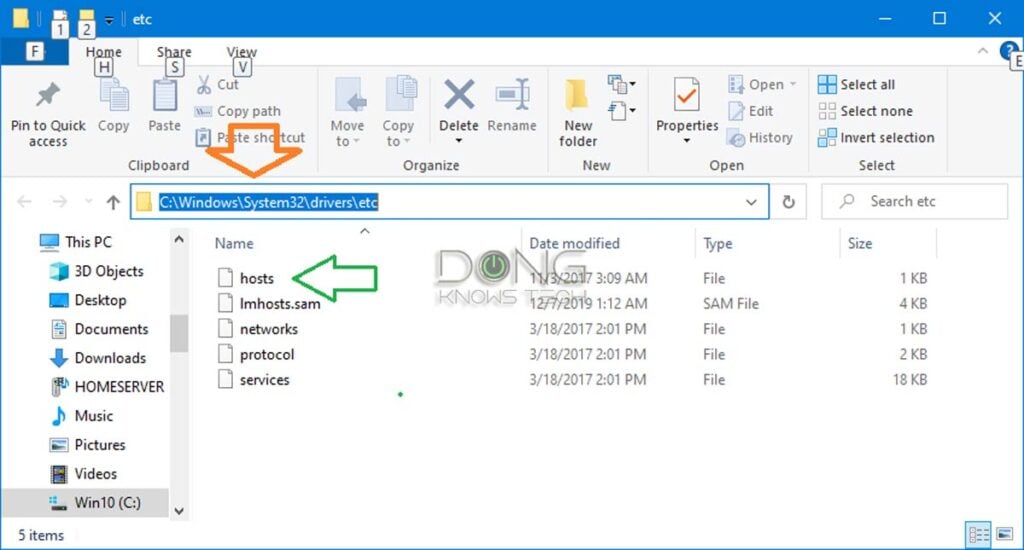
Copy and paste that line into the address bar of Windows Explorer and hit Enter to quickly reach the location, as shown in the screenshot above.
Now you can manage the file however you do any file, including deleting, renaming, or making a copy of it. By the way, if you move the HOSTS file to another location, it no longer has any effect.
It takes some work to open and edit the HOSTS file. Since it has no extension, the usual double-clicking won’t work. Plus, you need to open it with administrator privileges to make changes—otherwise, the file is read-only, and you can only view the content.
But generally, you can open it the way you open any file using a text editor, such as Windows’s built-in Notepad app.
If you’re unfamiliar with the app or don’t know how to handle files in general, the fastest way to open the HOSTS for editing in Windows is to open it via an elevated Command Prompt—again, you won’t be able to save the changes otherwise.
Here are the steps (as shown in the screenshot below).
1. Run elevated Command Prompt
- Type “cmd” (no quotes) into the search field on (or under) the Start Menu
- As Command Prompt appears in the result, right-click on it and choose “Run as administrator”.
- Answer the security prompt, if any, affirmatively.
The Command Prompt window will appear.
2. Open the HOSTS file in Notepad:
Copy and paste the following command into the Command Prompt window and hit Enter:
notepad c:\windows\system32\drivers\etc\hostsThat will open the file in Notepad for editing.
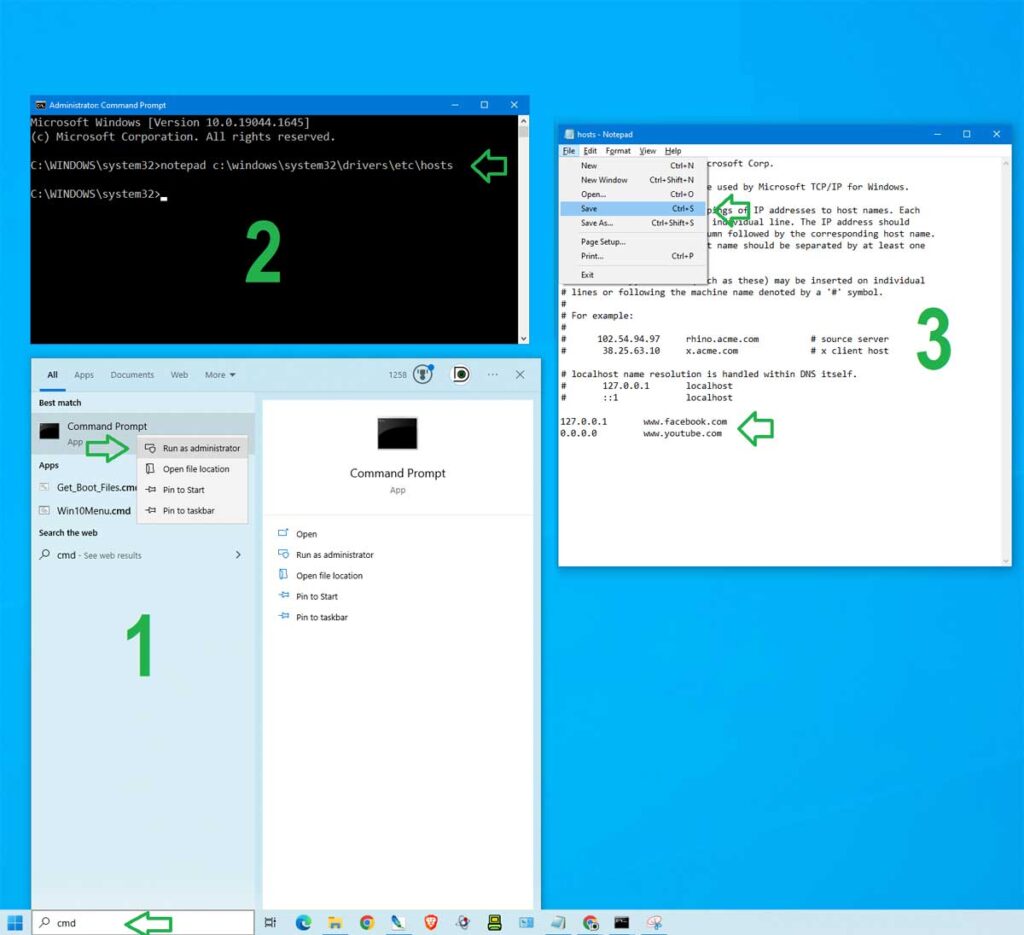
3. Edit the file and save the changes
- Enter domains you want to block following the syntax mentioned above, one domain per line, as shown in the last two lines in the screenshot. (Hit Enter each time you want to create a new line.)
- If you no longer want to block a domain, remove the entire line.
Once done, save the file. (Use the Ctrl+S keyboard combo, or just close the file and choose to save when prompted.)
Mission accomplished. The blocking will take effect immediately.
The HostsMan app
For Windows users, there’s a handy free application called HostsMan that makes handling the HOSTS file easy.
The app has a built-in HOSTS file editor and a host of other tools to manage entries. It can even disable/enable the HOSTS file via a little icon in the notification area.
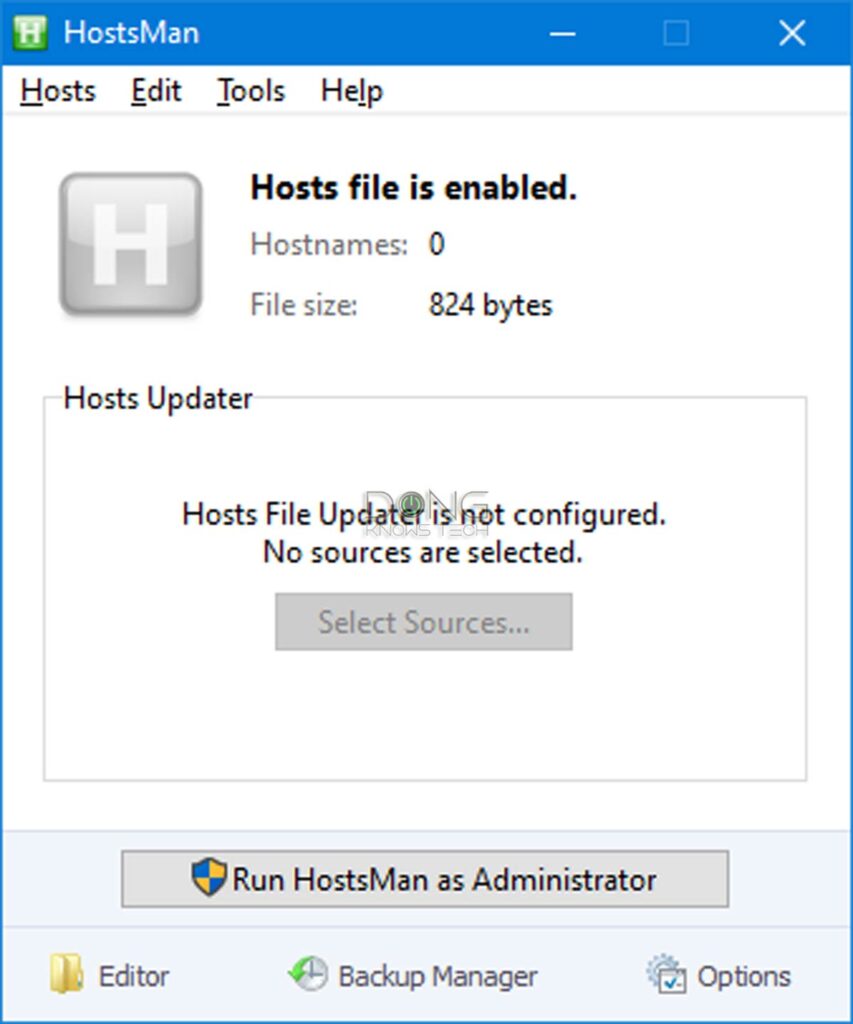
It’s generally not a good idea to use an app if that’s not necessary. But if you’re interested in using the app, you can download it via this link.
By the way, the HOSTS file shares the same syntax across platforms. Consequently, you can use the same file for Windows and macOS. Or you can copy the content of the file between them.
How to handle the HOSTS file on a Mac
The HOSTS file is generally hidden in the /private/etc/ folder on a Mac.
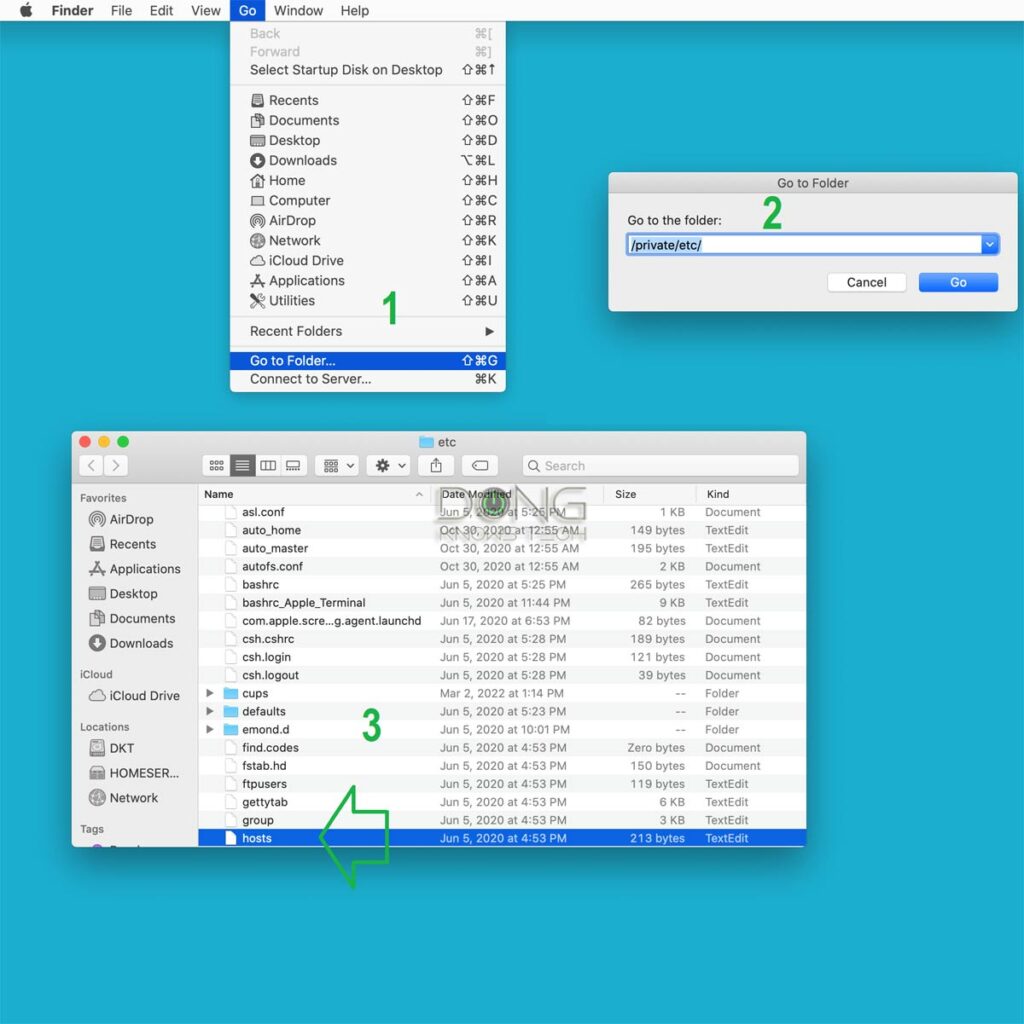
Here are the steps to locate the HOSTS file on a Mac, as shown in the screenshot above:
- Bring Finder to the forefront by clicking a blank spot on the desktop, then choose Go -> Go to Folder…
- Enter /private/etc/ in the field and hit Go.
- Locate the HOSTS file in the folder that appears. If it’s not there, you can make a new one or copy one over from another computer.
But if you want to edit the file, you can skip the above.
Here are the steps to open the HOSTS file on a Mac for editing
- Run Terminal (use the Spotlight to search for it), and enter the following command (then press Enter):
sudo nano /etc/hostsYou’ll be asked to enter the password for the current account. Do it!
Similar to the case of Windows above, you must use an admin-level account to be able to make changes to the HOSTS file on a Mac.
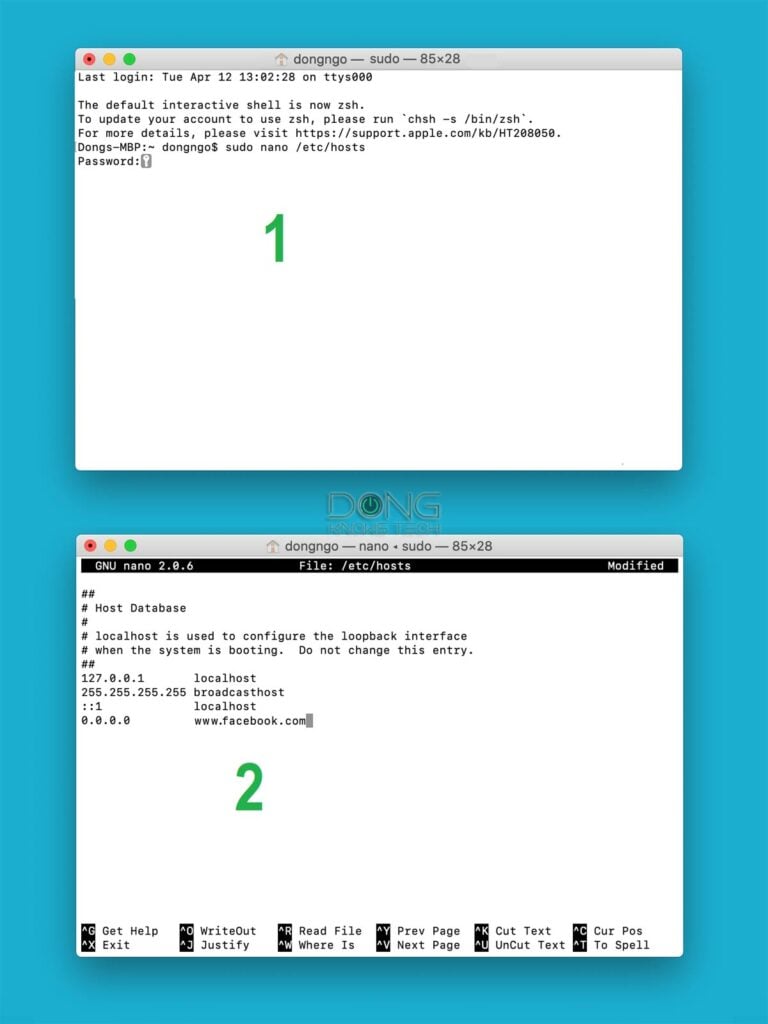
2. The HOSTS file will be open in the Nano app. You can now use the arrow keys to move around and enter the information as needed.
After that, use Ctrl+0 to save the changes and Ctrl+X to exit. Mission accomplished.
Not a security measure
Before using the HOSTS file to block a domain, consider why you want to do so instead of just not visiting it.
No matter what your answer is, this blocking mechanism applies when you want to exert control over something that you don’t have (enough) control over. Examples:
- An effective Parental Controls method. In this case, make sure your kid doesn’t have an admin-level account on the device.
- When you want to give yourself a cushion in controlling the urge to visit websites that you know you shouldn’t
- To impress or mess with somebody.
The point is that the HOSTS file is not a security measure but a control measure. Blocking a domain doesn’t make your computer safer. It only prevents the machine from accessing it.
The other way around works—the remote party can still access your computer. Since everyone knows about what this HOSTS file can do, keep in mind that the file can be used for unsavory purposes, considering how easily it can be altered.
Be careful with pre-made HOSTS files
Using the HOSTS file is a sure way to control the binding of a domain to an IP address on a computer, and all that applies. Consequently, it’s a straightforward and effective method to block certain websites from the machine.
Entering one domain at a time into the HOSTS file can be time-consuming. For this reason, there are many pre-made HOSTS files, where somebody has compiled a long list of blocked domains, available for download.
However, be careful with these pre-packaged HOSTS files. They tend to include hundreds of domains to block all kinds of things, including legitimate services. Not to mention, there can be malicious entries.
Many domains are interconnected, and blocking one can prevent others from working properly. Blocking the wrong domain can also cause important computer functions, such as auto-updates or security/integrity checks, to stop working.
On top of that, a large HOSTS file can also adversely affect performance. It’s a good idea to keep its size below a few hundred kilobytes. Generally, you should only use entries that you’re aware of in the HOSTS file.
The final thoughts
The HOSTS file is a prime example of a double-edged sword.
It’s a great tool when used properly for the right purpose. But it can also be a pain when you abuse it or are not aware of it. It can cause many unexpected connection issues—it’s like a phonebook that has been deliberately altered.
It’s a good practice to be mindful of this file and use a blank (default) HOSTS file when troubleshooting your connection or connection-related issues. When in doubt, you can safely disable the file by renaming, deleting, or moving it away from the default location.


It’ll be great if you can tell me how to block whatsapp media (Audio, Video, Documents) through whatsapp web or whatsapp desktop software. I tried using network monitoring tools to understand the destination addresses but putting them in the hosts file is just not working.
Can you please help ? Thank you
Follow the post and block whatsapp dot com or whichever the domain is where you are. It should work. Note that you can’t block and app from running via the hosts file.
Sorry I forgot to mention that I just want to block sharing of audio, video and documents through WhatsApp web and/or whatsapp desktop software. The user should be able to use the chat feature otherwise.
Not possible via the hosts file. And the idea is not as simple as you think. Get professional help, Sunny!
Thanks for the quick replies Dong. Really appreciate it 🙂
the real question with this is which situations and what Windows inbuilt, silent/invisible, applications or processes ignore the HOSTS file…. if they do…. when do they do it? or all the time?
MS’ propensity to build in static routes and to cripple software to intentionally restrict users from misconfiguring bode poorly on the prospect of Hosts file for consistently avoiding DNS lookups.
The only alternative for a pure client behind a conventional gateway/modem, would be DNScrypt or Windows 10 beta/Windows 11 DoH functionality
Is this a good time to introduce the pi-hole?
I don’t think it’s for general consumers, Nutz. It’s Linux only.
For those copying, you may want to correct the spelling in “noteapd c:\windows\system32\drivers\etc\hosts”.
Thanks, Mark. Typo fixed. Next time you can just highlight the text and hit the red button to the right of the screen.