The UNVR Instant, unveiled on September 10, 2025, is Ubiquiti’s first consumer-friendly UniFi Network Video Recorder—it hosts the UniFi Protect application on the inside. Prior to it, the company only had rackmount versions designed for businesses.
As I have already reviewed the Protect application as a whole—based on the UCG-Fiber, which has a built-in UNVR of similar specs—this review will focus on what makes the UNVR Instant stand out as a standalone add-on unit.
Here’s the bottom line: The UNVR Instant is an excellent camera-based surveillance solution for the friendly cost of $199 (diskless, camera not included) or $699 (a kit that includes a 1TB HDD plus four G5 Turret Ultra cameras)—I’d recommend the former for flexibility. In fact, if your property only needs half a dozen or so cameras, this system is among the best, if not the best, for the money. Get one today!
Dong’s note: I first published this post on September 10, 2025, as a preview and updated it to an in-depth review on October 10 after extensive real-world experience.

Ubiquiti UNVR Instant: A flexible, standalone security solution
In a nutshell, the UNVR Instant is a specialized non-Network UniFi console that runs the UniFi Protect app to host multiple UniFi cameras. It’s practically the UniFi Protect portion of many Network-enabled UniFi consoles. In that sense, the UCG-Fiber literally has this UNVR Instant built in to support a similar number of UniFi cameras.
UniFi console in a nutshell
A UniFi console always runs UniFi OS plus one or more UniFi applications, with Network being the most significant—the primary app.
However, not every UniFi console is equipped with this app. Network-enabled UniFi consoles are called “UniFi Cloud Gateways” (UCGs) and include the UniFi Dream series, such as Dream Machine (UDM) or Dream Wall (UDW)—all of which are UniFi “routers” if you prefer to call them that way.
A few UCGs have just this Network app—they are Network-only UniFi consoles. Most UCGs can host additional applications to qualify as a multi-app, Network UniFi consoles.
All UniFi Cloud Gateways (a.k.a. Network-enabled UniFi consoles) share the same basic features and settings. However, their capacities—specifically the number, breadth, and depth of UniFi applications they can handle simultaneously—vary depending on the hardware specifications.
The following are the current UniFi applications, with the first six belonging to the original UniFi Application Suite:
- Network (primary): This application enables the hardware to function as an advanced router, thereby qualifying it as a “UniFi Cloud Gateway” (UCG). This app handles all network-related aspects, including security, firewalls, access points, Wi-Fi system management, and more. On a UCG, the Network app is the default and can’t be uninstalled.
- Protect: The support for IP cameras as an advanced surveillance system, including a built-in UniFi Network Video Recorder (UNVR) of a UniFi console. Protect is the default app of a standalone UNVR. Generally, a standalone UNVR is a multi-app, non-Network console that can also host the Access and InnerSpace applications, but it’s often classified as a “Protect-only UniFi console”.
- Talk: A locally hosted Voice-over-IP system.
- Access: A “platform designed for Access Control Systems”—per Ubiquiti. Examples include door-related security IoT devices such as doorbells, key fobs, and locks.
- Connect: Application that manages digital signage and EV Stations
- InnerSpace: A visualization tool that allows users to map out their UniFi network by uploading floor plans, drawing walls, etc., for the deployment of UniFi devices.
- Drive: The latest app that turns a UniFi console into a UniFi network-attached storage (NAS) server, known as a UNAS. Generally, a UNAS server is a single-app non-Network UniFi console—it’s a “Drive-only UniFi console”.
Each of these applications is a world in itself, with various in-depth customizations, and some require UniFi devices to function as intended.
That said, the UNVR Instant is a device designed to add UniFi video surveillance capability to any existing network, specifically:
- A non-UniFi network, such as one hosted by a third-party router, like those from ASUS, NETGEAR, or any other. Or a network hosted by a non-Protect Network-enabled UniFi console, such as the UX7. This is its primary use case.
- A network hosted by a Protect-enabled Network-enabled UniFi console as the network’s router that has limited support for UniFi cameras (like the UDR7) or one that has run out of camera support. In the latter case, you’ll end up with two separate surveillance systems (or you can turn off Protect on the router to conserve its resources).


In more ways than one, the UNVR Instant, as a non-Network UniFi console, is similar to the UNAS 2, another non-Network UniFi console that adds UniFi network-attached storage (NAS) to an existing network. The two share the same setup process, among other things, though they serve two different purposes: one is the storage space for UniFi cameras, the other is the storage space for the entire network (but not UniFi cameras).
Ubiquiti UNVR Instant: A video recorder atop an unmanaged Gigabit PoE switch
Out of the box, the UNVR Instant looks like an oversized 7-port PoE Gigabit switch.
It’s a square box with a small non-touch screen on the front and seven Gigabit ports on the back, one of which is a standard uplink port and the others are PoE-ready. Plug the uplink port into an existing network, and you can use the other ports to add more wired devices, just like any unmanaged switch. So, it’s first and foremost a network switch—you can always use it as one when there are available ports.
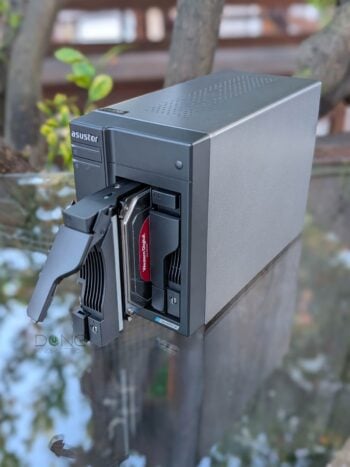
What makes it different from a switch—or “more” than a switch, to be specific—is that it comes with an HDMI port on the back and a drive bay on the underside. The former is to connect to a screen, such as a monitor or a TV, and the latter is to host a standard 3.5-inch hard drive of any capacity.
These two features qualify it as a network video recorder: users can use the PoE+ ports to host IP cameras, the HDD to store their recordings, and the HDMI port to display their real-time live footage.
Simple HDMI port use, 3.5-inch hard drive as storage
When you plug a screen (a computer monitor or a TV) into the HDMI port, it’ll instantly show live feeds of all connected cameras in the order of the Protect app’s Multi-View mode. The screen automatically resize the live feed of each camera so that they all fit—it’s better if you use an even number of cameras.
And that’s it. There’s no remote or any other way to interface with this live feed—you will need the Protect app for everything else, including rearranging cameras in the live feed or viewing recorded footage. Also, the Instant doesn’t have a built-in microphone, so you also have to use the Protect app if you want to talk to the remote party via the camera’s built-in speaker/microphone.
On the storage front, you can install or remove a 3.5-inch standard hard drive in the UNVR Instant easily without any tools, but there’s no mounting for 2.5-inch drives. That said, if you want to use a SATA SSD or a 2.5-inch laptop hard drive, you can tape one into the bay and it’ll work, but by design, there’s no way to add one securely. I want to add that this is not a huge deal since a 3.5-inch hard drive is the best storage in this case: it’s affordable, spacious, and more than fast enough for the use case.


Made for UniFi cameras
As mentioned, the UNVR Instant supports a similar number of cameras as the UCG-Fiber’s built-in UNVR: up to fifteen HD cameras, or eight 2K cameras, or six 4K cameras. If you use a mix of different cameras, the final number is between seven and fourteen, depending on their resolutions.
Clearly, out of the box, you can connect up to six PoE cameras to the UNVR Instant—its total 40W PoE output is more than enough for six units, regardless of the type of camera you use. If you want to use more, you’ll have to use Wi-Fi cameras or get a separate PoE switch/injector. As long as the cameras are connected to the same network (same subnet), they will be supported.
Like all UniFi Protect hardware, you can use either UniFi proprietary cameras or third-party ONVIF-enabled cameras. The former is recommended for the best experience.
The table below shows the hardware specs of the UNVR Instant with the UCG-Fiber as the reference—the two share almost the same UniFi Protect specs, with the UCG-Fiber encompassing the UNVR Instant in terms of hardware capability.
Ubiquiti UNVR Instant vs. UCG-Fiber: Hardware specifications
 |  | |
|---|---|---|
| Model | UNVR Instant | UCG-Fiber |
| Device Type | Non-Network UniFi console | Network-enabled UniFi console |
| Processing Power | Quad-core ARM Cortex-A55 at 1.7 GHz, 4GB of RAM | Quad-core ARM Cortex A73 at 2.2 GHz, 3GB RAM |
| UniFi Application (built-in) | Protect (default) Access InnerSpace | Network (default), Protect, Talk, Access, Connect InnerSpace |
| UniFi Protect Version (used for testing) | 6.1.78 | |
| Camera Support | (15) HD, (8) 2K, (6) 4K | (15) HD, (8) 2K, (5) 4K |
| Access Hub Support | 50 | |
| HDMI Port (for live feed) | 1 | None |
| Storage Capacity | 1x 3.5-inch HDD bay (any capacity) | 1x M.2 slot for NVMe SSD (any capacity) |
| Design | Compact desktop | |
| Mount | Wall, DIN rail mount (accessories included) | none |
| Network Port | 1x GbE RJ45 uplink port, 6x GbE PoE RJ45 ports | 1x 10GBASE-T WAN/LAN, 1x SFP+ WAN/LAN, 1x SFP+ LAN, 3x 2.5GBASE-T LAN, 1x 2.5GBASE-T PoE++ LAN |
| View Port (for live feed) | 1x HDMI | None |
| Power over Ethernet Standard (PoE) | 6x 802.3bt (PoE) | 1x 802at (PoE+) |
| Max PoE Power Budget (all ports) | 40W | 30W |
| Max PoE Power Output (per port) | 15.4W | 30W |
| Power Intake | AC/DC, Internal, 60W via Universal AC input, 100-240VAC, 1.5A Max, 50/60 Hz | DC Jack 54V, 1.1A (power adapter included) |
| Power Consumption (per 24 hours without PoE devices) | ≈ 330 Wh (running only the Protect app with a 4TB HDD) | ≈ 300 Wh (running only the Network app with no storage) |
| Internal Cooling Fan | Yes | |
| Local Web-based Management | Yes | |
| Cloud-Management | Yes (free) | |
| Mobile App | UniFi UniFi Protect | |
| Dimensions | 8.7 x 8.7 x 1.9″ (220 x 220 x 47 mm) | 8.3 x 5 x 0.5 in (212.8 x 127.6 x 30 mm) |
| Weight (without HDD and mounting accessories) | 2.3 lb (1.04 kg) | 1.5 lb (675 g) |
| Display | 1.14″ status display | 0.96″ status display |
| Ambient Operating Temperature and Humidity | 0 to 40° C (32 to 104° F) 5 to 95% noncondensing | |
| US Launch Price | $199 (standalone, no storage) $699 (kit with four cameras and 1TB HDD) (Buy now!) | $279 (no storage) $399 (1TB SSD) $529 (2TB SSD) (Buy now!) |

Ubiquiti UNVR Instant: A typical non-Network UniFi console
As mentioned above, the UNVR Instant is a non-Network UniFi console. As such, it shares the same setup process as its peers, similar to a UNAS—the UNVR Instant is a Protect-only console whereas a UNAS is a Drive-only console.
Specifically, connect it to the network and then point a browser to its IP address (given out by the network’s router). Alternatively, you can use the UnFi mobile app to detect and set it up that way, but I always prefer the web UI.
The web user interface will guide you through a series of self-explanatory steps to get the console up and running, including giving it a name, installing the UniFi OS and the Protect app, and updating both to the latest official versions. And that’s it. Now the Instant is ready to host cameras.
By the way, like all UniFi consoles, you’re offered the option to link the UNVR Instant with a UI account from Ubiquiti for added conveniences and features, but you can always use it locally without an account at all.
Ubiquiti and your privacy
Generally, Ubiquiti insists on a vendor-connected login account during the initial hardware setup process. However, that’s not a requirement, and logging in with a vendor translates to privacy risks.
UI account and UniFi hardware

However, with a UI account, the hardware’s built-in Remote Management and other handy features are conveniently available.
Here’s the link to the US networking company’s privacy policy.
Online privacy and security are a matter of degree. Different companies handle their users’ data differently.
Personally, after the UNAS 2 and multiple UniFi Cloud Gateways, I’d recommend using the UI account. It makes things a lot easier. But this is your call.
Adding a camera to the UNVR Instant is the same as doing so with any console that hosts the Protect app. Specifically, if you use a PoE camera, connect it to one of the UNVR Instant’s PoE ports (or any other PoE switch you have in the network, or an injector), and it’ll be detected automatically. For a Wi-Fi camera, you’ll generally need the UniFi Protect mobile application to add it since you might need to enter the Wi-Fi password.
In any case, excluding the time you need for mounting, it’ll take just a few seconds to get a camera connected and ready. After that, you can expect all the features available to the particular UniFi camera that the UniFi Protect application has in store (which is a lot).
In short, whether you use the UNVR Instant or any Network-enabled UniFi console with a built-in UNVR, the experience is the same. You’ll get all you can expect from an advanced surveillance system and much more.
So the question is, what if you use these two together? Specifically, what happens when you use the UNVR Instant in a network hosted by a UnFi “router” that also has a built-in UNVR already configured with a surveillance system? Well, things get interesting.
Ubiquiti standalone UNVR vs. UNVR integrated within Cloud Gateway: You have to pick and choose
As mentioned above, I tested the UNVR Instant in a network hosted by a UCG-Fiber, which is a Cloud Gateway (a.k.a. UniFi “router”) with a built-in UNVR of almost the same specs, hosting its own set of cameras.
In this case, or if you have any other UniFi Cloud Gateway set up similarly, keep the following in mind:
- The two UNVRs work as two separate systems. Specifically, there’s no link between them for recording, viewing, or searching.
- Even when the two share the same UI account, there’s no way to manage the add-on UNVR (the UNVR Instant in this case) via the interface of the UniFi Cloud Gateway (the UCG-Fiber in my case). They will always require two separate windows or browser tabs, among other things.
- To easily switch between the two (or more) surveillance systems (of the multiple UNVRs) within the same network, you need to use the Protect mobile app. In this case:
- You can also quickly reassign (move) a camera from one UNVR to another and vice versa. To move it back, though, you first need to remove it from the current UNVR. Then, from the original UNVR, choose to restore or re-adopt it.
- Unless you choose to delete the recording of each camera during the move, they remain there waiting for you to move the camera back. (These recordings are not accessible until the same camera is moved back—in a permanent move, it’s a good idea to delete the recording.)
- Moving a camera from one UNVR to another doesn’t transfer its existing recordings, and there’s no easy way to transfer them—you can always archive a camera’s recordings to an external storage device, which is different.
So, the gist is that it’s generally not a good idea to have two UNVRs in a single network, unless you deliberately want two independent surveillance zones. If you want to host many cameras on a single property, it’s best to get a higher-capacity UNVR from the get-go.


In my case, either the UCG-Fiber or the UNVR Instant is more than enough for the number of cameras I need. So, if I decide to keep both, it’s better to turn off UniFi Protect on the UCG-Fiber and use the UNVR Instant as the sole surveillance solution, conserving resources on the former and enjoying the HDMI viewport of the latter for live feed.
The table below shows the current available UNVRs, including standalone units and those integrated into Network-enabled UniFi consoles (a.k.a. “routers”), along with their camera capacity.
| Design | Type | HD Cams (up to) | 2K Cams (up to) | 4K Cams (up to) | |
|---|---|---|---|---|---|
| UDR / UDR7 | Compact (egg-shape) | Network-enabled UniFi console | 5 | 2 | 1 |
| UDM-PRO | Full-scale rackmount | Network-enabled UniFi console | 24 | 14 | 8 |
| UDM-PRO-MAX | Full-scale rackmount | Network-enabled UniFi console | 50 | 25 | 15 |
| UDM-SE | Full-scale rackmount | Network-enabled UniFi console | 24 | 14 | 8 |
| UDW | Wall mount | Network-enabled UniFi console | 12 | 7 | 4 |
| UCG-MAX | Compact (desktop) | Network-enabled UniFi console | 15 | 8 | 5 |
| UCG-FIBER | Compact (desktop) | Network-enabled UniFi console | 15 | 8 | 5 |
| UCK-G2-PLU | Compact (desktop) | CloudKey+ | 24 | 14 | 8 |
| UNVR | Full-scale rackmount | Standalone UNVR | 60 | 30 | 18 |
| UNVR Instant | Compact (desktop) | Standalone UNVR | 15 | 8 | 6 |
| UNVR-PRO | Full-scale rackmount | Standalone UNVR | 70 | 35 | 24 |
| ENVR | Full-scale rackmount | Standalone UNVR | 210 | 140 | 70 |
The higher the cameras’ resolutions (4K vs. 2K vs. HD), the fewer each UNVR can handle, and the specific number depends on the mix. For example, the UCG-Fiber can host a combo of three 4K cameras, two 2K cameras, and two HD cameras for a total of seven.
Ubiquiti UNVR Instant: Excellent performance
For this review, I used the UNVR Instant for almost a month and loved it. It worked exactly as intended, and the HDMI port means I don’t have to turn on my phone or tablet to check on the surroundings or see who’s at the door. My neighborhood is safe, but the ability to see things instantly is addictive, especially when you have kids around.

The console was also close to silent. It had a fan on the inside, but I could only hear a subtle hum when I placed my ear to it. Note, though, that depending on the hard drive you use, you might hear its click sound or feel the vibration.
Generally, a NAS drive that spins at 5400 RPM is fast and quiet enough. I initially used a 10TB 7200 RPM drive and then changed to a 4TB 5400 RPM drive for that reason.
In terms of storage usage, my UCG-Fiber with six cameras took almost 7 months to use slightly over 2TB of storage for event-triggered recordings. That said, you can expect 4TB to hold about a year’s worth of recordings, but your mileage will vary depending on how busy your surroundings are. When the drive is full, the system will recycle storage space, or you can manage it manually.
The UNVR Instant became slightly warm during operation, but never hot. Compared to other UniFi devices I’ve used, I’d even say it was pretty “cool”.
Ubiquiti UNVR Instant's Rating

Pros
Compact design with built-in PoE switch and HDMI port for real-time monitoring
Excellent support for UniFi Protect and its vast amount of features and camera selection
No subscription required, runs cool and quiet
Cons
No remote control, built-in microphone, or keyboard/mount support for direct management, no integration with the existing Network-enabled UniFi console
No solar camera options, limited support for ONVIF third-party cameras, storage bay doesn't accommodate 2.5-inch drives
Conclusion
The UNVR Instant is an excellent camera-based surveillance system. If you’re looking for one to keep tabs on your home or office, I’d say run a few network cables, get a couple of PoE UniFi cameras (or Wi-Fi ones), and this NVR today.
In fact, if you have a low-power UniFi Cloud Gateway, such as the UDR7, uninstall its Protect app and get the UNVR Instant instead.
In any case, you won’t be disappointed.
On the other hand, if you have the UCG-Max, UCG-Fiber, or any of the other powerful rackmount Network-enabled UniFi consoles as the router, use its Protect app instead. In this case, the UNVR Instant will be somewhat unnecessary unless you need the HDMI port for real-time monitoring—if so, use it instead of the UniFi router’s built-in UNVR.


I’m curious to hear if you have any insights into the audio quality of the Ubiquiti cameras. I was wondering if the audio performance changes depending on the model, and if there’s a standout model that’s particularly good for audio.
I have a few models, as you can see in the screenshots, and they are all good, for the surveillance purpose. You can adjust the loudness and clarity. Generally though, the quality is not for recording music or movies, if you know what I mean.
turret, not tourer, cameras.
no need to publish this note, just fix the typo
Well, it’s already published (it seems you had a good reputation!) Thanks for the report. Next time, you can simply highlight the text and hit the red box that jump out from the page’s top right area. It’s much faster for us to make correction that way.